

5-Minute Homemade Nutella: The Best Creamy & Irresistible Chocolate Hazelnut Spread

If your family is anything like mine, a jar of Nutella doesn’t survive long in the pantry. Between morning toast, lunchtime sandwiches, after-school snacks, weekend pancakes, and those sneaky midnight spoonfuls, it disappears faster than you can twist the lid back on. I used to buy the biggest jars I could find at Costco, thinking they’d last longer. They never did. That’s when it hit me: if we’re going to eat this stuff on repeat, I want it made with ingredients I actually recognize and flavors that feel real, not overly processed.
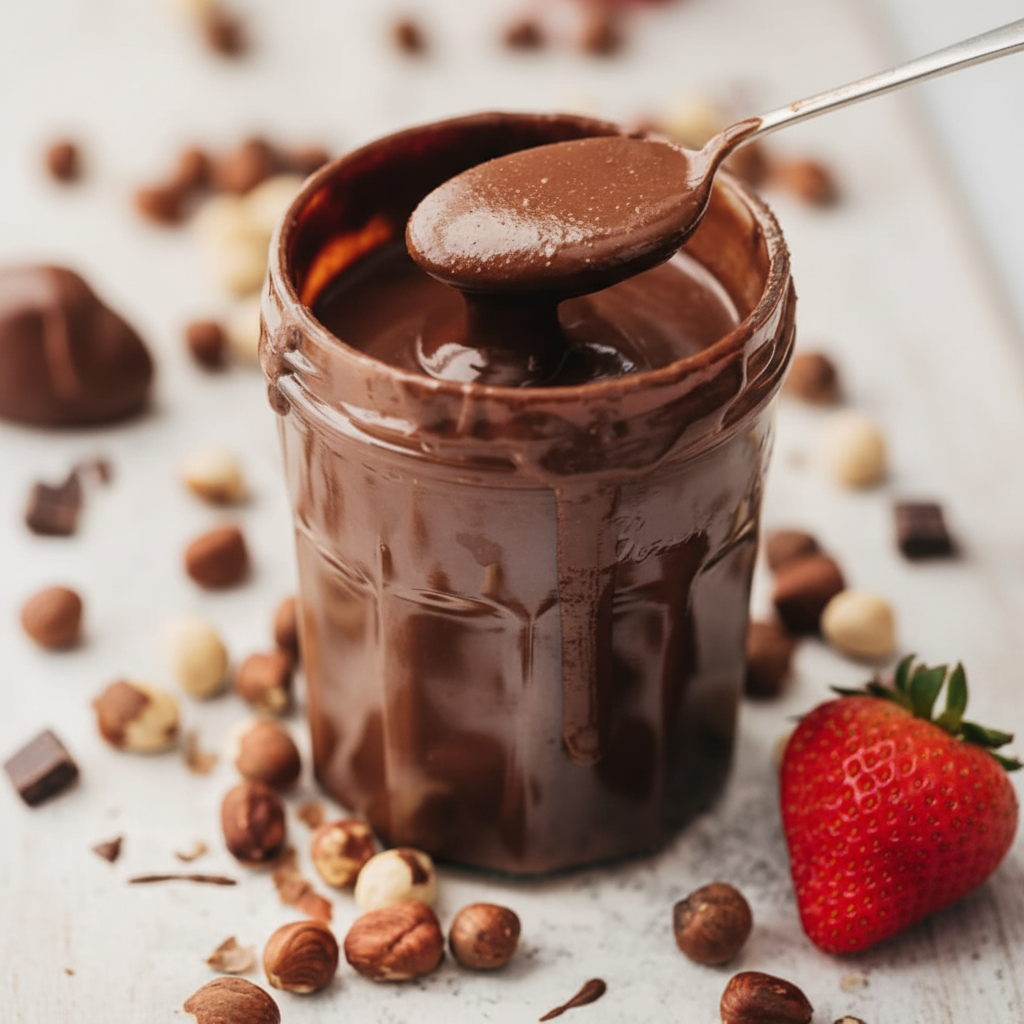
That’s how I discovered the magic of 5-Minute Homemade Nutella: The Best Creamy & Irresistible Chocolate Hazelnut Spread. And let me tell you, the title doesn’t exaggerate — this recipe is dangerously good. It delivers that same silky chocolate-meets-hazelnut moment we all love, but fresher, richer, cleaner, and made entirely in your kitchen. No mystery oils. No preservatives. No unnecessary extras. Just roasted hazelnuts, cocoa, chocolate, a touch of sweetness, and a blender doing the heavy lifting.
The first time I made this Homemade Nutella, I expected it to be “close enough.” It wasn’t just close — it was better. When the hazelnuts roast in the oven and their warm, nutty aroma drifts through the house, it feels like stepping into a European chocolate shop. The fragrance alone sets the mood. Then comes the transformation: the blender turns those golden roasted hazelnuts into liquid silk, cocoa deepens the flavor, melted chocolate makes it indulgent, and vanilla pulls everything together like a warm hug. In under 5 minutes, you’re staring at a glossy, creamy, dreamy chocolate spread that tastes like love in a jar.
Why You’ll Love This Homemade Nutella Recipe
Here’s what makes this homemade version extra special for families:
- Made with real roasted hazelnuts
- No palm oil, no preservatives, no artificial flavorings
- You can adjust sugar to your taste
- Vegan-friendly option included
- Smooth and spreadable like store-bought
- Budget-friendly for chocolate lovers
- A fun recipe for kids to help with
- Perfect for breakfast, snacks, and desserts
You’ll be shocked at how easy this is. And how fast it disappears.
Ingredients You Will Need
Just a handful of simple, pantry-friendly ingredients:
- 2 cups raw hazelnuts
- 1 cup powdered sugar (or less, to taste)
- 4 tablespoons unsweetened cocoa powder
- 1–2 teaspoons vanilla extract
- Pinch of salt
- 2–4 tablespoons neutral oil (sunflower or vegetable oil works well)
- Optional: 50–80 g melted dark chocolate for extra richness
Tip: The fresher your hazelnuts, the smoother your spread will be.
How to Make This Homemade Nutella Recipe Step-by-Step
You’ll only need 20 minutes and one food processor or blender.
Step-by-step instructions
- Roast your hazelnuts
Spread the hazelnuts on a baking sheet and toast them in a preheated oven at 180°C or 350°F for about 10 to 12 minutes. They should look slightly darker and smell fragrant. - Remove the skins
Transfer them into a clean kitchen towel while still warm. Rub them to remove most of the loose skins. A little remaining skin is totally fine. - Blend into hazelnut butter
Add the warm nuts to your blender or food processor. Blend until they turn into a smooth, creamy hazelnut butter. Scrape the sides every 30 seconds. Be patient. It usually takes 5–8 minutes. - Add cocoa, sugar, vanilla, and salt
Blend again until everything is mixed into a thick chocolate paste. - Adjust the texture
Pour in the oil slowly, one tablespoon at a time, blending in between, until you get a silky, spreadable texture. - Make it extra chocolatey (optional but wow)
Add melted dark chocolate and blend again. This creates that luxurious, glossy finish everyone loves.
Taste. Adjust. Enjoy. Yes, it’s really that easy.
How to Store Homemade Nutella
This recipe keeps beautifully.
- Store in a clean, airtight glass jar
- Keep at room temperature for 2–3 weeks
- Store in the fridge up to 1 month
- If it firms up, warm the jar slightly or stir in a teaspoon of warm milk (if not making vegan)
Separation is natural. Just stir to blend again.
Tasty Ways to Use Your Homemade Nutella Recipe
This spread makes everything taste a little more magical. Try it:
- Spooned into dates and topped with flaky salt
- Spread on bagels, English muffins, or croissants
- Dolloped over banana bread slices
- Melted slightly and poured over churros or donuts
- Used as a filling for stuffed French toast
- Spread onto rice cakes for a lighter snack
- Swirled into hot chocolate for a nutty twist
- Piped into pastry pockets or puff pastry twists
- Spread over graham crackers with marshmallows (s’mores upgrade!)
- Mixed into a smoothie bowl for extra richness
- Drizzled over cheesecake slices
- Used as a topping for homemade waffles
- Spread on apple slices with crushed nuts on top
- Spooned over sweet biscuits or cornbread
- Stirred into coffee for a mocha-hazelnut flavor
- Used as a filling for homemade chocolate cups
- Spread on warm cinnamon rolls
- Added to milkshakes for a chocolate-hazelnut boost
- Spread inside soft cookies as a surprise center
- Brushed onto a warm baked puff pastry braid
- Spread inside homemade brioche buns
- Used as a topping for protein pancakes
- Spread on pita bread and grilled for a crispy chocolate flatbread
- Used as a dip for pretzels + fruit combo
- Spread onto shortbread cookies
- Used as a glaze for roasted pears
- Spread on sweet potato toast (yes, it works!)
- Swirled into cookie butter for a double-spread combo
- Spread on warm cornbread with honey drizzle
- Used in parfaits layered with berries + whipped cream
Conclusion :
Making your own 5-Minute Homemade Nutella: The Best Creamy & Irresistible Chocolate Hazelnut Spread isn’t just about replacing a store-bought jar — it’s about upgrading the entire experience. It’s fresher, smoother, richer, and made with real ingredients you can feel good about, especially for the families here in the USA who want flavor without compromise and speed without complexity.
This recipe proves that something incredibly creamy, silky, and irresistible doesn’t need hours in the kitchen. Sometimes all it takes is warm roasted hazelnuts, melted chocolate, and a blender doing its job a little longer than expected. The result? A glossy homemade spread that disappears just as fast — but at least now you know you can make another batch in minutes.
Whether you’re spreading it on toast, swirling it into brownie batter, piping it into cupcakes, or sneaking a spoonful straight from the jar, this Homemade Nutella Recipe brings a little magic to everyday moments. And honestly? That’s what the best recipes do — they turn simple into unforgettable.
So go ahead, blend, spread, share, repeat. Because love, like Nutella, is always better when it’s homemade.
🍫✨ Enjoy every silky bite.
FAQ About Making a Homemade Nutella Recipe
Q1: Can I use raw hazelnuts instead of roasted?
A1: Yes, but roasting the hazelnuts first enhances their flavor and gives your Nutella a richer, nuttier taste. Raw hazelnuts will result in a milder flavor.
Q2: How long does homemade Nutella last?
A2: Store it in an airtight jar at room temperature for up to 2 weeks, or refrigerate for up to a month. Always use a clean spoon to avoid contamination.
Q3: Can I make this Nutella recipe vegan?
A3: Yes! Substitute the dairy milk with plant-based milk like almond, oat, or soy milk. Use vegan chocolate if needed.
Q4: Can I use a different type of chocolate?
A4: Absolutely! Dark chocolate gives a richer taste, while milk chocolate creates a sweeter, creamier spread. Adjust sugar accordingly.
Q5: Is it necessary to use a food processor or blender?
A5: Yes, a high-speed food processor or blender helps achieve a smooth, creamy texture. Otherwise, your Nutella may remain slightly grainy.
Q6: Can I add flavors to homemade Nutella?
A6: Yes! You can add vanilla extract, a pinch of salt, or even a hint of cinnamon for a unique twist.
Q7: Can I make sugar-free homemade Nutella?
A7: Yes! Replace sugar with a sugar substitute like erythritol, stevia, or monk fruit sweetener. Make sure the chocolate you use is also sugar-free.
Q8: Why is my homemade Nutella grainy?
A8: Graininess usually happens if the hazelnuts aren’t ground long enough or the chocolate isn’t fully melted. Process until ultra-smooth.
Q9: Can I double the recipe?
A9: Yes, just double all ingredients. Make sure your food processor or blender is large enough to handle the increased volume.
Q10: How can I make it extra creamy?
A10: Adding a small amount of neutral oil (like hazelnut or vegetable oil) while blending can make your Nutella ultra-creamy.
Tips for Silkiest Texture
A few pro secrets I’ve learned over the years:
- Blend while the hazelnuts are still warm. Heat helps the natural oils release faster, giving you that liquid-silk base.
- Don’t rush the blending. Even when it looks like paste, keep going — the magic happens after.
- Let the blender run long enough for the oils to fully release. Patience really does pay off.
- Sift the cocoa powder first. This prevents tiny bitter lumps from hiding in the spread.
- Add any oil very slowly and only if needed. Pouring too fast can break the creamy emulsion you’re building.
- Use melted chocolate instead of solid chocolate chips. It blends more evenly and boosts creaminess without grain.
- Drizzle liquids (like vanilla or maple syrup if using) down the side of the blender, not on top. This keeps the blades spinning smoothly.
- If your blender struggles, pause and scrape the sides often. Unblended bits = texture enemy.
- Blend in stages:
- Whole nuts →
- Nut butter →
- Liquid-smooth nut cream →
- Then add cocoa + chocolate.
- Warm blades = smoother spread. Run your empty blender for 20 seconds before starting to slightly heat the jar and blades.
- Use powdered sugar instead of granulated when possible. It dissolves instantly and keeps the spread satin-smooth.
- A pinch of salt actually enhances smoothness perception. It balances flavor and hides bitterness.
- Add 1–2 teaspoons of hot milk or warm water only if needed. It loosens without adding grain.
- Roast until skins crack, then rub them off completely. Leftover skins can cause micro-grit.
- Don’t stop when it looks smooth — stop when it shines.** The glossier it is, the silkier it will feel when spread.
- Store upside-down for the first hour after making. This helps the oils settle evenly throughout the jar.
⚠️ Common Mistakes That Ruin Texture
- Stopping the blender too early
- Using hazelnuts that weren’t roasted enough
- Adding cocoa before the nuts turn into butter
- Pouring oil or sweetener too fast
- Not scraping the blender walls
Mississippi Chicken Slow Cooker Recipe
→ Try this cozy and incredibly easy Mississippi Chicken Slow Cooker recipe for busy nights.
Mediterranean Salad Recipes
→ Looking for lighter sides? These fresh Mediterranean salad recipes pair beautifully with any meal.
Sweet Potato Casserole with Marshmallows
→ If you love sweet treats, you must check out this dreamy sweet potato casserole with marshmallows.
Why This Homemade Nutella Recipe Means So Much to Me
I used to hide Nutella jars on the highest shelf in the pantry, fully convinced I had cracked the code to longer-lasting chocolate bliss. Spoiler: I hadn’t. My kids are part mountain goat. Chairs, countertops, spice racks — nothing stood between them and that jar. At one point, I considered installing a tiny security camera in the pantry just to catch the culprit. Turns out, there were multiple culprits, usually working in teams.
When I finally learned how to make Homemade Nutella in 5 minutes, everything changed. Not only because it’s faster than a grocery run, but because it gave me peace of mind. Instead of battling over jars, we started making them together. My kitchen turned into our little weekend workshop: they help roast the hazelnuts until the skins crack, shake them inside a towel like they’re mining for treasure, measure cocoa with dramatic seriousness, and argue passionately over who gets to lick the first spoon. The blender sound? Our official “Nutella loading…” alarm.
I realized that the best part of this recipe isn’t even the texture or the taste (and trust me, both are incredible). It’s the moment. The tiny rituals we created around it. The way their faces light up when they smell the warm hazelnuts swirling into chocolate cream. The cocoa fingerprints left on the counter like evidence of happiness. The synchronized spoon-licking. The “can we make more?” before the jar even cools.
And yes — it also means fewer store-bought ingredients I don’t fully trust, and more wholesome ones I can control. It means letting them enjoy something they love without that small background whisper of mom-guilt. It means saying yes more often, and stressing less.
Another sweet bonus? We save money. Big time. Especially here in the U.S., where groceries keep testing our budgets. Each homemade jar feels like a little victory: fewer jars bought, more jars made, more snacks enjoyed, more dollars saved. But the real savings? The memories. The laughter. The teamwork. The joy.
Every jar feels like a small win. A sweet one. A shiny one. And a meaningful one.
Print
Homemade Nutella Recipe – Creamy Chocolate Hazelnut Spread (Easy + Better Than Store-Bought)
This Homemade Nutella Recipe delivers the perfect creamy, chocolate-hazelnut spread your whole family will crave. Roasted hazelnuts, rich cocoa, and a touch of vanilla blend together into a silky spread that tastes even better than store-bought Nutella. Easy to make, customizable, and totally irresistible!
Ingredients
- 2 cups raw hazelnuts
- 1 cup powdered sugar (or to taste)
- 4 tablespoons unsweetened cocoa powder
- 1–2 teaspoons vanilla extract
- Pinch of salt
- 2–4 tablespoons neutral oil (sunflower or vegetable)
- Optional: 50–80g melted dark chocolate for extra creaminess
Instructions
- Roast Hazelnuts: Spread hazelnuts on a baking sheet. Bake at 180°C / 350°F for 10–12 minutes, until fragrant.
- Remove Skins: Wrap hazelnuts in a clean towel and rub to remove loose skins.
- Blend: Add warm nuts to blender/processor. Blend until smooth hazelnut butter forms (5–8 minutes).
- Add Flavor: Add cocoa powder, powdered sugar, vanilla, and salt. Blend again.
- Adjust Texture: Add oil 1 tablespoon at a time until silky and spreadable.
- Optional: Blend in melted dark chocolate for a richer, creamier Nutella.
- Store: Transfer to a sealed jar. Keep at room temp up to 3 weeks.
Notes
- Vegan-Friendly: Use dairy-free chocolate if needed.
- Less Sugar: Start with 1/2 cup and adjust to taste.
- Too Thick? Add a splash more oil.
- Flavor Boost: Add a pinch of espresso powder or sea salt.
- Separates? Stir well—it’s natural!


1 Comment
[…] meal that’s perfect for busy weeknights. If you’re craving something sweet and homemade, this Homemade Nutella Recipe is a must-try and tastes even better than store-bought spreads. And for a soft, moist, and […]
Comments are closed.