

The Ultimate Chicken Thigh Recipe: Crispy, Juicy & Ready in 45 Minutes
This chicken thigh recipe will become your weeknight dinner savior, delivering restaurant-quality results with minimal effort and ingredients you probably already have in your pantry. I’ve spent years perfecting this method through countless dinner services and family meals, and I’m thrilled to share every secret that transforms ordinary chicken thighs into something truly extraordinary.
Let me tell you why this particular chicken thigh recipe stands out from the hundreds you’ll find online. First, it’s remarkably forgiving—even if you’re running late and the chicken stays in the oven a few extra minutes, the higher fat content in dark meat keeps everything moist and delicious. Second, the technique I’m sharing creates genuinely crispy skin without any fancy equipment or complicated steps. Third, this recipe serves as your foundation for endless variations, which I’ll explore later in this guide.
I remember the first time I cooked chicken thighs for my family after years of faithfully buying chicken breasts. The difference was revelatory. Where chicken breasts required constant vigilance and precise timing to avoid dryness, these thighs practically cooked themselves while I prepared the rest of dinner. My kids, who typically picked at their chicken, asked for seconds. My partner looked up from his plate and said, “This is the best chicken you’ve ever made.”
The secret wasn’t some exotic ingredient or complicated technique. It was simply understanding what makes chicken thighs special and respecting their unique characteristics. Dark meat contains more myoglobin, which gives it richer flavor and helps it retain moisture during cooking. The skin, when treated properly, transforms from rubbery and unappealing to a crackling, golden treasure that adds textural contrast to every bite.
Throughout this comprehensive guide, I’ll walk you through my perfected method step by step, sharing the professional techniques I’ve learned from working in restaurant kitchens alongside the practical wisdom gained from feeding my family week after week. You’ll learn exactly how to prepare the chicken, what temperature to use and why, how to know when it’s perfectly done, and what to do with leftovers. I’ll also troubleshoot the most common problems home cooks face and answer the questions I hear most frequently.
Whether you’re a complete beginner who’s intimidated by cooking meat or an experienced home cook looking to refine your technique, this guide will give you the knowledge and confidence to make perfect chicken thighs every single time. By the end, you’ll understand not just what to do but why each step matters, empowering you to adapt this recipe to your preferences and create your own signature variations.
Why This Chicken Thigh Recipe Works
Before diving into the recipe itself, let’s talk about what makes this method so reliable and why chicken thighs deserve a permanent place in your weekly meal rotation.
The cooking method I use—starting with a moderate oven temperature and finishing with high heat—accomplishes two goals simultaneously. The initial phase at 425°F allows the fat under the skin to render slowly and the meat to cook through gently. Then, cranking up the heat to 450°F for the final stretch crisps the skin beautifully without drying out the meat. This two-temperature approach mimics what professional chefs do in restaurant kitchens, where they might sear in a pan and finish in the oven.
Chicken thighs also offer incredible value. They typically cost fifty to seventy-five cents less per pound than chicken breasts, making them budget-friendly for families. That lower price doesn’t mean lower quality—quite the opposite. Chefs consistently prefer dark meat for its superior flavor and texture. In blind taste tests, most people find properly cooked chicken thighs more flavorful and satisfying than breasts.
From a health perspective, while chicken thighs do contain more fat than breasts, much of that fat is monounsaturated—the same heart-healthy fat found in olive oil and avocados. They’re also richer in iron, zinc, and B vitamins. When you remove the skin after cooking, the nutritional profile becomes quite similar to chicken breast, with only a modest increase in calories. And honestly, many nutritionists now acknowledge that including moderate amounts of flavorful, satisfying protein like chicken thighs can make healthy eating more sustainable long-term compared to forcing yourself to eat dry, boring chicken breast.
The versatility of this chicken thigh recipe cannot be overstated. The basic preparation I’m sharing serves as a blank canvas. Tonight you might season with Italian herbs and serve over pasta. Tomorrow you could use Cajun spices and pair with rice and beans. The weekend might call for Asian-inspired flavors with a side of stir-fried vegetables. Once you master the technique, the flavor possibilities become endless.
Understanding Chicken Thighs: A Quick Guide
Walking into the meat department can feel overwhelming with various chicken thigh options staring back at you. Let me demystify the choices so you can shop with confidence.
For this recipe, I recommend bone-in, skin-on chicken thighs. The bone serves multiple purposes: it conducts heat, helping the meat cook more evenly; it adds flavor during roasting; and it creates a visual presentation that looks appealing on the dinner table. The skin protects the meat from drying out while crisping into a delicious, golden layer that many consider the best part of the dish.
However, I realize boneless, skinless thighs have their place. They cook faster (useful for rushed weeknights), they’re easier for children to manage, and they work better in certain preparations like stir-fries or salads. If you choose boneless, skinless thighs for this recipe, reduce the cooking time by about ten to fifteen minutes and check for doneness earlier.
When shopping, look for thighs with a deep pink color. Avoid any with gray patches, which indicate age or improper storage. The meat should look moist but not slimy or wet. Smell is your friend—fresh chicken has almost no smell, while chicken past its prime develops a distinctly unpleasant, sour odor. Don’t be shy about checking the sell-by date and choosing the package with the furthest date.
Organic, free-range, and air-chilled chicken generally offers better flavor and texture than conventional chicken, though the difference is more noticeable in simple preparations. For this recipe with its flavorful seasoning, conventional chicken works beautifully and saves money. Save your premium chicken purchases for recipes where the chicken’s natural flavor really shines through, like simple roast chicken with minimal seasoning.
The Essential Ingredients
This chicken thigh recipe keeps the ingredients list refreshingly short, focusing on quality over quantity. Here’s exactly what you’ll need and why each ingredient matters.
Main Ingredients
8 bone-in, skin-on chicken thighs (approximately 3 to 3.5 pounds total) The star of our show. Look for thighs of relatively uniform size so they cook evenly. If some are significantly larger, they may need a few extra minutes.
2 tablespoons olive oil Extra virgin olive oil adds subtle fruity notes that complement the chicken beautifully. In a pinch, any neutral cooking oil works—avocado, canola, or vegetable oil all perform well.
1 tablespoon kosher salt Kosher salt is my preference because its coarse texture makes it easy to sprinkle evenly and you’re less likely to over-salt compared to fine table salt. If using table salt, reduce the amount to 2 teaspoons.
1 teaspoon freshly ground black pepper Freshly ground pepper makes a genuine difference. Those aromatic compounds that give pepper its distinctive flavor degrade quickly once ground, so pre-ground pepper tastes flat by comparison.
2 teaspoons garlic powder I prefer garlic powder over fresh garlic for this dry rub because it distributes more evenly and won’t burn during high-heat roasting. Fresh garlic has its place (we’ll use it in variations), but powder works better here.
1 teaspoon onion powder Onion powder adds savory depth and a subtle sweetness that balances the other seasonings. Don’t skip it—it’s a secret weapon.
1 teaspoon smoked paprika This ingredient elevates the entire dish. Smoked paprika brings subtle smokiness and helps achieve that gorgeous golden-red color. Regular paprika works in a pinch, but smoked paprika adds something special.
1 teaspoon dried thyme Thyme’s earthy, slightly minty flavor pairs beautifully with chicken. Dried thyme works better than fresh for this preparation because it won’t burn and its concentrated flavor stands up to the bold seasoning.
½ teaspoon dried oregano A little oregano goes a long way. It adds complexity without overwhelming other flavors.
Optional: ½ teaspoon cayenne pepper or red pepper flakes If you enjoy a subtle kick of heat, add this to the spice blend. Start with a quarter teaspoon if you’re unsure—you can always add more next time.
For Serving
Fresh lemon wedges A squeeze of fresh lemon juice over the hot chicken brightens all the flavors. Don’t skip this simple finishing touch.
Fresh parsley or cilantro, chopped A sprinkle of fresh herbs adds color and a fresh note that contrasts beautifully with the rich meat.
Step-by-Step Instructions for Perfect Chicken Thighs
Now let’s walk through the cooking process in detail. I’ll explain not just what to do but why each step matters, so you understand the science behind the success.
Step 1: Bring Chicken to Room Temperature (30 minutes before cooking)
Remove the chicken thighs from the refrigerator and place them on a plate. Let them sit at room temperature for twenty-five to thirty minutes. This step is genuinely important—it’s not just fussy chef nonsense. Cold chicken straight from the fridge cooks unevenly. The exterior overcooks while the interior near the bone stays undercooked. Room temperature chicken cooks through more uniformly, resulting in better texture throughout.
During this time, pat the thighs completely dry with paper towels. Pay special attention to the skin side—every drop of moisture you remove means crispier skin. Sometimes I pat them dry, let them sit for fifteen minutes, then pat them dry again. Any water on the surface will turn to steam in the oven, and steam is the enemy of crispy skin.
Step 2: Preheat Your Oven
Position a rack in the center of your oven and preheat to 425°F (220°C). While it heats, prepare your baking sheet. I recommend lining it with aluminum foil for easier cleanup, though this is optional. If you want even crispier skin, place a wire rack on the baking sheet—this allows air to circulate under the chicken, crisping the bottom side too. However, this isn’t essential, and the recipe works perfectly fine with chicken placed directly on the baking sheet.
Don’t skip preheating. An oven that’s still climbing to temperature when you add the chicken results in longer cooking times and less predictable results.
Step 3: Prepare the Seasoning Blend
In a small bowl, combine the kosher salt, black pepper, garlic powder, onion powder, smoked paprika, dried thyme, and dried oregano. Mix thoroughly with a spoon or your fingers. Creating this blend before applying it to the chicken ensures even distribution. If you sprinkled each spice individually, some thighs would end up with more garlic flavor while others got extra paprika.
This is also the moment to customize. Want more heat? Add cayenne. Love herbs? Double the thyme. Prefer a sweeter profile? Add a teaspoon of brown sugar to the mix. Making the blend first gives you the opportunity to adjust before committing.
Step 4: Oil and Season the Chicken
Drizzle the olive oil over the chicken thighs, then use your hands to rub it all over both sides of each piece. The oil serves multiple purposes: it helps the seasoning adhere, it promotes browning through the Maillard reaction, and it prevents sticking.
Now comes the satisfying part. Sprinkle the seasoning blend generously over all surfaces of the chicken. Don’t be timid—chicken thighs can handle bold seasoning. Use about two-thirds of the blend on the skin side (which will be facing up) and one-third on the flesh side. Press the seasonings into the meat gently so they stick.
Here’s a pro tip I learned from a chef I worked under years ago: season from high above the chicken, about twelve inches up. This might feel awkward at first, but it helps the seasonings distribute more evenly. When you season from close up, you tend to create piles in some spots while missing others entirely.
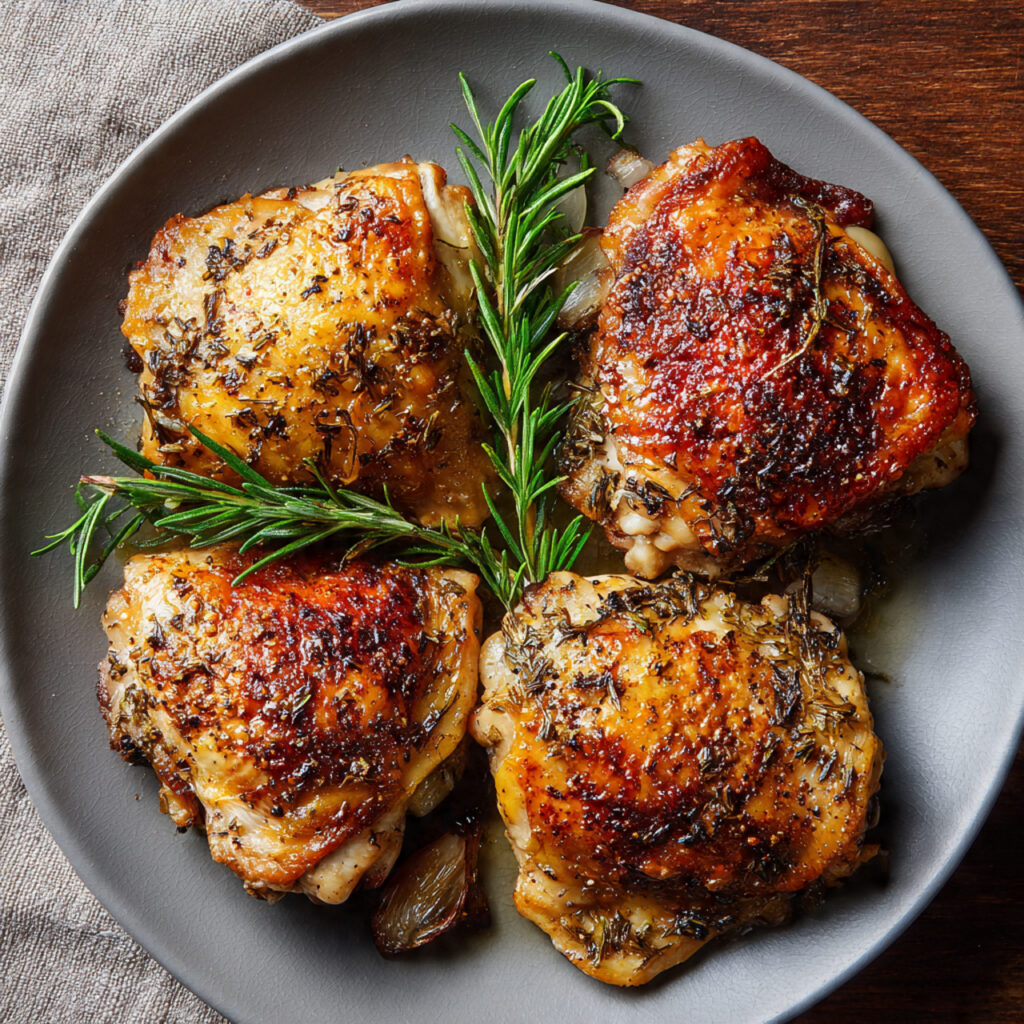
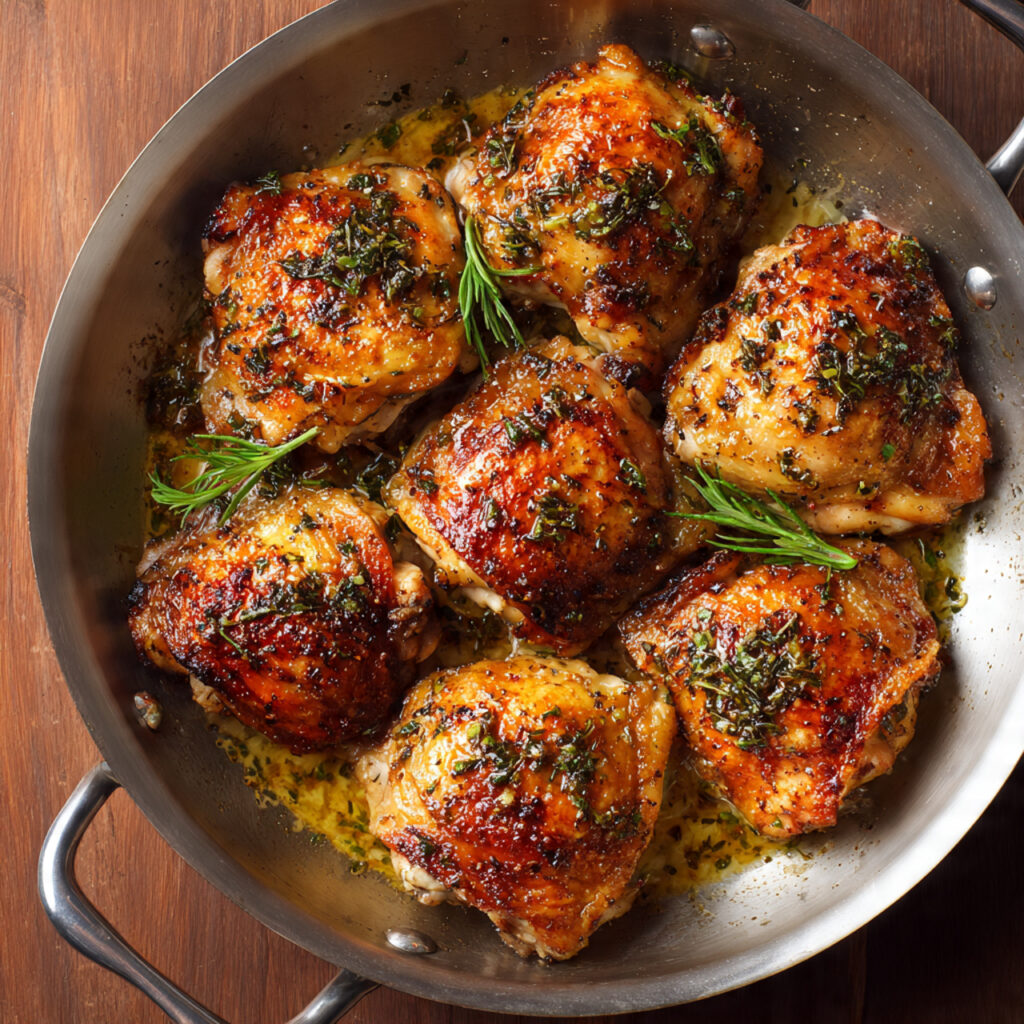
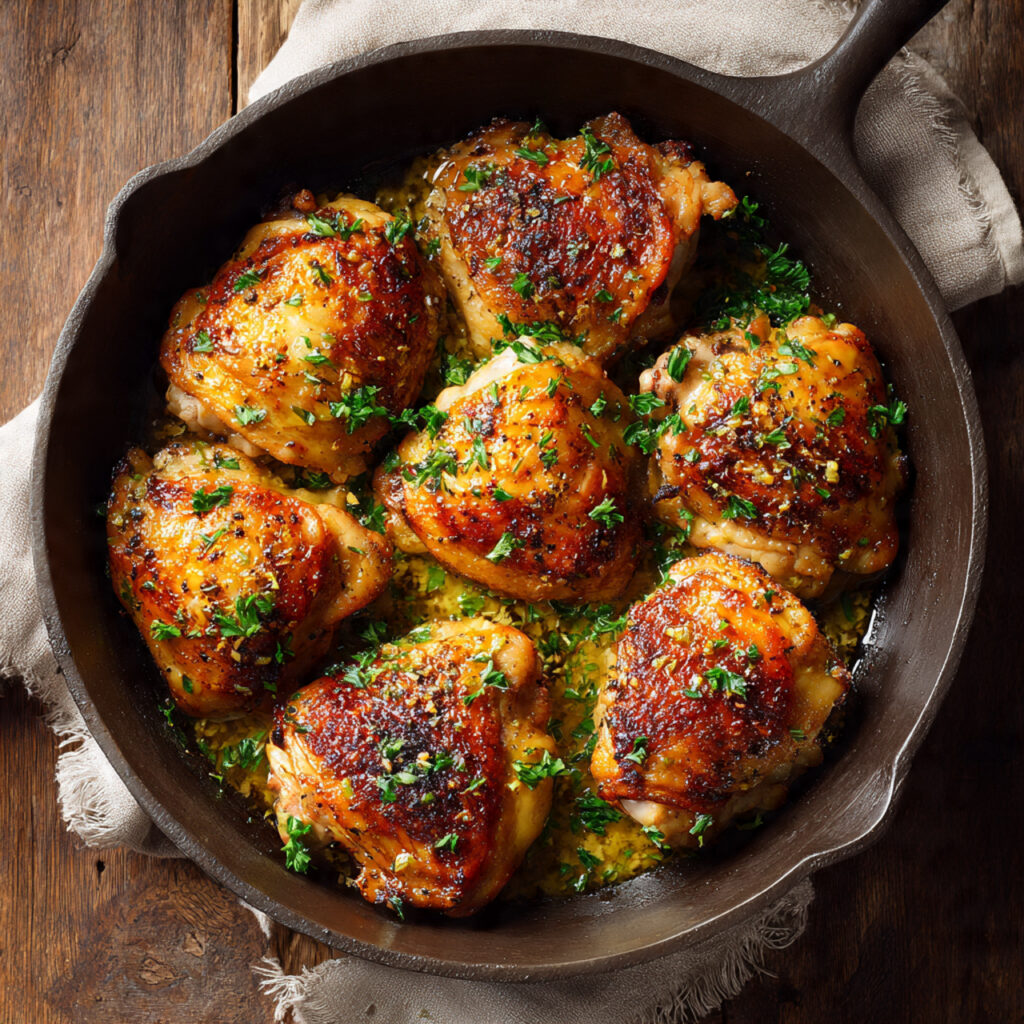
Step 5: Arrange on the Baking Sheet
Place the seasoned thighs on your prepared baking sheet, skin side up, leaving at least half an inch of space between each piece. Proper spacing is crucial. When chicken pieces touch or crowd together, they steam rather than roast, resulting in rubbery skin instead of crispy. If your baking sheet isn’t large enough for all eight thighs with proper spacing, use two baking sheets or cook in two batches.
Arrange the thighs with the thickest parts toward the outside edges of the pan. The center of most ovens runs slightly cooler than the edges, so putting the thickest pieces on the perimeter ensures everything finishes at the same time.
Step 6: Initial Roasting Phase
Slide the baking sheet into your preheated 425°F oven. Set a timer for twenty-five minutes and resist the urge to open the oven door. Every time you peek, the temperature drops, extending cooking time and affecting results. During this phase, the fat under the skin begins rendering and the meat cooks through gently.
You’ll start to smell the wonderful aromas of roasting chicken and toasting spices around the fifteen-minute mark. This is normal and delightful, not a sign that something is burning.
Step 7: Increase Heat for Crispy Skin
After twenty-five minutes, increase the oven temperature to 450°F (230°C). Don’t remove the chicken—just adjust the dial and continue cooking. This blast of higher heat will crisp the skin beautifully while ensuring the meat near the bone reaches the proper temperature.
Cook for an additional fifteen to twenty minutes. The exact timing depends on the size of your thighs and how accurate your oven runs. Start checking at the fifteen-minute mark.
Step 8: Check for Doneness
The most reliable way to check doneness is with an instant-read thermometer. Insert it into the thickest part of a thigh, making sure it doesn’t touch the bone (bones conduct heat differently and give false readings). You’re looking for an internal temperature of 175°F (80°C).
Wait—isn’t chicken safe at 165°F? Yes, but dark meat reaches its ideal texture at a slightly higher temperature. The extra heat breaks down collagen in the connective tissue, making the meat incredibly tender. At 165°F, dark meat can still feel slightly tough and chewy. At 175°F, it becomes melt-in-your-mouth tender.
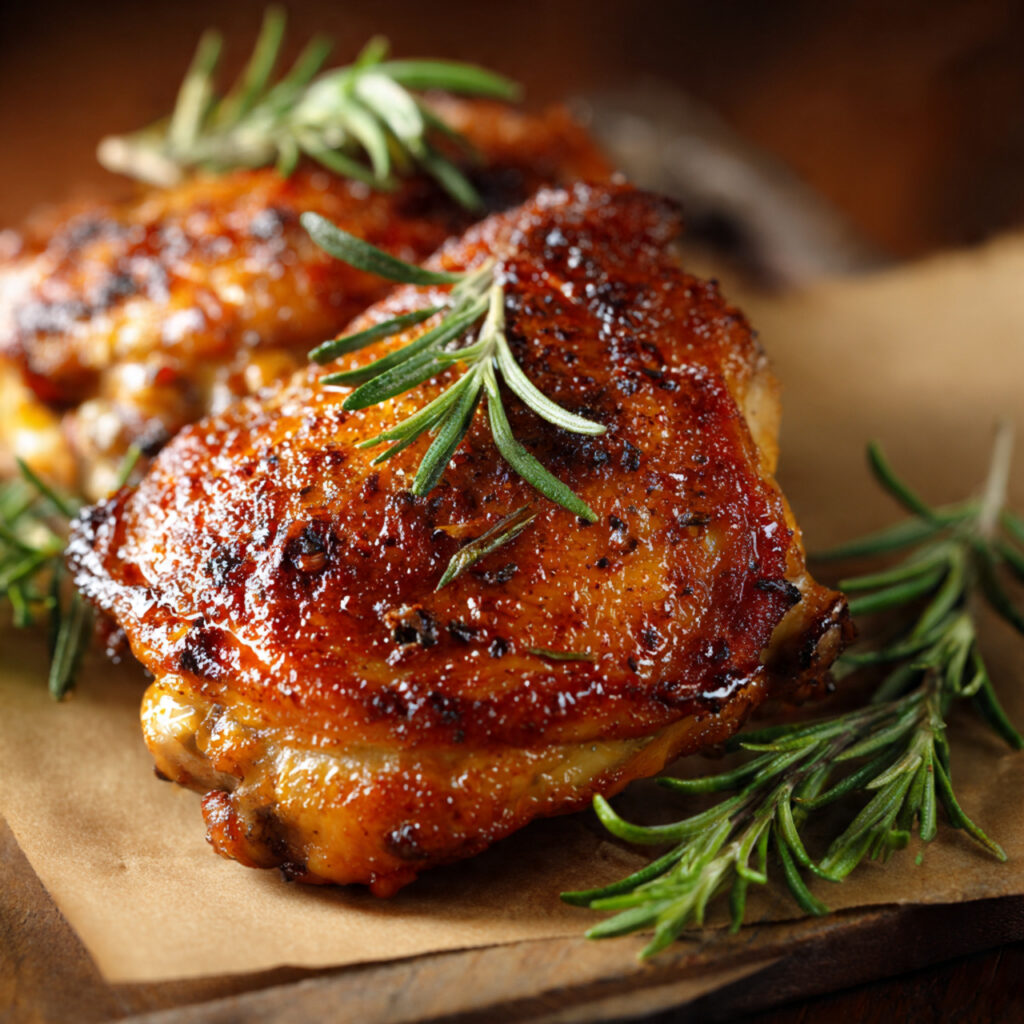
Visual cues also help. The skin should be deeply golden brown with some darker spots where seasonings concentrated. The meat should feel firm when pressed, not soft or squishy. If you pierce the thickest part with a knife, the juices should run clear, not pink.
Step 9: Rest Before Serving
Once the chicken reaches temperature, remove the baking sheet from the oven and let the thighs rest for five to eight minutes. This brief resting period allows the juices, which have been driven toward the center during cooking, to redistribute throughout the meat. Cut into the chicken immediately and those precious juices run out onto the cutting board. Wait five minutes and they stay locked in the meat where they belong, ensuring every bite is juicy.
During this rest, the internal temperature will rise another three to five degrees from carryover cooking—another reason to pull the chicken at 175°F rather than waiting for a higher reading.
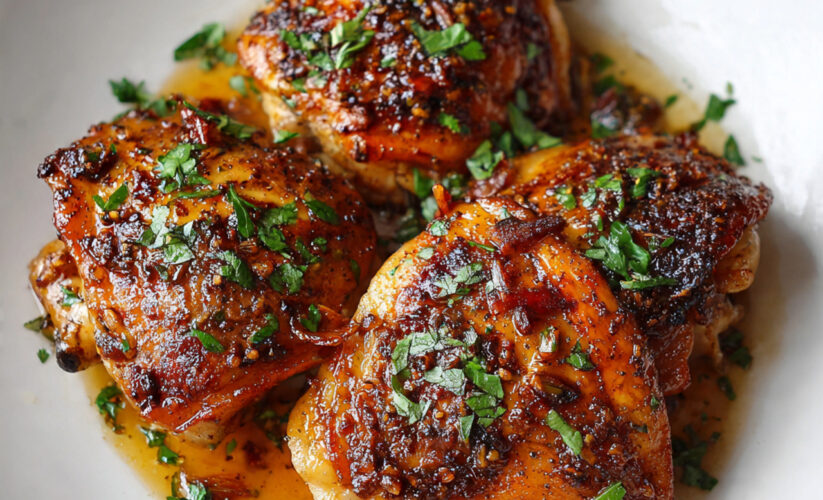
Step 10: Garnish and Serve
Transfer the chicken thighs to a serving platter. Squeeze fresh lemon juice generously over the top—the bright acidity cuts through the richness and makes all the flavors pop. Sprinkle with chopped fresh parsley or cilantro for color and freshness.
Serve immediately while the skin is at peak crispiness. The chicken is delicious at room temperature too, so don’t stress if dinner gets delayed slightly.
Pro Tips for the Perfect Chicken Thigh Recipe
After making this recipe hundreds of times and teaching it to countless students and home cooks, I’ve identified the techniques that separate good results from great ones.
The Air-Drying Trick
For the crispiest possible skin, try this restaurant technique: after patting the chicken dry, place the thighs uncovered on a wire rack set over a plate in your refrigerator for four to eight hours or overnight. The cold, dry refrigerator air dehydrates the skin surface, removing moisture that would otherwise prevent crisping. When you cook these air-dried thighs, the skin crisps up incredibly fast and achieves a texture you simply can’t get otherwise. This technique is used by restaurants preparing Peking duck and other dishes where shatteringly crisp skin is essential.
Seasoning Under the Skin
Here’s a technique that takes this chicken thigh recipe to the next level: carefully work your finger between the skin and meat, creating a pocket. Then spread a mixture of softened butter, minced garlic, and fresh herbs directly onto the meat under the skin. The skin protects these delicate ingredients from burning while they infuse the meat with flavor. The butter also bastes the meat from within, adding extra richness.
The Two-Pan Method
If feeding a crowd, you might need to use two baking sheets. Place one on the middle rack and one on the upper-middle rack. Halfway through cooking, switch their positions (the sheet that started on top moves to the middle, and vice versa). This rotation ensures even cooking despite variations in oven hot spots.
Using a Cast Iron Skillet
For an alternative method that creates incredible pan drippings for gravy, start the thighs skin-side down in a cold cast iron skillet. Place the skillet on the stovetop over medium heat and let the fat render slowly as the pan heats. After eight to ten minutes, when the skin is golden and crispy, flip the thighs and transfer the entire skillet to a 400°F oven to finish cooking, about twenty-five to thirty minutes. This method gives you beautiful fond (browned bits) stuck to the skillet that you can deglaze with wine or stock for an instant pan sauce.
Checking Multiple Thighs
Don’t just check one thigh for doneness—check at least two or three, especially if they vary in size. Occasionally one thigh finishes significantly faster than others. By checking multiple pieces, you can remove the done ones and let the others continue cooking for a few more minutes.
Resting on a Wire Rack
If you’re particular about maintaining crispy skin during the resting period, transfer the cooked thighs to a wire rack rather than letting them sit in their own juices on the baking sheet. This keeps the bottom skin crispy instead of getting soggy.
Save Those Pan Drippings
After removing the chicken, don’t discard what’s left on the baking sheet. Those browned bits and rendered fat are flavor gold. Pour them into a heat-safe container, let the fat separate from the juices (the fat rises to the top), then use the juices as a flavor booster in soups, rice, or vegetables. The fat can be strained and used for cooking potatoes or other vegetables.
Tent with Foil If Browning Too Quickly
If you notice the skin getting too dark before the internal temperature reaches 175°F, loosely tent the chicken with aluminum foil. This slows the browning while allowing the interior to continue cooking. This situation is rare but can happen in ovens that run hot.
Common Mistakes to Avoid
Even with a straightforward recipe like this, certain pitfalls can compromise results. Let me help you sidestep the most common issues.
Mistake 1: Skipping the Drying Step
I can’t emphasize this enough—wet skin will not crisp properly. It will steam instead of roasting, resulting in rubbery, unappealing skin. Take those extra two minutes to thoroughly pat the chicken dry. Your efforts will be rewarded with gorgeously crispy skin.
Mistake 2: Overcrowding the Pan
When thighs touch each other or sit too close together, moisture can’t escape and air can’t circulate. This creates a steaming environment rather than a roasting one. The result is pale, flabby skin instead of crispy, golden perfection. Use two pans if necessary or cook in batches.
Mistake 3: Opening the Oven Door Repeatedly
Every time you open the oven door, the temperature drops by twenty-five to fifty degrees. Your oven then has to work to regain that heat, extending cooking time and affecting browning. Set your timer, trust the process, and only open the door when it’s time to increase the temperature or check for doneness.
Mistake 4: Under-Seasoning
Chicken thighs have robust flavor that can stand up to generous seasoning. Many home cooks, worried about over-salting, use too light a hand. Don’t be afraid to season boldly. If you’re nervous, start with three-quarters of the seasoning blend, taste a finished thigh, and adjust next time.
Mistake 5: Cooking Straight from the Fridge
Cold chicken cooks unevenly, with the exterior overcooking before the interior near the bone is done. Always let chicken sit at room temperature for twenty-five to thirty minutes before cooking. This simple step dramatically improves results.
Mistake 6: Cutting Into the Chicken Too Soon
I understand the temptation to cut into the chicken immediately to check if it’s done, but this releases all those precious juices. Use a thermometer instead, or if you must cut into it, choose one thigh to sacrifice for the greater good and leave the others intact.
Mistake 7: Not Trimming Excess Fat
While chicken thighs benefit from their internal fat, large deposits of pure fat around the edges don’t render fully and create greasy results. Before seasoning, trim away obvious pockets of yellow fat with kitchen shears, leaving just the thin layer under the skin.
Mistake 8: Using a Thin, Warped Baking Sheet
Cheap, thin baking sheets don’t distribute heat evenly and often warp in high heat, creating uneven cooking. Invest in heavy-duty, rimmed baking sheets (half-sheet pans). They last for years and transform your cooking results across many recipes, not just chicken.
Mistake 9: Ignoring Oven Hot Spots
Most home ovens have hot spots—areas that run hotter than others. If you notice one side of your chicken browns significantly faster, rotate the baking sheet halfway through cooking. Better yet, use an oven thermometer to verify your oven’s accuracy and identify problem areas.
Mistake 10: Serving Immediately Without Resting
I know you’re hungry and the chicken smells amazing, but those five minutes of resting make a measurable difference in juiciness. Use this time to finish preparing sides, set the table, or make a simple salad. Your patience will be rewarded.
Storage and Serving Suggestions
Properly storing and reheating chicken thighs ensures you can enjoy this recipe multiple times throughout the week without sacrificing quality.
Refrigerator Storage
Cooked chicken thighs will keep in the refrigerator for three to four days when stored properly. Let them cool completely before refrigerating—placing hot chicken directly in the fridge raises the overall temperature, potentially compromising other foods. Store in airtight containers or wrap tightly in aluminum foil.
For maintaining the crispiest skin, store the chicken uncovered or loosely covered for the first few hours, allowing steam to escape. Once completely cool, cover tightly. If you’re meal prepping and don’t care about crispy skin (since you’ll reheat anyway), you can store them however is most convenient.
Freezer Storage
These chicken thighs freeze beautifully for up to three months. For best results, wrap each thigh individually in plastic wrap, then place several wrapped thighs in a freezer bag with as much air removed as possible. This double-wrapping prevents freezer burn and allows you to remove just one or two thighs as needed.
Label the bags with the date and any seasonings used. When you’re staring into the freezer at 5 PM wondering what to make for dinner, these labels become incredibly helpful.
Reheating for Best Results
Oven reheating produces the best results for maintaining texture. Preheat your oven to 350°F (175°C), place thighs on a baking sheet, and cover loosely with foil. Heat for fifteen to twenty minutes until warmed through. Remove the foil for the last five minutes if you want to re-crisp the skin slightly.
Stovetop reheating works well when you’re in a hurry. Add a small amount of oil to a skillet over medium heat, place the thighs skin-side down, cover with a lid, and heat for about four minutes per side until warmed through.
Microwave reheating is the fastest but produces the least ideal texture. If you must microwave, place thighs on a microwave-safe plate, cover loosely with a damp paper towel, and heat in thirty-second intervals until warm. To rescue the texture slightly, finish under the broiler for a minute to crisp the skin.
Serving Suggestions
The beauty of this chicken thigh recipe lies in its versatility—it pairs beautifully with countless sides and accompaniments.
Classic pairings include mashed potatoes with the pan drippings stirred in, roasted vegetables (Brussels sprouts, carrots, and broccoli are favorites), simple green salads with vinaigrette, crusty bread for soaking up juices, and rice pilaf or quinoa.
Creative serving ideas take this basic recipe in exciting directions. Shred the leftover meat for tacos topped with fresh pico de gallo and avocado. Slice and serve over Caesar salad for a hearty lunch. Dice and add to fried rice with vegetables and soy sauce. Use in chicken salad with mayo, celery, and grapes for sandwiches. Chop and toss with pasta, sun-dried tomatoes, and spinach in a light cream sauce.
Sauce options elevate the dish for special occasions. A simple pan sauce made from deglazing the baking sheet with white wine and stirring in butter creates restaurant-worthy results. Chimichurri sauce brings bright, herbaceous notes. Tzatziki provides cool, creamy contrast. A quick honey-mustard sauce combines two tablespoons each of honey and Dijon mustard with a splash of apple cider vinegar.
Leftover Ideas
Chicken thigh meat, with its rich flavor and tender texture, excels in second-day preparations. Here are my favorite ways to use leftovers:
Chicken and rice soup: Simmer leftover chicken with rice, vegetables, and broth for a comforting soup that tastes like you spent hours on it.
Quesadillas: Shred the meat, layer between tortillas with cheese and sautéed peppers, and cook until golden and melty.
Grain bowls: Top quinoa or farro with sliced chicken, roasted vegetables, avocado, and a drizzle of tahini dressing for a healthy lunch.
Pizza topping: Dice the chicken and use it as a pizza topping along with barbecue sauce, red onions, and mozzarella.
Chicken salad: Mix shredded chicken with mayo, Dijon mustard, diced celery, dried cranberries, and chopped pecans for amazing sandwiches.
Frequently Asked Questions
Over the years, these questions come up repeatedly. Let me address the most common concerns.
What temperature should chicken thighs be cooked to?
Chicken thighs should reach an internal temperature of 175°F (80°C) for optimal texture and food safety. While the USDA considers poultry safe at 165°F, dark meat benefits from the extra heat. The additional ten degrees breaks down collagen and connective tissue, transforming the meat from merely cooked to meltingly tender. Use an instant-read thermometer inserted into the thickest part of the thigh, avoiding the bone, for accurate readings. The chicken will continue cooking a few degrees during resting due to carryover heat.
How long does it take to cook chicken thighs at 425°F?
Bone-in, skin-on chicken thighs typically take forty to forty-five minutes total when using this two-temperature method—twenty-five minutes at 425°F followed by fifteen to twenty minutes at 450°F. However, timing varies based on several factors: the size of the thighs (larger ones take longer), how accurate your oven runs (some ovens run hot or cool), whether you’re using one or two baking sheets, and the starting temperature of the chicken (room temperature chicken cooks faster than cold). Always verify doneness with a thermometer rather than relying solely on timing.
Can I use boneless, skinless chicken thighs for this recipe?
Absolutely! Boneless, skinless thighs work well with this recipe, though they cook faster—typically twenty-five to thirty-five minutes total. Since they lack skin to crisp and bones to add flavor, I recommend marinating them for at least thirty minutes before cooking to boost flavor. You can also increase the seasoning slightly since you’re not getting the flavor contribution from rendered skin fat. Check for doneness at the twenty-five-minute mark, pulling them when they reach 165°F (they don’t need the higher temperature since there’s no connective tissue around bones to break down).
Why is my chicken skin not crispy?
Rubbery skin results from excess moisture. The most common cause is not drying the chicken thoroughly before cooking. Take extra time patting every surface with paper towels, especially the skin. Other causes include overcrowding the pan (trapped moisture can’t escape), oven temperature too low (you need high heat for crisping), or not rendering the fat properly (make sure the skin side faces up throughout cooking so fat can drip away). For crispiest results, try the air-drying technique mentioned in the pro tips section—letting the chicken sit uncovered in the refrigerator overnight.
Can I cook chicken thighs from frozen?
While it’s possible, I don’t recommend it for this recipe. Frozen chicken won’t cook evenly—the exterior will overcook before the interior thaws and cooks through. The skin won’t crisp properly because ice crystals create excess moisture. If you’re in a pinch, increase the cooking time by fifty percent, cover with foil for the first half of cooking, then uncover and increase heat for the second half. However, results will be inferior to starting with thawed chicken. The safest method is thawing overnight in the refrigerator.
How do I know when chicken thighs are done without a thermometer?
While a thermometer provides the most reliable results, you can use visual cues if necessary. Pierce the thickest part with a knife—juices should run completely clear with no pink tinge. The meat should be opaque throughout with no translucent or raw-looking areas. Press the meat with your finger—it should feel firm rather than soft or squishy. The skin should be deeply golden brown. However, these methods are less precise and can lead to overcooking as you err on the side of caution. Instant-read thermometers cost under twenty dollars and eliminate all guesswork.
Can I marinate chicken thighs overnight?
Yes, but with important considerations about marinade composition. Oil-based marinades with herbs and spices can safely marinate overnight (up to twenty-four hours) without negative effects. However, acidic marinades containing citrus juice, vinegar, wine, or yogurt should be limited to two to four hours maximum. Extended exposure to acid breaks down the meat’s surface proteins, creating an unpleasant mushy texture. If you want to prep ahead with an acidic marinade, reduce the acid content by half for overnight marinating.
What sides go best with this chicken thigh recipe?
This versatile chicken pairs beautifully with countless sides. Starchy options like mashed potatoes, roasted potatoes, rice pilaf, or crusty bread soak up the delicious juices. Vegetable sides like roasted Brussels sprouts, glazed carrots, sautéed green beans, or roasted broccoli add color and nutrition. Fresh salads with vinaigrette-based dressings provide brightness and crunch that cuts through the richness. For a complete one-pan meal, arrange vegetables like potatoes, carrots, and onions around the chicken thighs before roasting—they’ll cook in the rendered fat and pick up amazing flavor.
Print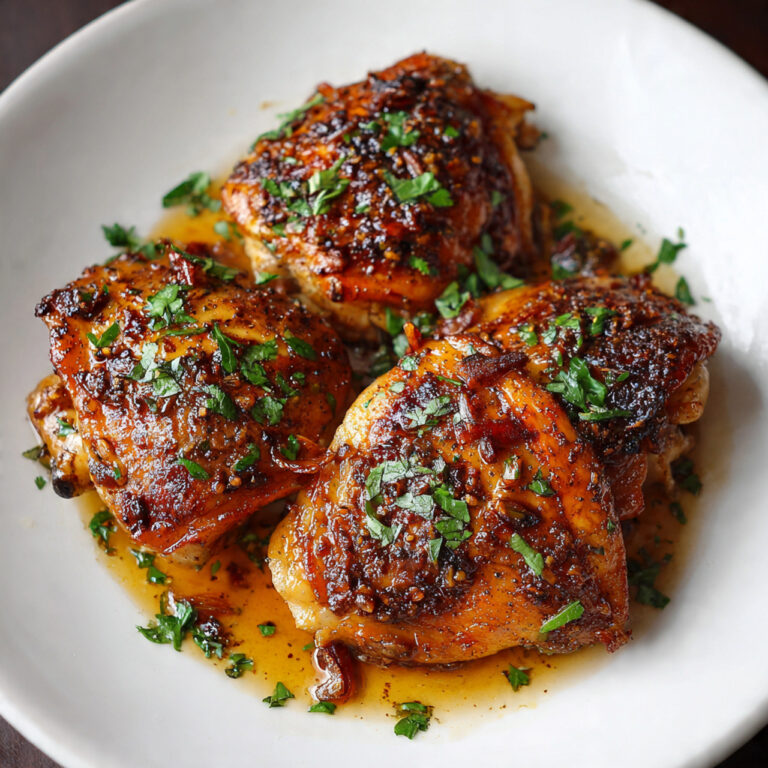
The Ultimate Chicken Thigh Recipe: Crispy, Juicy & Ready in 45 Minutes
The ultimate chicken thigh recipe that delivers restaurant-quality results at home. Features perfectly crispy golden skin, tender juicy meat, and a simple seasoning blend. This foolproof method works every time and takes just 45 minutes from start to finish.
- Total Time: 55 minutes
- Yield: 8 servings (1 thigh per person)
Ingredients
- 8 bone-in, skin-on chicken thighs (approximately 3-3.5 pounds)
- 2 tablespoons olive oil
- 1 tablespoon kosher salt
- 1 teaspoon freshly ground black pepper
- 2 teaspoons garlic powder
- 1 teaspoon onion powder
- 1 teaspoon smoked paprika
- 1 teaspoon dried thyme
- ½ teaspoon dried oregano
- Fresh lemon wedges (for serving)
- Fresh parsley, chopped (for garnish)
Instructions
- Remove chicken from refrigerator 30 minutes before cooking. Pat completely dry with paper towels.
- Preheat oven to 425°F (220°C). Line a baking sheet with foil.
- Mix all seasonings (salt, pepper, garlic powder, onion powder, paprika, thyme, oregano) in a small bowl.
- Drizzle olive oil over chicken and rub all over. Sprinkle seasoning blend generously on all sides.
- Arrange chicken thighs on baking sheet skin-side up, leaving space between each piece.
- Roast at 425°F for 25 minutes without opening the oven door.
- Increase oven temperature to 450°F and continue cooking for 15-20 minutes.
- Check internal temperature reaches 175°F in the thickest part (avoid touching bone).
- Remove from oven and rest for 5-8 minutes.
- Squeeze fresh lemon juice over chicken, garnish with parsley, and serve immediately.
Notes
- For crispier skin: Pat chicken dry thoroughly and consider air-drying uncovered in the fridge for 4-8 hours.
- Boneless option: Use boneless, skinless thighs and reduce cooking time to 25-35 minutes total.
- Storage: Refrigerate in airtight container for 3-4 days or freeze up to 3 months.
- Reheating: Best in oven at 350°F for 15-20 minutes to maintain texture.
- Customization: Add cayenne for heat or swap herbs to match your preferred cuisine.
- Prep Time: 10 minutes
- Cook Time: 45 minutes
- Category: Main Dish, Dinner
- Method: Roasting, Baking
- Cuisine: American
- Diet: Gluten Free


2 Comments
[…] and have dinner on the table in thirty minutes flat. It’s fancy enough for date night but easy enough for a random Tuesday when you’re […]
[…] makes this cajun chicken pasta so irresistible is the balance of flavors. The Cajun seasoning brings heat and complexity, the cream mellows everything out, and […]
Comments are closed.