Heart Pizza: 7 Secrets to Making the Ultimate Romantic Dinner (2026)
Introduction
Heart Pizza is the perfect way to turn an ordinary pizza night into an extraordinary romantic gesture that shows someone just how much you care. This isn’t just any pizza—it’s a thoughtfully crafted, heart-shaped masterpiece that combines the comfort of homemade pizza with the romance of Valentine’s Day or any special celebration of love.
Whether you’re planning a cozy date night at home, surprising your partner with breakfast in bed, or creating a fun cooking activity together, Heart Pizza delivers both visual charm and incredible flavor.
The beauty of this recipe lies in its versatility: you can
everything from the crust thickness to the toppings, making it truly personal. Plus, shaping pizza dough into a heart is surprisingly simple once you know the technique, and the wow factor is absolutely worth the minimal extra effort involved.
Why This Heart Pizza Recipe Will Become Your Go-To
What sets this Heart Pizza apart from throwing together a quick dinner is the attention to detail in every component. The homemade dough recipe creates a perfectly chewy yet crispy crust that rivals any pizzeria. The sauce balances acidity and sweetness beautifully, and the topping suggestions range from classic pepperoni arrangements to gourmet combinations that elevate the entire experience. This recipe also includes time-saving options for busy schedules—you can make the dough ahead, use store-bought alternatives when needed, and even prep toppings in advance. Most importantly, making Heart Pizza together can become a cherished tradition, turning cooking from a chore into quality time filled with laughter and creativity.
Ingredients
For the Pizza Dough:
- 2¼ teaspoons (1 packet) active dry yeast
- 1 teaspoon granulated sugar
- 1 cup (240ml) warm water (105-110°F/40-43°C)
- 2½ cups (315g) all-purpose flour, plus extra for dusting
- 2 tablespoons olive oil
- 1 teaspoon salt
- 1 teaspoon Italian seasoning (optional)
For the Pizza Sauce:
- 1 can (15 oz/425g) crushed tomatoes or tomato sauce
- 2 cloves garlic, minced
- 1 tablespoon olive oil
- 1 teaspoon dried oregano
- 1 teaspoon dried basil
- ½ teaspoon sugar (to balance acidity)
- ¼ teaspoon salt
- ¼ teaspoon black pepper
- ¼ teaspoon red pepper flakes (optional)
For the Toppings:
- 2 cups (200g) shredded mozzarella cheese
- ½ cup (50g) grated Parmesan cheese
- Pepperoni slices (arranged in heart patterns)
- Fresh basil leaves
- Cherry tomatoes, halved
- Bell peppers (red for extra romance)
- Mushrooms, sliced
- Red onion, thinly sliced
- Italian sausage, cooked and crumbled
- Black olives, sliced
- Fresh mozzarella pearls
- Prosciutto (add after baking)
- Arugula (add after baking)
Optional Finishing Touches:
- Extra virgin olive oil for drizzling
- Fresh herbs (basil, oregano)
- Balsamic glaze
- Red pepper flakes
- Grated Parmesan
Step-by-Step Instructions
Step 1: Prepare the Perfect Pizza Dough
Start by activating your yeast, which is crucial for achieving that light, airy crust. In a small bowl, combine warm water (test with your finger—it should feel like warm bath water), sugar, and yeast. Stir gently and let sit for 5-10 minutes until the mixture becomes foamy and bubbly. This foam indicates your yeast is alive and ready to work its magic.
While the yeast activates, combine flour, salt, and Italian seasoning in a large mixing bowl. Once your yeast mixture is foamy, add it to the flour along with olive oil. Mix with a wooden spoon until a shaggy dough forms, then turn out onto a lightly floured surface.
Knead the dough for 8-10 minutes until it becomes smooth, elastic, and slightly tacky but not sticky. The dough should bounce back when you poke it. If using a stand mixer with a dough hook, knead on medium speed for 5-6 minutes.
Shape the dough into a ball and place in a lightly oiled bowl, turning once to coat all sides. Cover with a damp kitchen towel or plastic wrap and let rise in a warm, draft-free spot for 1-1.5 hours, or until doubled in size. A warm oven (turned off, with just the light on) works perfectly.
Step 2: Make the Flavorful Pizza Sauce
While your dough rises, prepare the sauce. Heat olive oil in a medium saucepan over medium heat. Add minced garlic and sauté for 30-60 seconds until fragrant but not browned (burned garlic tastes bitter).
Add crushed tomatoes, oregano, basil, sugar, salt, pepper, and red pepper flakes if using. Stir well and bring to a gentle simmer. Reduce heat to low and let simmer for 15-20 minutes, stirring occasionally. The sauce should thicken slightly and develop a deeper flavor.
Taste and adjust seasonings as needed. Remove from heat and let cool while your dough finishes rising. This sauce can be made up to 3 days ahead and refrigerated, which actually improves the flavor as the seasonings meld together.
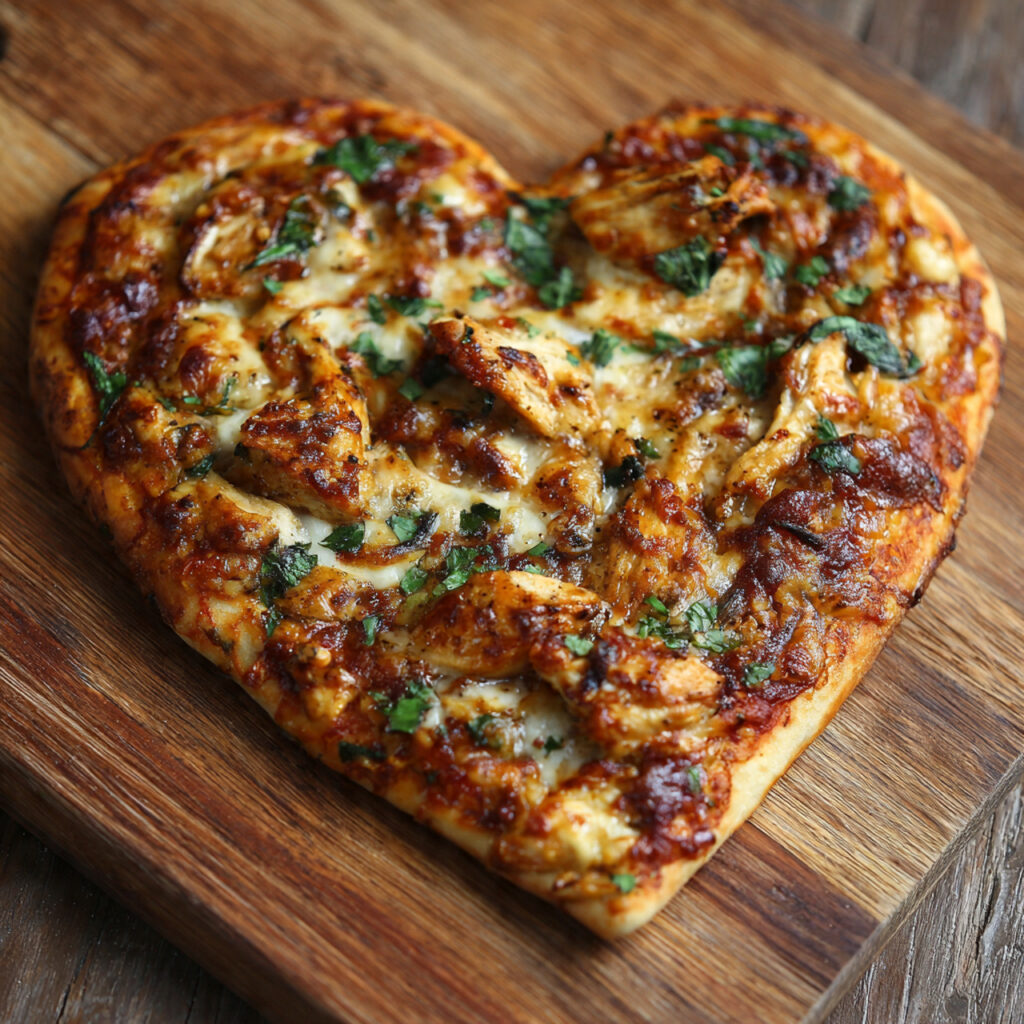
Step 3: Shape Your Dough into a Heart
This is where the magic happens! Once your dough has doubled, punch it down gently to release air bubbles. Transfer to a lightly floured surface and let rest for 5 minutes—this relaxes the gluten and makes shaping easier.
Roll the dough into a circle about 12 inches in diameter and roughly ¼ inch thick. Use even pressure and rotate the dough as you roll to maintain a circular shape.
To create the heart shape, first cut a small V-shaped notch from the top center of the circle (this will become the top of the heart where the two curves meet). Then, gently pull and stretch the bottom portion into a point, forming the bottom tip of the heart. Use your hands to shape and refine the two top curves, making them symmetrical.
Don’t worry if it’s not perfect—rustic charm is part of homemade pizza’s appeal! Transfer your heart-shaped dough to a parchment-lined baking sheet or pizza stone dusted with cornmeal to prevent sticking.
Step 4: Preheat and Prep for Baking
Preheat your oven to 475°F (245°C). If using a pizza stone, place it in the oven while preheating—a hot stone creates the crispiest crust. Let it heat for at least 30 minutes before baking.
While the oven heats, brush the edges of your heart-shaped dough lightly with olive oil—this creates a beautiful golden crust. Let the shaped dough rest for 10-15 minutes before adding toppings. This brief rest allows the gluten to relax and prevents shrinkage during baking.
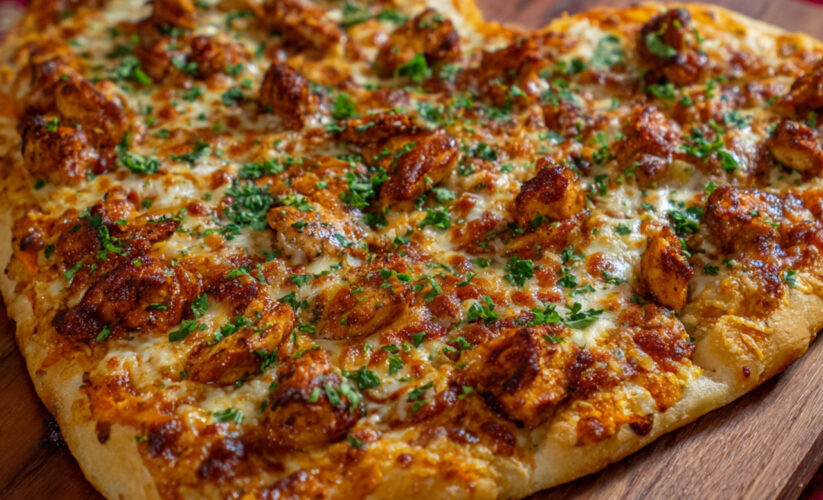
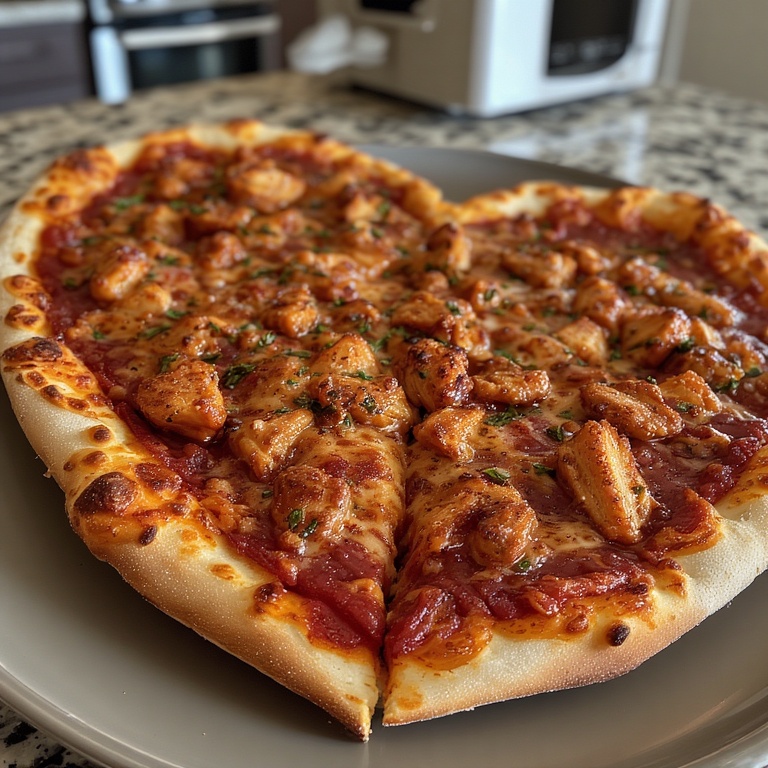
Step 5: Build Your Heart Pizza with Love
Start with the sauce: spread about ½ cup of your homemade sauce over the dough, leaving a ½-inch border around the edges for the crust. Use the back of a spoon in circular motions for even coverage.
Sprinkle mozzarella cheese evenly over the sauce, then add a light layer of Parmesan. Don’t overload with cheese—too much makes the pizza soggy and overpowers other flavors.
Now comes the fun part: arrange your toppings creatively! For a romantic presentation:
- Arrange pepperoni in smaller heart shapes across the pizza
- Create a border of cherry tomato halves around the outer edge
- Scatter fresh basil leaves artistically
- Place thin slices of red bell pepper in heart patterns
- Add mushrooms, onions, and olives in the center
Remember: less is more with toppings. An overloaded pizza becomes soggy and difficult to eat.
Step 6: Bake to Golden Perfection
Carefully transfer your topped Heart Pizza to the preheated oven (if using a pizza stone, use a pizza peel or the back of a baking sheet to slide it on).
Bake for 12-15 minutes, watching carefully. The pizza is done when:
- The crust is golden brown around the edges
- The cheese is melted and bubbling
- The bottom is crispy (lift gently with a spatula to check)
- Small brown spots appear on the cheese (this is called “leoparding” and indicates perfect baking)
If the top is browning too quickly but the bottom isn’t done, lower the oven temperature to 425°F (220°C) and continue baking.
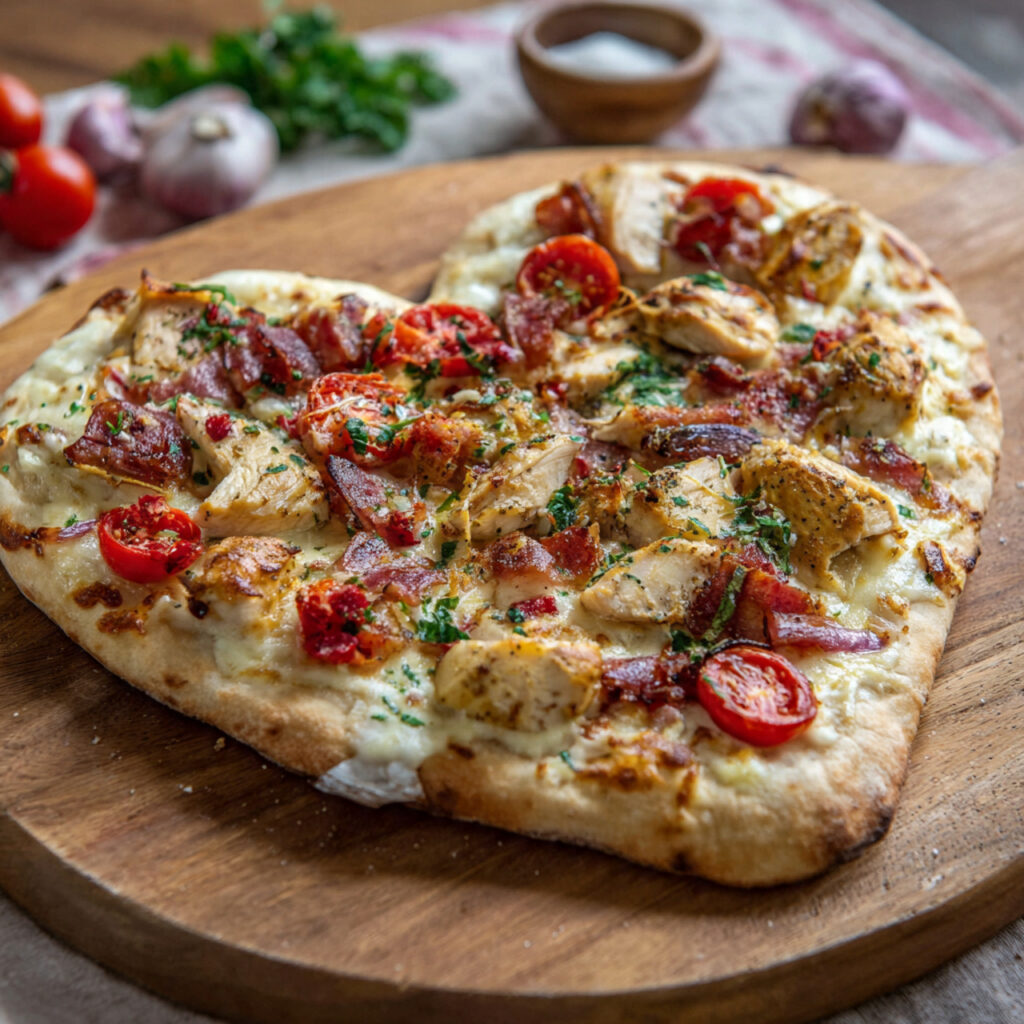
Step 7: Finish and Serve with Flair
Remove the Heart Pizza from the oven and let rest for 2-3 minutes before slicing—this allows the cheese to set slightly and makes cutting easier.
While still hot, add finishing touches:
- Drizzle with high-quality olive oil
- Scatter fresh basil leaves torn by hand
- Add delicate prosciutto strips (the heat will slightly warm them)
- Top with fresh arugula tossed in lemon juice
- Drizzle with balsamic glaze for sweetness
- Sprinkle with red pepper flakes for heat
- Add more grated Parmesan
Slice into wedges and serve immediately on a decorative platter or wooden board for maximum visual impact.
Pro Tips for the Perfect Heart Pizza
Temperature Matters: Use an oven thermometer to verify accuracy. Most home ovens run 25°F hotter or cooler than the dial indicates, which significantly affects baking results.
The Poke Test: Before topping, gently poke the stretched dough. If holes remain, it needs more rising time. If it springs back, you’re ready to build your pizza.
Par-Bake for Crispy Crust: For extra-crispy results, bake the shaped dough without toppings for 3-4 minutes, then add sauce and toppings and continue baking. This prevents a soggy center.
Room Temperature Ingredients: Take cheese and toppings out of the refrigerator 20 minutes before using. Cold toppings lower the oven temperature and increase cooking time.
Strategic Topping Placement: Moisture-heavy items like tomatoes and mushrooms should be patted dry and placed sparingly to avoid a soggy pizza.
The Cornmeal Secret: Dusting your baking surface with cornmeal creates a subtle crunch and prevents sticking while adding authentic pizzeria texture.
Save Some Cheese: Reserve a small handful of mozzarella to sprinkle on during the last 2 minutes of baking for fresh, melted cheese on top.
Make It a Date: Cooking together is part of the romance. Divide tasks—one person makes dough while the other preps toppings, making the experience collaborative and fun.
Common Mistakes to Avoid
Using Water That’s Too Hot: Water above 120°F (49°C) kills yeast, preventing your dough from rising. Always test the temperature—it should feel warm, not hot.
Skipping the Rise: Rushing the rising process results in dense, tough crust without that characteristic pizza texture. Patience is essential here.
Overworking the Dough: Once your dough comes together, resist the urge to keep kneading. Overworked dough becomes tough and chewy rather than light and airy.
Rolling Too Thin: Heart shapes are prone to tearing if rolled too thin, especially at the point. Aim for ¼-inch thickness for structural integrity.
Sauce Overload: More sauce doesn’t mean more flavor—it means soggy pizza. Use a light hand and spread thinly.
Forgetting to Preheat: Putting pizza into a cold or insufficiently heated oven results in pale, soft crust instead of crispy, golden perfection.
Cutting Immediately: Slicing right out of the oven causes all the cheese and toppings to slide off. That 2-3 minute rest is crucial.
Using Low-Quality Cheese: Pre-shredded cheese contains anti-caking agents that prevent proper melting. Shred your own mozzarella from a block for superior results.

Storage and Serving Suggestions
Immediate Serving: Heart Pizza is best enjoyed fresh from the oven when the crust is at peak crispiness and the cheese is perfectly melted and gooey.
Storing Leftovers: Allow pizza to cool completely, then store slices in an airtight container with parchment paper between layers. Refrigerate for up to 3 days.
Reheating for Best Results:
- Oven method: Preheat to 375°F (190°C), place pizza directly on the oven rack, and bake for 8-10 minutes until cheese bubbles
- Skillet method: Heat a non-stick skillet over medium heat, add pizza slice, cover with a lid, and heat for 2-3 minutes until bottom crisps and cheese melts
- Air fryer: 350°F (175°C) for 3-4 minutes for incredibly crispy reheated pizza
- Avoid microwaving—it makes the crust rubbery and soggy
Freezing Options:
- Unbaked dough: After shaping into a heart, wrap tightly in plastic wrap and freeze for up to 3 months. Thaw overnight in refrigerator before topping and baking
- Baked pizza: Cool completely, wrap individual slices in plastic wrap, then aluminum foil, and freeze for up to 2 months. Reheat directly from frozen in a 400°F (200°C) oven for 12-15 minutes
Make-Ahead Strategy:
- Dough: Make up to 2 days ahead and refrigerate in an oiled bowl. Bring to room temperature before shaping
- Sauce: Prepare up to 5 days ahead and refrigerate, or freeze for up to 3 months
- Toppings: Prep and store in separate containers the morning of, making assembly quick and easy
Serving Suggestions:
- Pair with a simple arugula salad dressed with lemon vinaigrette
- Serve with red wine (Chianti or Sangiovese) or sparkling rosé
- Add garlic knots or breadsticks for a complete Italian feast
- Finish with a light dessert like tiramisu or panna cotta
- Create an antipasto platter while the pizza bakes
- Light candles and set a romantic table for the full experience
- Cut into smaller heart-shaped portions for appetizer servings
Presentation Ideas:
- Serve on a wooden pizza board with fresh herbs as garnish
- Place tea lights around the serving area for ambiance
- Write a message with balsamic glaze on the plate before placing the slice
- Use heart-shaped plates to continue the theme
- Garnish the serving platter with rose petals (pesticide-free, food-safe only)

Frequently Asked Questions (FAQ)
Q: Can I use store-bought pizza dough for Heart Pizza? A: Absolutely! Store-bought dough is a fantastic time-saver and still delivers delicious results. Look for fresh dough from your grocery store’s bakery or refrigerated section rather than the frozen tubes. Let it come to room temperature for 30 minutes before shaping—this makes it much easier to work with and prevents tearing. The shaping technique remains the same regardless of whether your dough is homemade or store-bought.
Q: How do I prevent my Heart Pizza from losing its shape in the oven? A: Shape retention comes down to three key factors: proper gluten development (adequate kneading), adequate resting time after shaping (10-15 minutes), and not stretching the dough too thin. If your dough keeps shrinking back when you shape it, let it rest for 5 more minutes—the gluten needs time to relax. Also, make sure your oven is fully preheated before baking, as gradual heating can cause dough to spread rather than rise.
Q: What’s the best cheese combination for Heart Pizza? A: The classic combination of mozzarella (for melt and stretch) and Parmesan (for sharp flavor) works beautifully. For upgraded flavor, try a blend of whole milk mozzarella, fontina (adds creaminess), and Pecorino Romano (sharper than Parmesan). Fresh mozzarella creates a different texture—wetter and creamier—so if using it, slice thinly and pat dry before adding to prevent sogginess.
Q: Can I make Heart Pizza on the grill? A: Yes, and it’s fantastic! Preheat your grill to high (500°F/260°C). Shape your heart on a piece of oiled parchment, then carefully flip onto the grill grates (remove parchment). Grill for 2-3 minutes until bottom has grill marks, then flip, quickly add toppings, close the lid, and cook for another 3-5 minutes. The result is a beautifully charred, smoky crust perfect for summer date nights.
Q: How can I make Heart Pizza healthier? A: Several modifications maintain great taste while reducing calories: use whole wheat flour for half the all-purpose flour, load up on vegetable toppings while reducing cheese by 25%, make a white sauce with Greek yogurt instead of cream, choose turkey pepperoni over regular, opt for part-skim mozzarella, or try cauliflower crust as a lower-carb alternative. Adding extra vegetables also increases nutrition while adding minimal calories.
Q: My pizza crust is always too thick and doughy. What am I doing wrong? A: This typically indicates either not rolling thin enough or insufficient baking time/temperature. Roll your dough to a consistent ¼-inch thickness, checking with your fingers as you go. Make sure your oven is fully preheated to at least 475°F (245°C)—use an oven thermometer to verify. Also, don’t overload with toppings, as excess weight prevents proper crust cooking. Try the par-bake method mentioned in the pro tips for guaranteed crispy results.
Q: Can I make mini Heart Pizzas instead of one large one? A: Definitely! Divide your dough into 4-6 portions and shape each into small hearts. These personal-sized pizzas are perfect for families, kids’ activities, or a pizza party. Bake at the same temperature for 8-10 minutes since they’re smaller. Mini heart pizzas also make adorable gifts—bake, cool, wrap in cellophane with a ribbon, and deliver to friends and family.
Q: What if I don’t have a pizza stone? A: No problem—a heavy baking sheet works well. For best results, preheat the baking sheet in the oven, then carefully transfer your topped pizza onto it using parchment paper. The hot surface mimics a pizza stone’s heat distribution. Alternatively, bake directly on parchment-lined baking sheets (no preheating required), though the bottom won’t be quite as crispy.
Final Thoughts: Why Heart Pizza Is More Than Just Dinner
Heart Pizza represents something deeper than simply reshaping dough—it’s about taking the time to make something special, transforming an ordinary weeknight into a memorable occasion. In our fast-paced world where convenience often trumps thoughtfulness, creating a homemade Heart Pizza shows genuine care and effort. The act of making pizza from scratch, carefully shaping it with love, and customizing it to someone’s preferences speaks volumes.
The versatility of this recipe means it fits countless occasions beyond Valentine’s Day. Celebrate a promotion, anniversary, “just because” day, or even a Galentine’s gathering with friends. Heart Pizza works equally well as a fun family activity where kids can help shape and top their own mini versions, creating lasting memories along with delicious food.
What makes this recipe truly special is its accessibility. You don’t need professional equipment, expensive ingredients, or culinary school training. With basic pantry staples and a willingness to try something new, anyone can create restaurant-quality Heart Pizza at home. The techniques you’ll learn—working with yeast, shaping dough, balancing toppings—translate to countless other recipes, expanding your cooking confidence.
Don’t stress about achieving perfection on your first attempt. A slightly misshapen heart still tastes incredible, and honestly, those imperfections add charm and authenticity. The flour on your hands, the laughter while shaping the dough, the anticipation while it bakes—these moments matter more than flawless geometry.
Consider making Heart Pizza a tradition. Maybe it becomes your Valentine’s Day ritual, your monthly date night staple, or your way of celebrating relationship milestones. Traditions built around food create powerful memories and give you something to look forward to together.
The beauty of pizza is its endless customization potential. Once you’ve mastered this basic Heart Pizza, experiment with different flavor profiles: try a white pizza with ricotta and spinach, create a breakfast version with eggs and bacon, go Mediterranean with feta and olives, or embrace BBQ chicken pizza with red onions and cilantro. Each variation keeps the concept fresh while maintaining that romantic heart shape.
Remember that cooking together strengthens relationships. Divide the tasks—one person kneads while the other preps toppings, someone shapes while someone else grates cheese. The teamwork, conversation, and shared accomplishment create connection beyond the meal itself. Even if you’re cooking for someone rather than with them, the care you pour into each step translates into love they can taste.
So gather your ingredients, preheat that oven, and prepare to create some magic. Whether this becomes your signature romantic gesture or sparks a new passion for homemade pizza, you’re about to discover that the best meals come straight from the heart—in this case, quite literally!
Happy cooking, and may your Heart Pizza be filled with as much love as the moments you share while making it. Don’t forget to take photos of your creation before diving in—these memories are worth preserving! Now get in that kitchen and start spreading some delicious love, one heart-shaped slice at a time.
Print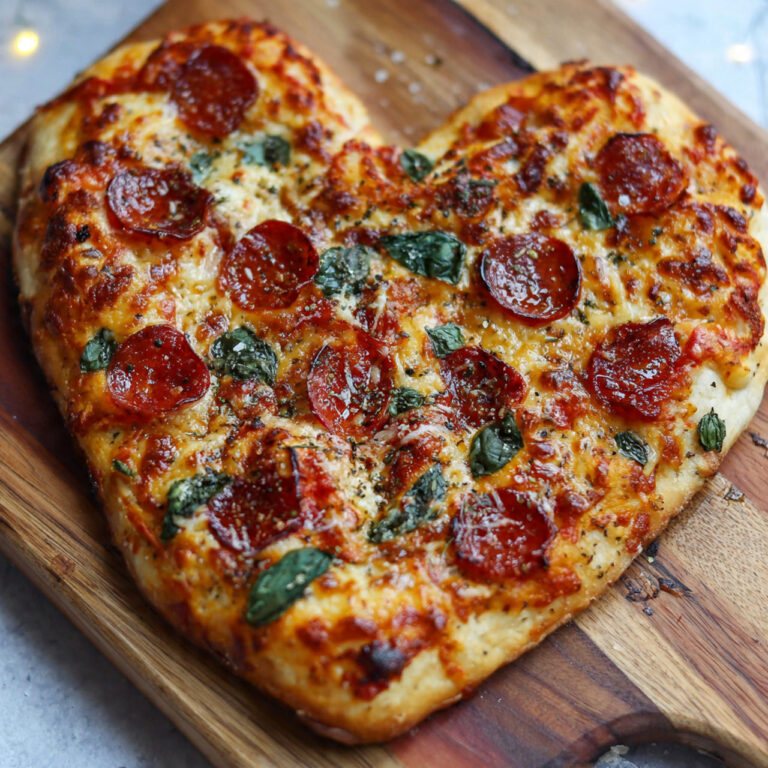
Heart Pizza: 7 Secrets to Making the Ultimate Romantic Dinner (2026)
Heart Pizza transforms traditional pizza into a romantic, heart-shaped masterpiece perfect for Valentine’s Day, anniversaries, or date nights. Features homemade dough, flavorful sauce, melted cheese, and customizable toppings arranged in an adorable heart shape.
- Total Time: 35 minutes
- Yield: 1 large heart pizza (serves 2-4 people)
Ingredients
- Pizza dough: yeast, warm water, sugar, flour, olive oil, salt, Italian seasoning
- Pizza sauce: crushed tomatoes, garlic, olive oil, oregano, basil, sugar, salt, pepper
- Toppings: mozzarella, Parmesan, pepperoni, fresh basil, vegetables, choice of proteins
- Finishing: olive oil, fresh herbs, optional balsamic glaze
Instructions
Activate yeast and prepare pizza dough, knead and let rise until doubled. Make pizza sauce and simmer to develop flavors. Roll dough into circle, shape into heart form, transfer to baking sheet. Spread sauce, add cheese and toppings in creative arrangements. Bake at 475°F for 12-15 minutes until golden and bubbly. Add fresh toppings after baking and serve immediately.
Notes
Dough can be made 2 days ahead and refrigerated. Store-bought dough works as a time-saving alternative. Don’t overload with toppings to prevent sogginess. Let pizza rest 2-3 minutes before slicing. Par-bake the crust for extra crispiness if desired.
- Prep Time: 20 minutes
- Cook Time: 25 minutes
- Category: Main Dishes
- Method: Baking
- Cuisine: Italian-American
- Diet: Vegetarian