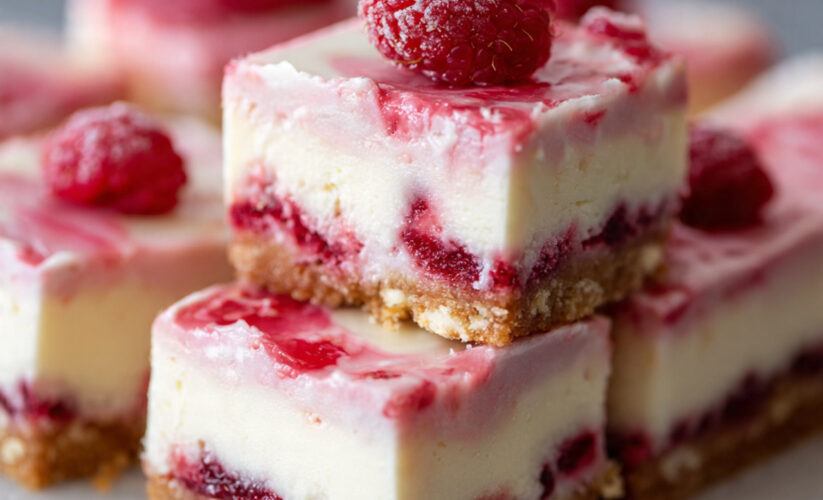
No-Bake Raspberry Cheesecake Bars (5 Ingredients, Ready in 20 Minutes!)
Your New Favorite No-Bake Dessert
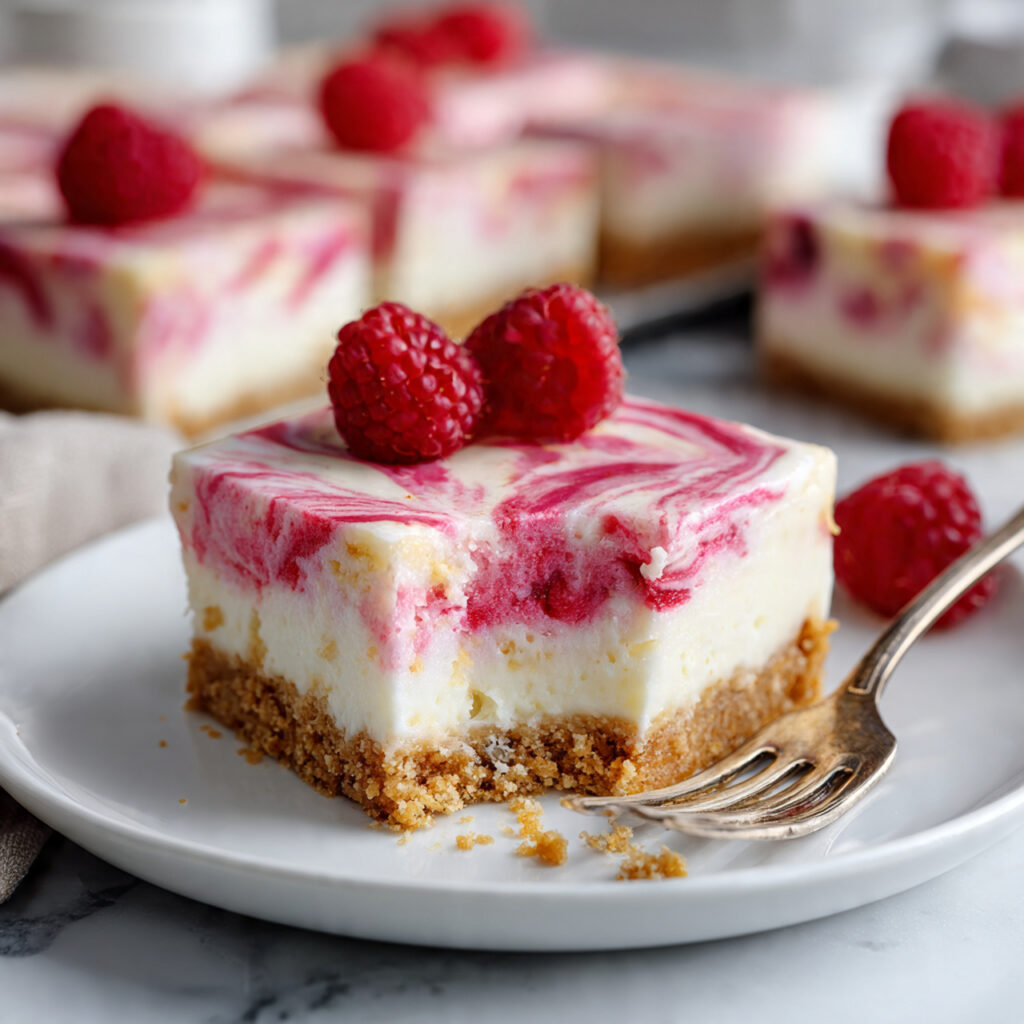
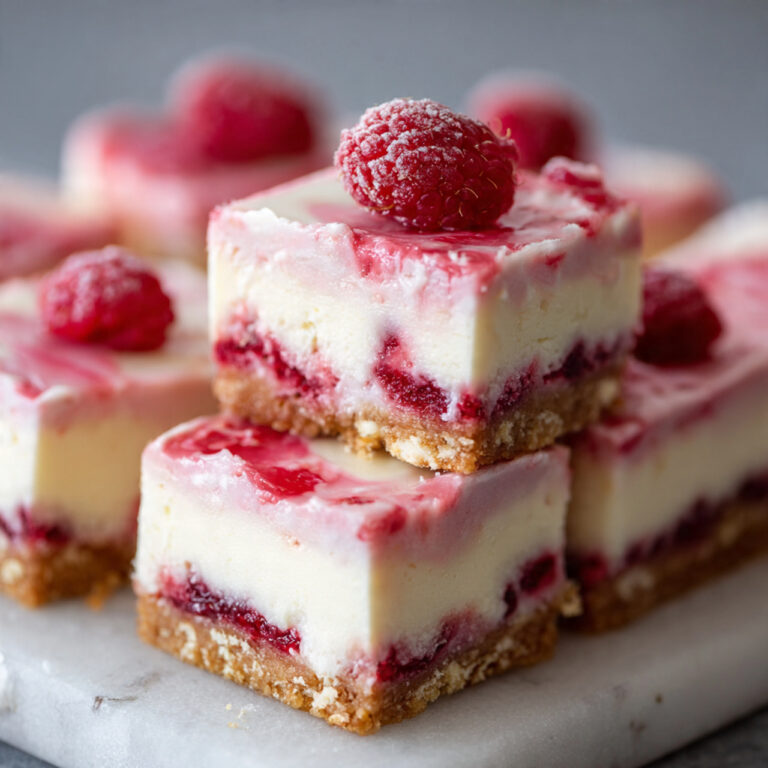
No-Bake Raspberry Cheesecake Bars are the answer to every dessert lover’s prayer when the weather is too hot to turn on the oven or when you need an impressive treat without the stress of baking. These luscious bars combine a buttery graham cracker crust, silky cream cheese filling, and vibrant raspberry topping that delivers both stunning visual appeal and an explosion of fresh fruit flavor in every bite.
What makes these bars absolutely irresistible is their perfect balance of textures and tastes. The crisp, slightly salty crust provides the ideal foundation for the rich, tangy cream cheese layer, while the sweet-tart raspberry swirl cuts through the richness with bright, fruity notes. Each forkful offers that magical combination that keeps you reaching for just one more piece—until suddenly the entire pan has disappeared.
The genius of No-Bake Raspberry Cheesecake Bars lies in their simplicity. Unlike traditional cheesecakes that require careful water baths, precise oven temperatures, and anxious waiting to see if cracks will appear, these bars come together with minimal equipment and foolproof techniques. There’s no stand mixer necessary, no worrying about overbaking, and no complex steps that leave you second-guessing yourself. If you can stir ingredients together and spread them in a pan, you can make these spectacular bars.
Perfect for summer gatherings, potlucks, last-minute dinner parties, or simply treating yourself on a Tuesday afternoon, these raspberry cheesecake bars deliver bakery-quality results with a fraction of the effort. They’re elegant enough for special occasions yet simple enough for everyday indulgence. The vibrant pink swirls make them naturally beautiful without any fancy decorating skills required—Mother Nature did the hard work for you.
Whether you’re an experienced baker looking for a low-stress dessert option or a complete beginner wanting to impress friends and family, No-Bake Raspberry Cheesecake Bars are about to become your secret weapon. Let’s explore how to create these crowd-pleasing treats that taste like you spent hours in the kitchen when really, you barely broke a sweat.
Why No-Bake Raspberry Cheesecake Bars Work Every Time
The beauty of this recipe is rooted in smart ingredient choices and simple chemistry. Cream cheese provides the structure and richness associated with traditional cheesecake, while whipped cream folded into the mixture creates that light, mousse-like texture that melts on your tongue. The combination sets up beautifully in the refrigerator without requiring eggs or baking, thanks to the stabilizing power of the cream cheese and the air incorporated through whipping.
Raspberries are the perfect fruit partner for cheesecake. Their natural tartness balances the richness of cream cheese better than almost any other fruit, and their gorgeous color creates visual drama without artificial dyes. Whether you use fresh or frozen raspberries, their flavor shines through brilliantly—in fact, frozen raspberries often have more intense flavor since they’re picked at peak ripeness.
The graham cracker crust is the unsung hero here. Mixing crushed graham crackers with melted butter and a touch of sugar creates a base that firms up in the refrigerator, providing structural support while adding that essential crunch that contrasts beautifully with the creamy filling. It’s sturdy enough to hold the bars together when cut, yet tender enough to cut cleanly with a fork.
Essential Ingredients for Perfect No-Bake Raspberry Cheesecake Bars
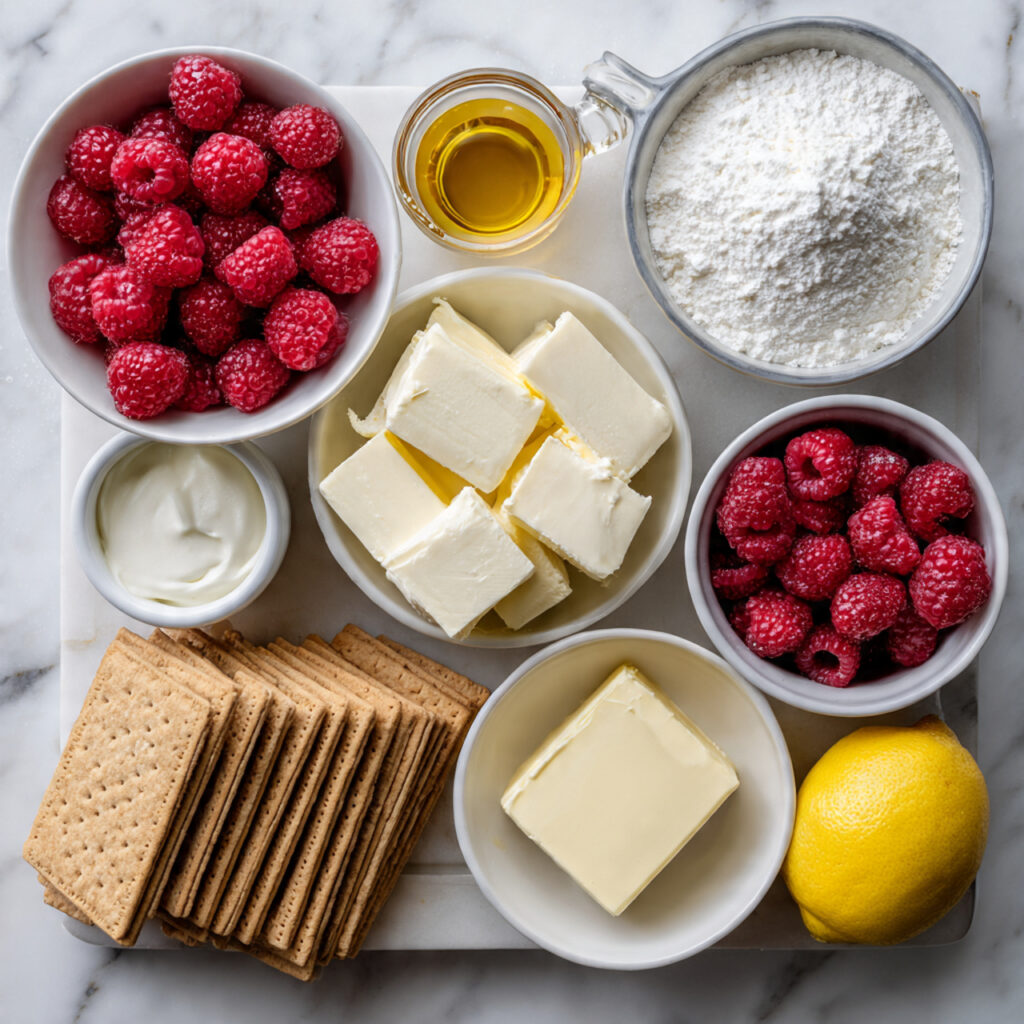
The ingredient list is refreshingly short, but quality matters here since each component plays a starring role:
For the Graham Cracker Crust:
- 2 cups graham cracker crumbs (about 15 full graham cracker sheets): Use regular honey graham crackers for classic flavor
- 6 tablespoons unsalted butter, melted: Binds the crumbs together and adds richness
- 3 tablespoons granulated sugar: Sweetens the crust and helps it hold together
- Pinch of salt: Enhances flavor and balances sweetness
For the Cream Cheese Filling:
- 16 ounces cream cheese (two 8-ounce blocks): Full-fat only—don’t even think about low-fat, softened to room temperature
- 1 cup powdered sugar: Dissolves smoothly without graininess, also called confectioners’ sugar
- 2 teaspoons vanilla extract: Pure vanilla is worth it here for best flavor
- 1½ cups heavy whipping cream: Must be cold for proper whipping
- Pinch of salt: Brings out the sweetness and cream cheese tang
For the Raspberry Swirl:
- 2 cups fresh or frozen raspberries: If using frozen, no need to thaw
- ¼ cup granulated sugar: Adjust based on berry sweetness
- 1 tablespoon lemon juice: Brightens the raspberry flavor and helps with texture
- 1 tablespoon cornstarch: Thickens the sauce to perfect swirling consistency
Optional Garnishes:
- Fresh raspberries: For topping each bar
- Mint leaves: Adds a pop of color and freshness
- White chocolate shavings: For elegant presentation
- Whipped cream: Extra dollop on each serving
- Lemon zest: Subtle citrus accent
Step-by-Step Instructions: Creating Your Masterpiece
Step 1: Prepare Your Pan (2 Minutes)
Line a 9×13-inch baking pan with parchment paper, leaving an overhang on two opposite sides. This overhang creates “handles” that make lifting the entire set of bars out of the pan effortless once they’re chilled. You can also use an 8×8 or 9×9-inch pan for thicker bars—just adjust your expectations for yield.
Alternatively, you can spray the pan with non-stick cooking spray, but the parchment paper method gives you cleaner cuts and easier removal. Don’t skip this step unless you enjoy wrestling dessert out of a pan!
Step 2: Make the Graham Cracker Crust (5 Minutes)
If you’re starting with whole graham crackers, place them in a food processor and pulse until you have fine, even crumbs. No food processor? No problem. Place the crackers in a large zip-top bag, seal it, and crush them with a rolling pin or the bottom of a measuring cup. You want uniform crumbs without large chunks for the best texture.
In a medium bowl, combine the graham cracker crumbs, melted butter, sugar, and a pinch of salt. Stir with a fork until the mixture resembles wet sand and holds together when pressed. Every crumb should be moistened by the butter—dry spots will create a crumbly crust that falls apart.
Pour the mixture into your prepared pan and press it firmly into an even layer across the entire bottom. Use the bottom of a measuring cup or drinking glass to really pack it down, paying special attention to the corners and edges. A well-compacted crust is the difference between bars that hold together beautifully and ones that crumble when cut.
Place the pan in the refrigerator while you prepare the filling. This gives the butter time to solidify, creating a firmer base.
Step 3: Prepare the Raspberry Swirl (10 Minutes)
In a small saucepan, combine the raspberries, sugar, lemon juice, and cornstarch. Stir to combine, then place over medium heat. Cook, stirring frequently and gently mashing the berries with your spoon as they soften. The mixture will begin to bubble and thicken as the cornstarch activates.
Continue cooking for about 5-7 minutes until the sauce has thickened to a jam-like consistency. It should coat the back of your spoon and not run off immediately. Remember that it will thicken more as it cools, so don’t overdo it.
Remove from heat and let the raspberry sauce cool to room temperature. If you’re impatient, you can place the saucepan in a bowl of ice water to speed things up, stirring occasionally. For the smoothest swirl, you can strain the sauce through a fine-mesh sieve to remove the seeds, but this is entirely optional—many people love the rustic texture that seeds provide.
Step 4: Make the Cream Cheese Filling (10 Minutes)
In a large bowl, beat the softened cream cheese with an electric mixer on medium speed until it’s completely smooth and fluffy, about 2 minutes. Make sure there are absolutely no lumps—scrape down the sides of the bowl as needed. Lumpy cream cheese will create an unpleasant texture in your finished bars.
Add the powdered sugar, vanilla extract, and a pinch of salt. Beat on low speed at first to prevent a sugar cloud, then increase to medium-high and beat until completely smooth and well combined, about 1-2 minutes.
In a separate bowl (make sure it’s very clean and dry), pour the cold heavy whipping cream. Using clean beaters, whip the cream on high speed until stiff peaks form, about 3-4 minutes. You’ll know you’ve reached stiff peaks when you lift the beaters and the cream stands straight up without drooping.
Here comes the crucial step: gently fold the whipped cream into the cream cheese mixture using a large spatula. Use a folding motion—cut down through the center, scrape along the bottom, and bring the mixture up and over. Rotate the bowl and repeat until no white streaks remain. The key word is “gently”—you want to maintain all that air you whipped into the cream. Overmixing will deflate the cream and result in a denser filling.
Step 5: Assemble the Bars (5 Minutes)
Remove your crust from the refrigerator. Pour the cream cheese filling over the crust and spread it into an even layer with an offset spatula or the back of a spoon. Make sure you reach all the way to the edges and smooth the top as much as possible.
Now for the fun part—creating the raspberry swirl. Dollop spoonfuls of the cooled raspberry sauce randomly across the top of the cream cheese filling. You can create as many or as few dollops as you like, depending on how much raspberry flavor you want in each bite.
Using a butter knife, toothpick, or wooden skewer, swirl the raspberry sauce through the cream cheese filling by dragging it in figure-eight patterns, swirls, or zigzags. Don’t over-swirl or the colors will muddy together—you want distinct ribbons of pink against the white. A few strategic swirls create the most beautiful marbled effect.
Step 6: Chill and Set (4+ Hours)
Cover the pan with plastic wrap or aluminum foil and transfer to the refrigerator. The bars need to chill for at least 4 hours, but overnight is even better. During this time, the cream cheese filling will firm up to the perfect sliceable consistency, and all the flavors will meld together beautifully.
If you’re really in a rush, you can pop them in the freezer for 2 hours, but refrigeration gives better texture. Resist the temptation to check them every hour—they need uninterrupted cold time to set properly.
Step 7: Cut and Serve
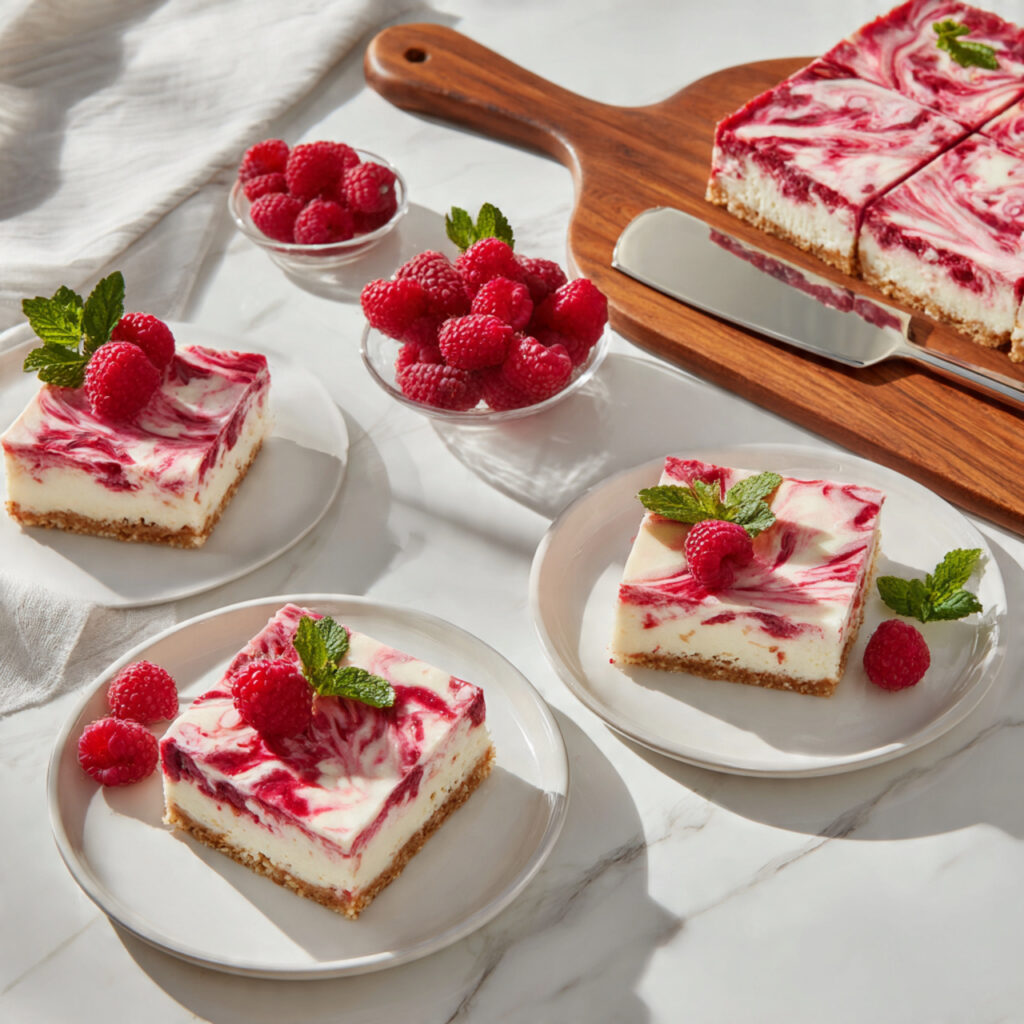
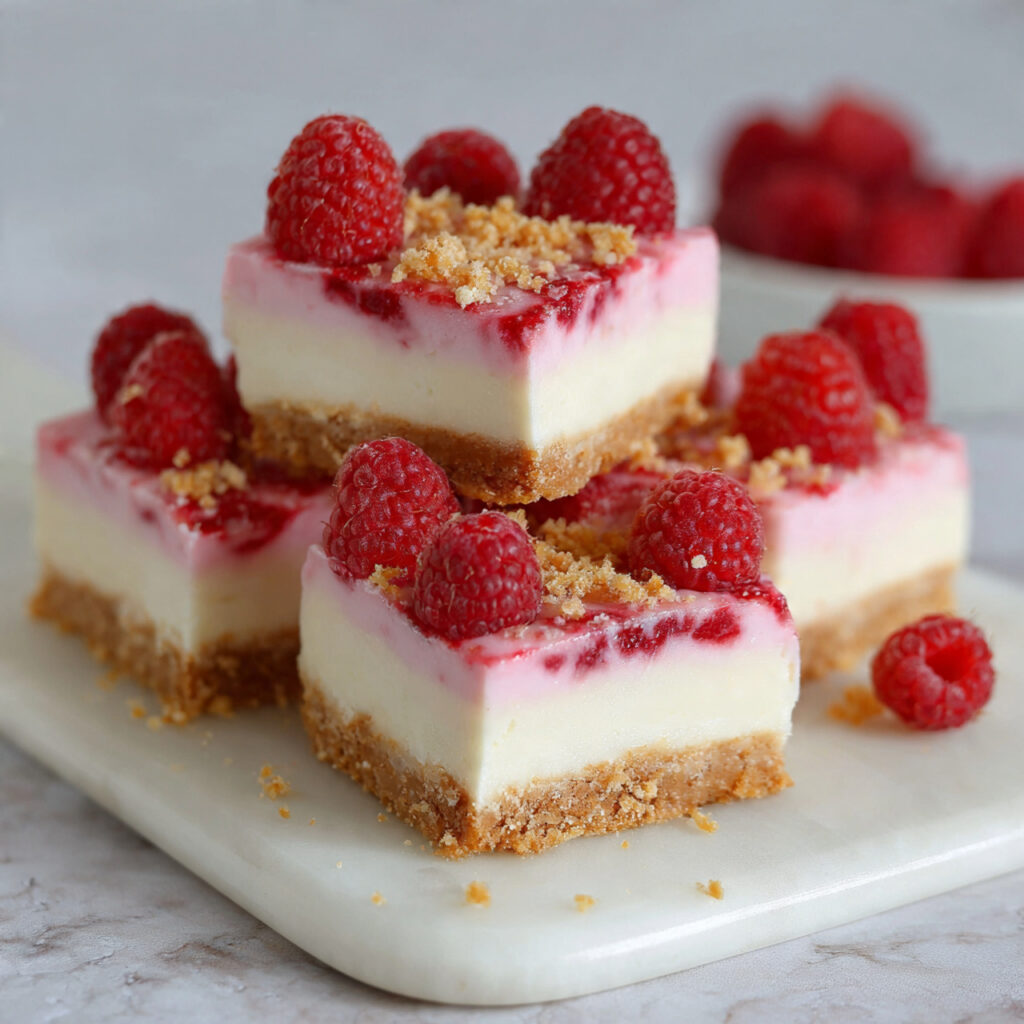
Once the bars are completely set, use the parchment paper overhang to lift the entire dessert out of the pan and onto a cutting board. For the cleanest cuts, use a large, sharp knife dipped in hot water and wiped clean between each cut. This hot knife technique slices through the cream cheese filling like butter and prevents dragging.
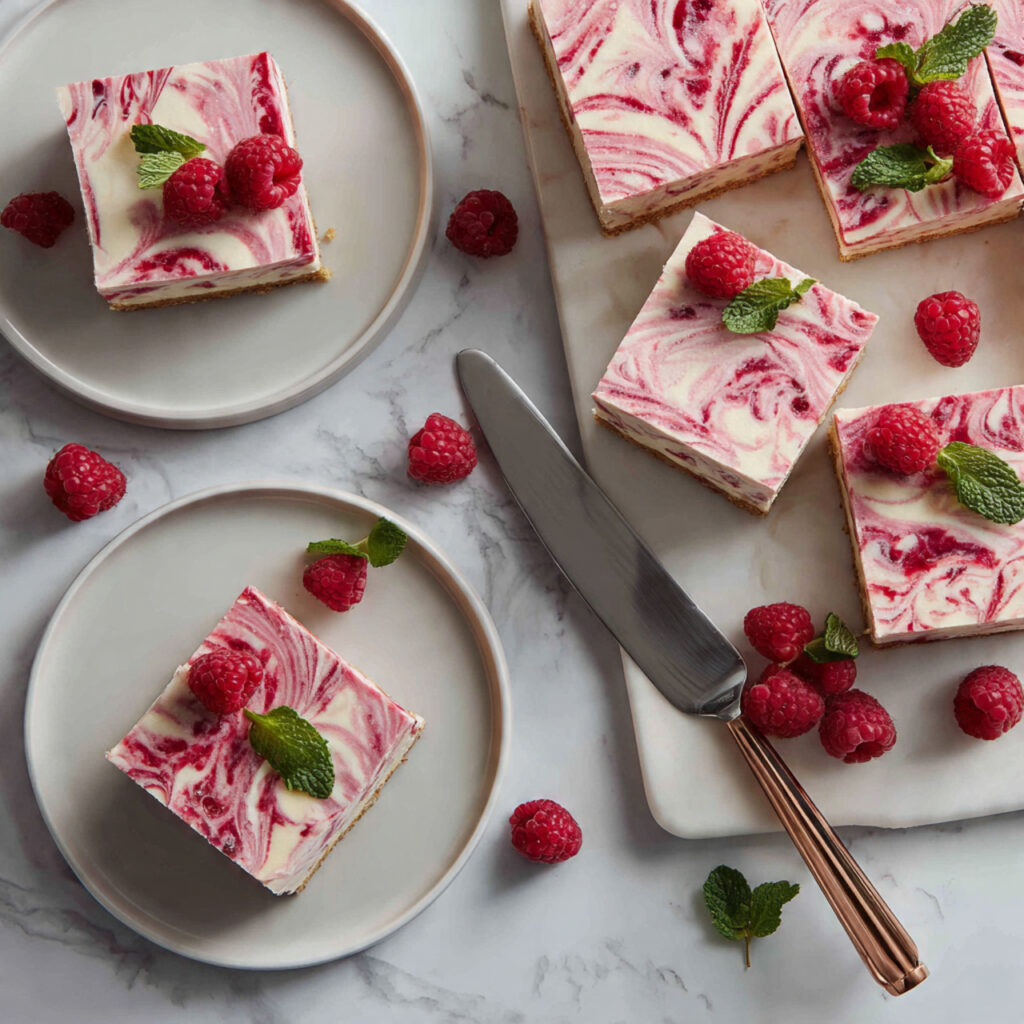
Cut into 12-16 bars, depending on your preferred size. Wipe the knife clean and re-warm it between each cut for professional-looking edges. Garnish each bar with a fresh raspberry and a tiny mint leaf if desired, and serve immediately.
Pro Tips for Perfect No-Bake Raspberry Cheesecake Bars
Soften That Cream Cheese Properly: Room temperature cream cheese is non-negotiable for a smooth filling. Take it out of the fridge 1-2 hours before you start. Properly softened cream cheese should feel soft when pressed but still hold its shape. In a pinch, you can soften it in the microwave in 10-second bursts, but be careful not to melt it.
Don’t Skip the Whipping Cream Step: The whipped cream is what gives these bars their light, mousse-like texture that sets them apart from dense, traditional cheesecake. Make sure your cream is very cold and your bowl and beaters are clean and dry—any fat or warm temperature will prevent proper whipping.
Fold, Don’t Stir: When combining the whipped cream with the cream cheese mixture, always fold gently. Vigorous stirring deflates all those beautiful air bubbles you just created, resulting in a heavy, dense filling instead of light and airy.
Raspberry Sauce Consistency Matters: Your raspberry sauce should be thick enough to sit on top of the filling without immediately sinking in, but thin enough to swirl easily. If it’s too thick, add a teaspoon of water. Too thin? Cook it a bit longer or add a touch more cornstarch mixed with cold water.
The Hot Knife Trick: This professional technique makes all the difference. Dip your knife in hot water, wipe it completely dry, then make your cut. Clean the knife and repeat for each cut. The warmth helps the knife glide through the cream cheese without dragging.
Freeze for Longer Storage: These bars freeze beautifully for up to 3 months. Cut them into individual portions, wrap each one in plastic wrap, then place in a freezer bag. Thaw in the refrigerator for a few hours before serving.
Make It Your Own: Once you’ve mastered the basic recipe, experiment with variations. Try blueberry, strawberry, or mixed berry swirls. Add lemon zest to the filling for lemon-raspberry bars. Mix crushed Oreos into the crust for cookies-and-cream raspberry bars.
Presentation Counts: For extra elegance, pipe small rosettes of whipped cream on each bar before serving, or dust with powdered sugar. A drizzle of melted white chocolate creates bakery-worthy presentation.
Common Mistakes to Avoid (And How to Fix Them)
Mistake #1: Runny, Soupy Filling That Won’t Set This happens when the whipped cream wasn’t whipped to stiff peaks before folding, or when you overmixed and deflated the cream. Make sure your cream is very cold and whip it until it stands straight up. If your filling seems too soft after mixing, you can chill the bowl for 30 minutes and re-whip gently before spreading on the crust.
Mistake #2: Lumpy Cream Cheese Filling Cold or insufficiently beaten cream cheese creates lumps that won’t smooth out once you add the whipped cream. Always start with room temperature cream cheese and beat it thoroughly until completely smooth before adding any other ingredients. If you discover lumps after everything’s mixed, you can’t really fix it without deflating the cream.
Mistake #3: Crumbly Crust That Falls Apart Not enough butter or not packing the crust firmly enough causes this issue. The mixture should stick together when pressed. If your crust seems dry, add another tablespoon of melted butter. Use real pressure when packing it down—you can’t press too hard.
Mistake #4: Muddy, Brown Swirl Instead of Pretty Pink Ribbons Over-swirling mixes the colors together into an unappetizing brown. Less is more when creating swirls—just a few strategic drags through the filling creates the best marbled effect. Think 5-8 swirls total, not 50.
Mistake #5: Bars That Stick to the Pan Skipping the parchment paper makes removal nearly impossible and ruins your beautiful bars. Always line your pan with parchment paper with overhangs on two sides. This investment of 30 seconds saves massive frustration later.
Mistake #6: Watery Raspberry Layer If your raspberry sauce wasn’t cooked long enough or didn’t have enough cornstarch, it will be too thin and sink into the filling or create a watery layer. The sauce should be thick and jam-like. If you realize it’s too thin after it’s already on the bars, just embrace it—it will still taste delicious, even if the presentation isn’t perfect.
Mistake #7: Dense, Heavy Texture Instead of Light and Creamy This results from using low-fat cream cheese, not whipping the cream properly, or overmixing when folding. Always use full-fat cream cheese, whip your cream to stiff peaks, and fold gently. The air is what creates that dreamy, mousse-like texture.
Storage and Serving Suggestions: Keeping Your Bars Perfect
How to Store No-Bake Raspberry Cheesecake Bars
Refrigerator Storage (5-7 days): These bars keep beautifully in the refrigerator. Cover the pan tightly with plastic wrap or aluminum foil, or transfer cut bars to an airtight container with parchment paper between layers to prevent sticking. The bars actually taste even better after a day or two as the flavors meld together.
Freezer Storage (up to 3 months): No-Bake Raspberry Cheesecake Bars are freezer-friendly! Cut into individual bars, wrap each one tightly in plastic wrap, then place in a freezer-safe container or zip-top bag. Label with the date. To serve, thaw in the refrigerator for 2-3 hours or at room temperature for 30-45 minutes. The texture remains remarkably creamy even after freezing.
Counter Storage: Because these bars contain cream cheese and whipped cream, never leave them at room temperature for more than 2 hours. They need to stay cold to maintain food safety and proper texture.
Serving Suggestions That Elevate Your No-Bake Raspberry Cheesecake Bars
Classic Presentation: Serve chilled on a white plate with a fresh raspberry and small mint sprig garnish. Simple and elegant.
Whipped Cream Dollop: Top each bar with a rosette of fresh whipped cream piped through a star tip. It’s classic for a reason.
Berry Medley: Serve alongside or topped with a mix of fresh raspberries, blackberries, and blueberries for a beautiful berry medley effect.
Chocolate Drizzle: Melt white or dark chocolate and drizzle it artistically over each bar for a professional bakery look.
Lemon Twist: Add a thin slice of lemon wheel or a small curl of lemon zest on top for a bright citrus accent.
Dessert Board: Arrange the bars on a large platter or board with fresh berries, mint sprigs, and small bowls of whipped cream for a help-yourself dessert display.
With Coffee or Tea: These bars pair beautifully with hot coffee, iced tea, or champagne for an elegant afternoon treat.
Ice Cream Pairing: Serve with a small scoop of vanilla bean ice cream or raspberry sorbet alongside for temperature and texture contrast.
Perfect Occasions for These Bars
These versatile treats shine at:
- Summer BBQs and picnics: No melting, no oven needed
- Baby and bridal showers: Pretty pink color is perfect
- Mother’s Day or Easter: Elegant and festive
- Pool parties: Refreshing and easy to grab
- Potlucks: Travels well and serves a crowd
- Birthday celebrations: Alternative to cake
- Afternoon tea parties: Refined and delicious
- Valentine’s Day: Romantic pink presentation
Frequently Asked Questions About No-Bake Raspberry Cheesecake Bars
Q: Can I use frozen raspberries instead of fresh?
A: Absolutely! Frozen raspberries actually work beautifully in the sauce portion of this recipe since they’re picked at peak ripeness. You don’t even need to thaw them before cooking—just add them frozen to the saucepan and they’ll release their juices as they heat. The cooking time may be 1-2 minutes longer. For garnishing the tops of the bars, fresh raspberries look prettier, but you can certainly use thawed frozen berries in a pinch.
Q: How long do these bars need to set in the refrigerator?
A: For best results, refrigerate for at least 4 hours, but overnight (8-12 hours) is ideal. The filling needs time to firm up to proper slicing consistency. If you’re really in a hurry, you can put them in the freezer for 2 hours, but refrigeration gives better texture. Don’t try to cut them before they’re fully set or they’ll be messy and won’t hold their shape.
Q: Can I make these bars with a different fruit?
A: Yes! This recipe is incredibly versatile. Strawberries, blueberries, blackberries, or mixed berries all work wonderfully. You can also try cherry pie filling for a quick variation, or make a lemon curd swirl for lemon cheesecake bars. Just follow the same cooking process to create a thick sauce that will swirl nicely without sinking into the filling.
Q: Why is my filling too soft and not setting up?
A: The most common reasons are: not whipping the cream to stiff peaks, using low-fat cream cheese instead of full-fat, or deflating the mixture by overmixing. Make sure you whip the cream until it stands straight up when you lift the beaters, use full-fat cream cheese, and fold gently when combining. If your filling still seems soft after the recommended chill time, give it a few more hours—patience pays off.
Q: Can I use Cool Whip instead of whipped cream?
A: While homemade whipped cream tastes significantly better, you can substitute 2 cups of thawed Cool Whip (or similar whipped topping) for the whipped cream in a pinch. Skip the whipping step and just fold the Cool Whip into the cream cheese mixture. The texture will be slightly different—a bit more stable but less fresh-tasting. For best results, stick with real whipped cream.
Q: Do I have to use parchment paper?
A: While not technically required, parchment paper makes removing the bars from the pan infinitely easier and gives you cleaner cuts. Without it, you’ll need to serve the bars directly from the pan, which is fine but less elegant. If you don’t have parchment paper, you can use aluminum foil sprayed with non-stick spray, but parchment is really worth keeping on hand for recipes like this.
Q: Can I make these bars in advance?
A: Yes! These are actually perfect make-ahead desserts. You can prepare them up to 3 days before serving—they actually taste better after sitting for a day as the flavors develop. Just keep them covered in the refrigerator. You can also freeze them for up to 3 months. For parties, I recommend making them the day before so you can focus on other preparations the day of.
Q: What if I don’t have a 9×13-inch pan?
A: You can definitely adjust the pan size! An 8×8 or 9×9-inch pan will give you thicker bars (increase chill time to 5-6 hours). Two 8-inch round pans create circular portions perfect for cutting into wedges. A 9-inch springform pan makes one impressive round cheesecake you can slice. Just adjust your expectations for thickness and number of servings accordingly.
Final Thoughts: Why No-Bake Raspberry Cheesecake Bars Deserve a Permanent Spot in Your Recipe Box
No-Bake Raspberry Cheesecake Bars represent everything wonderful about easy, stress-free dessert making. They prove that impressive doesn’t have to mean complicated, and that stunning presentation can come from simple techniques. In a world where we’re all juggling too many responsibilities and not enough hours in the day, having a go-to dessert that requires no oven, minimal dishes, and basic ingredients feels like a small miracle.
The versatility of this recipe is truly its superpower. Need a elegant dessert for a special occasion? These bars deliver with their beautiful pink swirls and creamy texture. Want something simple for a weeknight treat? The same recipe works perfectly. Feeding a crowd at a potluck? These bars travel beautifully and serve many. Looking for make-ahead convenience? They actually improve with time in the refrigerator.
What I love most about No-Bake Raspberry Cheesecake Bars is how they make everyone feel like a successful baker, regardless of skill level. There’s no anxiety about whether a cheesecake will crack, no worrying if your oven temperature is accurate, no holding your breath as you remove a delicate dessert from a water bath. You simply mix, spread, swirl, and chill. The hardest part is waiting for them to set—and even that is made easier knowing you can make them the day before.
The flavor combination of tangy cream cheese and bright, sweet-tart raspberries is timeless. It’s sophisticated enough for adults who appreciate complex flavors, yet familiar and fruity enough that children enjoy it too. The creamy, mousse-like texture melts on your tongue, while the graham cracker crust provides just enough crunch to keep things interesting. Each bite is balanced, refreshing, and utterly satisfying.
As you make this recipe, don’t be afraid to put your own spin on it once you’ve mastered the basics. Try different crusts—Oreo, vanilla wafer, or gingersnap all work beautifully. Experiment with fruit combinations or add citrus zest to the filling. Make mini versions in a muffin tin for perfect portion control. The fundamental technique is so solid that it welcomes creativity.
One final thought: these bars have a way of making people happy. There’s something about that first bite—the creamy filling, the burst of raspberry, the satisfying crunch of crust—that brings smiles. In a time when we could all use a little more joy, being able to create that with five ingredients and 20 minutes of work feels like a genuine gift.
So grab your cream cheese, fire up your mixer, and get ready to fall in love with the easiest, most delicious cheesecake bars you’ll ever make. Your refrigerator is about to become home to your new favorite dessert, and trust me, you’ll be making these No-Bake Raspberry Cheesecake Bars on repeat all summer long—and probably well into fall, winter, and spring too.
Looking for more easy, feel-good recipes? Come follow me on Pinterest
No-Bake Raspberry Cheesecake Bars (5 Ingredients, Ready in 20 Minutes!)
These No-Bake Raspberry Cheesecake Bars are easy to make, refreshing, and packed with delicious layers of cream cheese, graham cracker crust, and a tangy raspberry swirl.
Ingredients
- For the Graham Cracker Crust:
- 2 cups graham cracker crumbs (about 15 full graham cracker sheets)
- 6 tablespoons unsalted butter, melted
- 3 tablespoons granulated sugar
- Pinch of salt
- For the Cream Cheese Filling:
- 16 ounces cream cheese (full-fat, softened)
- 1 cup powdered sugar
- 2 teaspoons vanilla extract
- 1½ cups heavy whipping cream (cold)
- Pinch of salt
- For the Raspberry Swirl:
- 2 cups fresh or frozen raspberries
- ¼ cup granulated sugar
- 1 tablespoon lemon juice
- 1 tablespoon cornstarch
- Optional Garnishes:
- Fresh raspberries
- Mint leaves
- White chocolate shavings
- Whipped cream
- Lemon zest
Instructions
- Line a 9×13-inch baking pan with parchment paper, leaving an overhang for easy removal.
- For the crust: Combine graham cracker crumbs, melted butter, sugar, and salt. Press into the bottom of the prepared pan to form an even layer. Refrigerate while preparing the filling.
- For the raspberry swirl: In a saucepan, combine raspberries, sugar, lemon juice, and cornstarch. Cook over medium heat, stirring frequently, until thickened (5-7 minutes). Let cool to room temperature.
- For the filling: Beat softened cream cheese until smooth, then add powdered sugar, vanilla, and salt. In a separate bowl, whip cold heavy cream to stiff peaks and gently fold it into the cream cheese mixture until smooth.
- Spread the cream cheese mixture over the chilled crust. Spoon the cooled raspberry sauce on top in dollops and swirl using a butter knife or skewer.
- Cover and refrigerate for at least 4 hours, or overnight, to set. Slice into bars and garnish with fresh raspberries, mint, or whipped cream if desired.
Notes
For a firmer texture, chill the bars overnight. These can be stored in the refrigerator for up to 5-7 days or frozen for up to 3 months.