

Red Velvet Brownies Recipe: Perfect for 16 Decadent Squares!

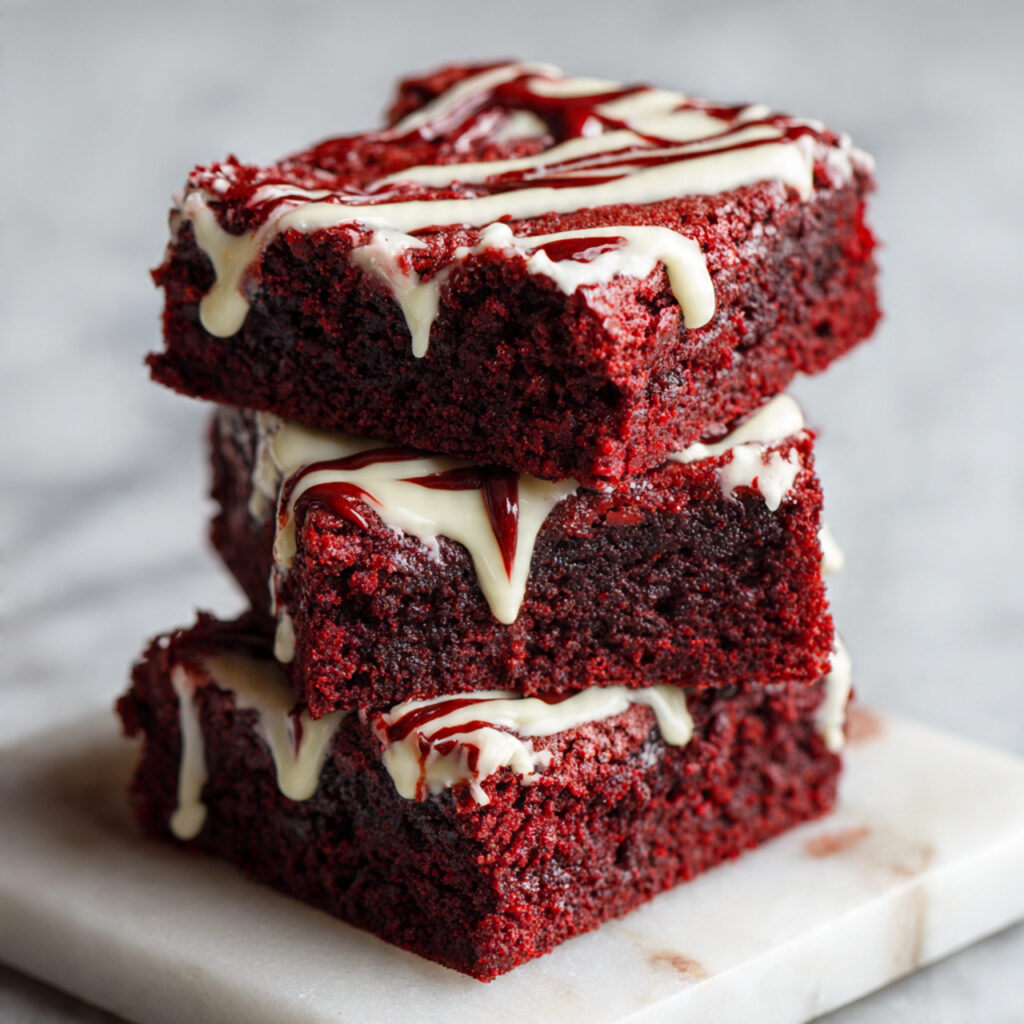
Red Velvet Brownies are the ultimate marriage of two beloved desserts—the fudgy, dense texture of classic brownies meets the subtle cocoa flavor and stunning crimson color of red velvet cake, all topped with swirls of tangy cream cheese frosting that create a beautiful marbled effect. These show-stopping treats deliver serious chocolate satisfaction while maintaining that signature red velvet character that makes them instantly recognizable and utterly irresistible.
I created these Red Velvet Brownies after years of making both regular brownies and red velvet cake separately. One Valentine’s Day, I had a revelation—why not combine them? The first batch came out of the oven with those gorgeous red layers peeking through the cream cheese swirl, and I knew I’d stumbled onto something special. My family devoured them in record time, declaring them even better than either dessert alone.
What makes these Red Velvet Brownies so exceptional is how they capture the best qualities of both treats. You get the dense, fudgy texture that brownie lovers crave, the subtle cocoa and buttermilk tang that defines red velvet, and that cream cheese element that’s non-negotiable in any proper red velvet dessert. The result is sophisticated enough for dinner parties yet comforting enough for casual weekend baking.
These brownies work beautifully for Valentine’s Day, Christmas, birthdays, bake sales, or any occasion when you want to serve something that looks as impressive as it tastes. They’re surprisingly straightforward to make despite their elegant appearance.
Why This Red Velvet Brownies Recipe Works
The foundation of exceptional Red Velvet Brownies is achieving the right balance between brownie density and red velvet lightness. This recipe uses melted butter and oil together, creating brownies that are fudgy but not overly heavy, with just enough structure to cut into clean squares.
The cocoa powder amount is calibrated specifically for red velvet flavor—enough to provide chocolate taste without overwhelming the subtle complexity that buttermilk and vanilla bring. Too much cocoa creates regular chocolate brownies; too little and you lose that characteristic red velvet profile.
The cream cheese swirl isn’t just decorative—it adds moisture, tanginess, and visual appeal that transforms these from good brownies into memorable Red Velvet Brownies. The technique of swirling rather than layering creates that beautiful marbled effect you see in bakery versions.
Food coloring is essential for achieving that signature red hue. While some resist using it, the vibrant color is part of what makes red velvet special. Gel food coloring works best, creating intense color without adding excess liquid that would change the brownie texture.
Ingredients for Perfect Red Velvet Brownies
For the Brownie Base:
- 1/2 cup (1 stick) unsalted butter, melted
- 1/4 cup vegetable oil
- 1 1/4 cups granulated sugar
- 2 large eggs, room temperature
- 2 teaspoons vanilla extract
- 1 teaspoon white vinegar
- 1 tablespoon red food coloring (gel or liquid)
- 1 cup all-purpose flour
- 2 tablespoons unsweetened cocoa powder
- 1/2 teaspoon salt
- 1/4 teaspoon baking powder
For the Cream Cheese Swirl:
- 8 ounces cream cheese, softened
- 1/4 cup granulated sugar
- 1 large egg yolk
- 1/2 teaspoon vanilla extract
Optional Additions:
- 1/2 cup white chocolate chips
- 1/2 cup semi-sweet chocolate chips
- Cream cheese frosting for topping
- Red velvet crumbs for garnish
Ingredient Notes:
Food Coloring Choice: Gel food coloring creates the most vibrant red with less liquid. Liquid food coloring works but requires more volume. Natural alternatives like beet powder create brownish-red rather than true red but are healthier options for these Red Velvet Brownies.
Butter and Oil Combination: Using both creates the ideal texture—butter for flavor, oil for moisture and fudginess. Don’t use all butter (too cakey) or all oil (too greasy). The combination is key to perfect Red Velvet Brownies.
Cocoa Powder Type: Use natural unsweetened cocoa powder, not Dutch-processed. Natural cocoa’s acidity interacts with the baking powder and vinegar, contributing to both flavor and that characteristic red velvet chemistry.
Cream Cheese Quality: Use full-fat brick cream cheese, not spreadable cream cheese from a tub. The brick style has proper consistency for swirling. Make sure it’s truly softened to room temperature for smooth mixing.
Room Temperature Eggs: Cold eggs don’t incorporate smoothly and can cause butter to solidify into lumps. Bring eggs to room temperature by placing them in warm water for 5-10 minutes before using.
Step-by-Step Instructions for Red Velvet Brownies
Step 1: Prepare Your Pan and Oven (5 minutes)
Preheat your oven to 350°F (175°C). Line a 9×9-inch square baking pan with parchment paper, leaving overhang on two sides for easy removal. This creates handles for lifting finished brownies out cleanly.
Spray the parchment with non-stick cooking spray even though it’s non-stick paper. This insurance prevents any sticking and makes cleanup effortless.
Bring your eggs and cream cheese to room temperature if you haven’t already. Room temperature ingredients mix more smoothly and create better texture in these Red Velvet Brownies.
Step 2: Make the Brownie Batter (10 minutes)
In a large mixing bowl, whisk together the melted butter, vegetable oil, and sugar until well combined and slightly fluffy—about 1 minute of vigorous whisking.
Add the eggs one at a time, whisking well after each addition. The mixture should become lighter in color and smooth. Add the vanilla extract, white vinegar, and red food coloring. Whisk until the color is evenly distributed throughout.
In a separate bowl, whisk together the flour, cocoa powder, salt, and baking powder. Sift if your cocoa powder is lumpy—you want smooth batter for beautiful Red Velvet Brownies.
Add the dry ingredients to the wet ingredients. Fold gently with a spatula just until no streaks of flour remain. Don’t overmix—this develops gluten and creates tough, cakey brownies instead of fudgy ones. The batter should be thick and glossy.
Step 3: Make the Cream Cheese Mixture (5 minutes)
In a medium bowl, beat the softened cream cheese with an electric mixer until completely smooth and fluffy—about 2 minutes. Scrape down the bowl to ensure no lumps remain.
Add the sugar and beat until combined. Add the egg yolk and vanilla extract, beating just until smooth. The mixture should be creamy and pourable but not runny.
If your cream cheese mixture has lumps, it wasn’t softened enough. Microwave for 10 seconds and beat again until completely smooth before proceeding with your Red Velvet Brownies.
Step 4: Layer and Swirl (5 minutes)
Pour about 3/4 of the red velvet brownie batter into your prepared pan. Spread it evenly with a spatula, smoothing the top and getting into the corners.
Drop spoonfuls of the cream cheese mixture over the brownie batter, distributing it as evenly as possible. Don’t worry about perfect placement—it will look beautiful once swirled.
Pour the remaining brownie batter in dollops over the cream cheese layer. Using a butter knife or skewer, swirl through all the layers in a figure-eight or S-pattern. Don’t over-swirl—you want distinct marbling, not a muddy mix. Three or four swoops through the pan is perfect.
Step 5: Bake to Perfection (30-35 minutes)
Place the pan in the center of your preheated oven. Bake for 30-35 minutes. The brownies are done when a toothpick inserted in the center comes out with just a few moist crumbs—not wet batter, but not completely clean either.
The top should look set with slight cracks forming. The cream cheese swirl will be lightly golden. Don’t overbake—these Red Velvet Brownies continue cooking slightly as they cool, and overbaked brownies are dry and disappointing.
If the edges look done but the center seems underdone, tent loosely with foil and bake another 3-5 minutes. Better to slightly underbake than overbake.
Step 6: Cool Completely (2 hours)
Remove from the oven and place the pan on a wire rack. Let cool in the pan for 30 minutes—this allows the brownies to set enough to cut cleanly.
After 30 minutes, use the parchment overhang to lift the entire brownie slab out of the pan onto a cutting board. Let cool completely at room temperature—at least another 1.5 hours.
Cutting warm brownies creates a crumbly mess. Patience is essential for clean, beautiful squares of these Red Velvet Brownies.
Step 7: Cut and Serve
Using a sharp knife, cut into 16 squares (4×4 grid). Wipe the knife clean between cuts for the neatest squares. Warm the knife under hot water and dry it between cuts for even cleaner slices.
If desired, top with additional cream cheese frosting, dust with powdered sugar, or serve plain. The marbled tops are gorgeous as-is and need no additional decoration for these Red Velvet Brownies.
Pro Tips for Perfect Red Velvet Brownies
Achieving Fudgy Texture
The secret to fudgy Red Velvet Brownies is not overbaking and using the right fat combination. The melted butter and oil create moisture that stays locked in during baking.
Remove brownies from the oven when a toothpick comes out with moist crumbs, not clean. They firm up considerably as they cool. What seems slightly underdone hot from the oven will be perfectly fudgy once cooled.
If you prefer cakier brownies, add an extra 2 tablespoons of flour and bake for the full 35 minutes. But the fudgy texture is what makes these Red Velvet Brownies truly special.
Creating Beautiful Swirls
The key to Instagram-worthy swirls is contrast and restraint. Make sure your cream cheese mixture is thick enough—too thin and it sinks into the batter instead of staying visible.
Don’t over-swirl. Three or four swoops through the batter creates beautiful marbling. More than that and the colors muddy together, losing that distinct contrast that makes Red Velvet Brownies so visually appealing.
Use a butter knife or wooden skewer rather than a spoon for swirling. The thin edge creates more delicate, elegant patterns than a thick utensil.
Getting Vibrant Red Color
For the brightest red, use gel food coloring. Start with 1 tablespoon and add more if needed—you can always add more but can’t remove it. The color darkens slightly during baking.
Add the food coloring to the wet ingredients before adding flour. This ensures even distribution throughout the batter for consistent color in your Red Velvet Brownies.
If you’re hesitant about food coloring, know that the brownies will still taste delicious with less (or none), just won’t have that signature red velvet appearance.
Make-Ahead and Freezing
These Red Velvet Brownies freeze beautifully! Cool completely, cut into squares, wrap individually in plastic wrap, then place in a freezer bag. They keep frozen for up to 3 months.
Thaw wrapped brownies at room temperature for 2-3 hours before serving. They taste remarkably fresh—the freezing actually helps lock in moisture.
For advance preparation, bake the brownies a day ahead and store at room temperature in an airtight container. They taste even better the next day as flavors meld together.
Variations to Try
White Chocolate Red Velvet Brownies: Fold 1/2 cup white chocolate chips into the batter before baking. They create melty pockets of sweetness throughout.
Oreo Red Velvet Brownies: Press Oreo halves into the top before baking. The cookies and cream combination is addictive.
Triple Cream Cheese Red Velvet Brownies: Double the cream cheese swirl and create multiple layers for ultra-rich, tangy brownies.
Red Velvet Brownie Bites: Bake in a mini muffin tin for 12-15 minutes, creating individual servings perfect for parties.

Common Mistakes to Avoid with Red Velvet Brownies
Mistake #1: Overbaking
This is the number one way to ruin Red Velvet Brownies. Overbaked brownies are dry, crumbly, and disappointing. The fudgy texture that makes these special disappears completely.
Trust the toothpick test—moist crumbs mean done, even if the center looks slightly soft. Remember that brownies continue cooking from residual heat after leaving the oven.
Set a timer for 30 minutes and check. If not quite done, add 3-minute intervals rather than baking the full 35 minutes without checking.
Mistake #2: Using Cold Cream Cheese
Cold cream cheese doesn’t beat smooth—it leaves lumps that create an uneven, grainy swirl. These lumps won’t melt during baking and create an unpleasant texture.
Always soften cream cheese to room temperature. It should be soft enough to easily press your finger into but not melty or oily. This takes 1-2 hours at room temperature.
In a rush? Microwave unwrapped cream cheese for 10-15 seconds, checking frequently. But be careful—melted cream cheese doesn’t work either.
Mistake #3: Overmixing the Batter
Vigorous mixing or using an electric mixer on the batter (after adding flour) develops gluten, creating cakey texture instead of the dense, fudgy consistency that makes Red Velvet Brownies amazing.
Fold dry ingredients in gently by hand with a spatula. Mix just until no flour streaks remain, then stop. A few small lumps are fine and will work themselves out.
Overmixed batter also creates brownies that rise excessively during baking, then sink and crack as they cool.
Mistake #4: Cutting Too Soon
Warm brownies are too soft to cut cleanly. You’ll end up with crumbly, messy squares instead of neat, bakery-worthy slices.
Wait until brownies are completely cool to room temperature—this takes about 2 hours total. For cleanest cuts, refrigerate for 30 minutes after cooling, then slice.
The patience required for perfect Red Velvet Brownies is the hardest part, but absolutely worth it for beautiful results.
Mistake #5: Not Lining the Pan
Trying to cut brownies directly in the pan creates a mess, and trying to flip the pan to remove them rarely works well. You end up with broken brownies and a frustrating experience.
Always line your pan with parchment paper, leaving overhang on two sides. This creates handles for lifting the entire brownie slab out cleanly.
Even with parchment, spray with cooking spray. This insurance policy prevents any sticking and makes serving these Red Velvet Brownies effortless.
Mistake #6: Skipping the Vinegar
The small amount of vinegar seems insignificant but is crucial for authentic red velvet flavor. It reacts with the baking powder and cocoa, contributing to both taste and texture.
The vinegar also enhances the red color when using food coloring. Without it, your Red Velvet Brownies will taste and look slightly off, missing that characteristic tang.
White vinegar is neutral-tasting and won’t be detectable in the finished brownies, but its chemical role is essential.
Storage and Serving Suggestions for Red Velvet Brownies
Proper Storage Methods
Store Red Velvet Brownies in an airtight container at room temperature for up to 4 days. Layer brownies between sheets of parchment paper to prevent sticking.
The cream cheese swirl means these need to be refrigerated if keeping longer than 4 days. Refrigerated brownies stay fresh for up to 1 week but are best brought to room temperature before serving.
Don’t cover warm brownies—the trapped steam creates soggy texture. Always let them cool completely before storing.
Serving Suggestions for Different Occasions
Valentine’s Day: Cut into heart shapes using a cookie cutter. Dust with powdered sugar and serve on individual dessert plates with fresh raspberries.
Birthday Party: Stack brownies with layers of cream cheese frosting between, creating a brownie “cake.” Top with candles for a unique birthday dessert.
Bake Sale: Cut into 2-inch squares, wrap individually in cellophane tied with ribbon. These Red Velvet Brownies sell out fast at any bake sale.
Dinner Party: Serve warm with vanilla ice cream and a drizzle of chocolate sauce. Elegant yet comforting dessert that impresses guests.
Holiday Gatherings: Cut into festive shapes (stars for Christmas, hearts for Valentine’s, etc.) and arrange on a decorative platter.
Pairing Suggestions
Coffee is the classic pairing—the slight bitterness balances the sweetness of Red Velvet Brownies perfectly. Serve with strong coffee, cappuccino, or espresso.
Cold milk is ideal, especially for kids. The brownies are rich enough that milk helps cleanse the palate between bites.
For adult gatherings, red wine (especially fruity varieties like Merlot) or cream liqueurs like Baileys pair beautifully with the chocolate-cream cheese combination.
Hot chocolate creates a double-chocolate experience that’s perfect for winter evenings. Top the hot chocolate with whipped cream for extra indulgence.
Creative Serving Ideas
Create brownie sundaes: warm a square, top with vanilla ice cream, whipped cream, chocolate sauce, and a cherry. Restaurant-quality dessert at home.
Make brownie parfaits by layering crumbled Red Velvet Brownies with whipped cream and fresh berries in clear glasses. Beautiful presentation for parties.
Serve with cream cheese frosting on the side for dipping. Some people love extra tanginess—let them customize their experience.
Gift them in decorative boxes or tins. These Red Velvet Brownies make wonderful homemade gifts that show you care enough to bake from scratch.

Frequently Asked Questions About Red Velvet Brownies
Can I make these without food coloring?
Yes! The brownies will taste the same but will be brown instead of red. They’ll essentially be chocolate cream cheese brownies, which are still delicious, just not red velvet.
For natural coloring, use beet powder (2-3 tablespoons) but know that it creates more burgundy than bright red and adds subtle earthy flavor.
The food coloring is really what makes them “red velvet” in appearance. If you’re comfortable with it, use it for authentic-looking Red Velvet Brownies.
Why are my brownies cakey instead of fudgy?
Several causes create cakey texture: overbaking (most common), overmixing the batter after adding flour, or using too much flour. Measure flour correctly by spooning it into the measuring cup and leveling, not scooping.
Too many eggs also creates cakey texture. Make sure you’re using the exact amount called for in these Red Velvet Brownies.
For guaranteed fudgy results, remove brownies when the toothpick has moist crumbs and let them finish cooking from residual heat as they cool.
Can I use a different size pan?
An 8×8-inch pan works but creates thicker brownies that need 5-10 minutes longer baking time. A 9×13-inch pan creates thinner brownies that bake faster—reduce time by 5-8 minutes.
For best results as written, use a 9×9-inch square pan. Different sizes change the texture and baking time significantly.
If using a different size, watch carefully and use the toothpick test rather than relying on time alone for these Red Velvet Brownies.
How do I know when they’re done?
Insert a toothpick in the center. It should come out with moist crumbs—not wet batter, but not completely clean. The top should look set with slight cracks.
The edges will pull away slightly from the pan sides. The cream cheese swirl will be lightly golden but not browned.
Remember that Red Velvet Brownies firm up considerably as they cool. What seems slightly underdone will be perfect once cooled.
Can I add frosting on top?
Absolutely! Cream cheese frosting is traditional for red velvet desserts. Let brownies cool completely, then spread frosting over the top before cutting.
For the neatest presentation, frost the whole slab before cutting, then wipe the knife between cuts. Or frost individual squares after cutting.
The cream cheese swirl means these don’t technically need frosting, but it’s delicious if you want extra richness in your Red Velvet Brownies.
Why did my cream cheese swirl sink?
The cream cheese mixture was too thin (cream cheese not thick enough or too much liquid) or the brownie batter was too thin to support it.
Make sure your cream cheese is properly softened but still firm, and follow measurements exactly. The mixture should be thick and creamy, not runny.
If it sinks, the brownies still taste great—just won’t have that pretty marbled top that makes Red Velvet Brownies so visually appealing.
Can kids help make these?
Yes! Red Velvet Brownies are great for baking with kids. They can help measure, mix the wet ingredients, add food coloring (their favorite part!), and do the swirling.
Supervise around the oven and mixer, but otherwise this recipe is very kid-friendly. The swirling step especially is fun for children.
Making these together creates wonderful memories and teaches valuable baking skills.
Final Thoughts on Red Velvet Brownies
These Red Velvet Brownies prove that combining two beloved desserts creates something even better than either alone. The fudgy texture, subtle chocolate flavor, tangy cream cheese swirl, and stunning appearance make them irresistible.
The beauty of mastering this recipe is its versatility. Make them for special occasions or casual weekends. Dress them up with frosting or serve them plain. Add mix-ins or keep them classic. Once you nail the basic technique, the possibilities are endless.
Whether you’re baking Red Velvet Brownies for Valentine’s Day, a birthday celebration, or simply because Tuesday needs chocolate, they deliver joy in every fudgy, cream-cheese-swirled bite. Happy baking!
Print
Red Velvet Brownies Recipe: Perfect for 16 Decadent Squares!
These decadent Red Velvet Brownies combine fudgy chocolate brownies with the distinctive flavor and gorgeous red color of red velvet cake, all marbled with tangy cream cheese swirl. Rich, moist, and visually stunning, they’re perfect for Valentine’s Day, special occasions, or anytime you want an impressive homemade treat. Easier than cake but more special than regular brownies, they deliver the best of both worlds.
- Total Time: 55 minutes
- Yield: 16 brownies
Ingredients
Brownie Base:
- 1/2 cup unsalted butter, melted
- 1/4 cup vegetable oil
- 1 1/4 cups granulated sugar
- 2 large eggs, room temperature
- 2 teaspoons vanilla extract
- 1 teaspoon white vinegar
- 1 tablespoon red food coloring
- 1 cup all-purpose flour
- 2 tablespoons unsweetened cocoa powder
- 1/2 teaspoon salt
- 1/4 teaspoon baking powder
Cream Cheese Swirl:
- 8 ounces cream cheese, softened
- 1/4 cup granulated sugar
- 1 large egg yolk
- 1/2 teaspoon vanilla extract
Instructions
- Prep: Preheat oven to 350°F. Line 9×9-inch pan with parchment, leaving overhang. Spray with cooking spray.
- Make brownie batter: Whisk melted butter, oil, and sugar until combined. Add eggs one at a time, then vanilla, vinegar, and food coloring. In separate bowl, whisk flour, cocoa, salt, and baking powder. Fold dry into wet just until combined.
- Make cream cheese mixture: Beat softened cream cheese until smooth. Add sugar, egg yolk, and vanilla. Beat until creamy.
- Layer: Pour 3/4 of brownie batter into pan. Drop spoonfuls of cream cheese mixture over batter. Add remaining brownie batter in dollops. Swirl with knife in figure-eight pattern 3-4 times.
- Bake: Bake 30-35 minutes until toothpick comes out with moist crumbs. Don’t overbake.
- Cool: Cool in pan 30 minutes, then lift out using parchment. Cool completely (2 hours total) before cutting into 16 squares.
Notes
- Room temperature: Eggs and cream cheese must be room temp for smooth mixing.
- Don’t overmix: Fold flour in gently to keep brownies fudgy, not cakey.
- Underbake slightly: Remove when toothpick has moist crumbs. They firm as they cool.
- Cool completely: Essential for clean cutting. Warm brownies crumble.
- Food coloring: Gel creates most vibrant color. Can reduce or omit if preferred.
- Storage: Room temperature 4 days, refrigerated 1 week, frozen 3 months.
- Pan size: 9×9-inch is ideal. Other sizes require time adjustments.
- Prep Time: 20 minutes
- Cook Time: 35 minutes
- Category: Desserts
- Method: Baking
- Cuisine: American, Southern
- Diet: Vegetarian


3 Comments
[…] Meringue Hearts are the most elegant, delicate desserts you’ll ever make—crispy on the outside, slightly chewy inside, with a beautiful natural […]
[…] scones represent the perfect marriage between British baking tradition and indulgent chocolate satisfaction. These tender, crumbly pastries have captured […]
[…] in every bite, and the tender, cake-like texture that makes these treats absolutely irresistible. Unlike their fried counterparts, these donuts are lighter, easier to make, and don’t require any […]
Comments are closed.