

Oreo Red Velvet Cookie Bars: The Ultimate 3-Layer Dessert That’ll Steal Every Party
Introduction: When Three Iconic Flavors Become One Show-Stopping Dessert
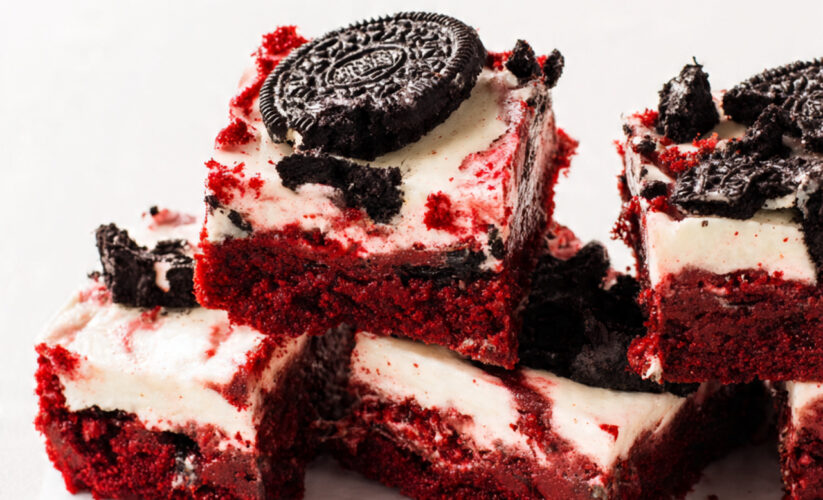
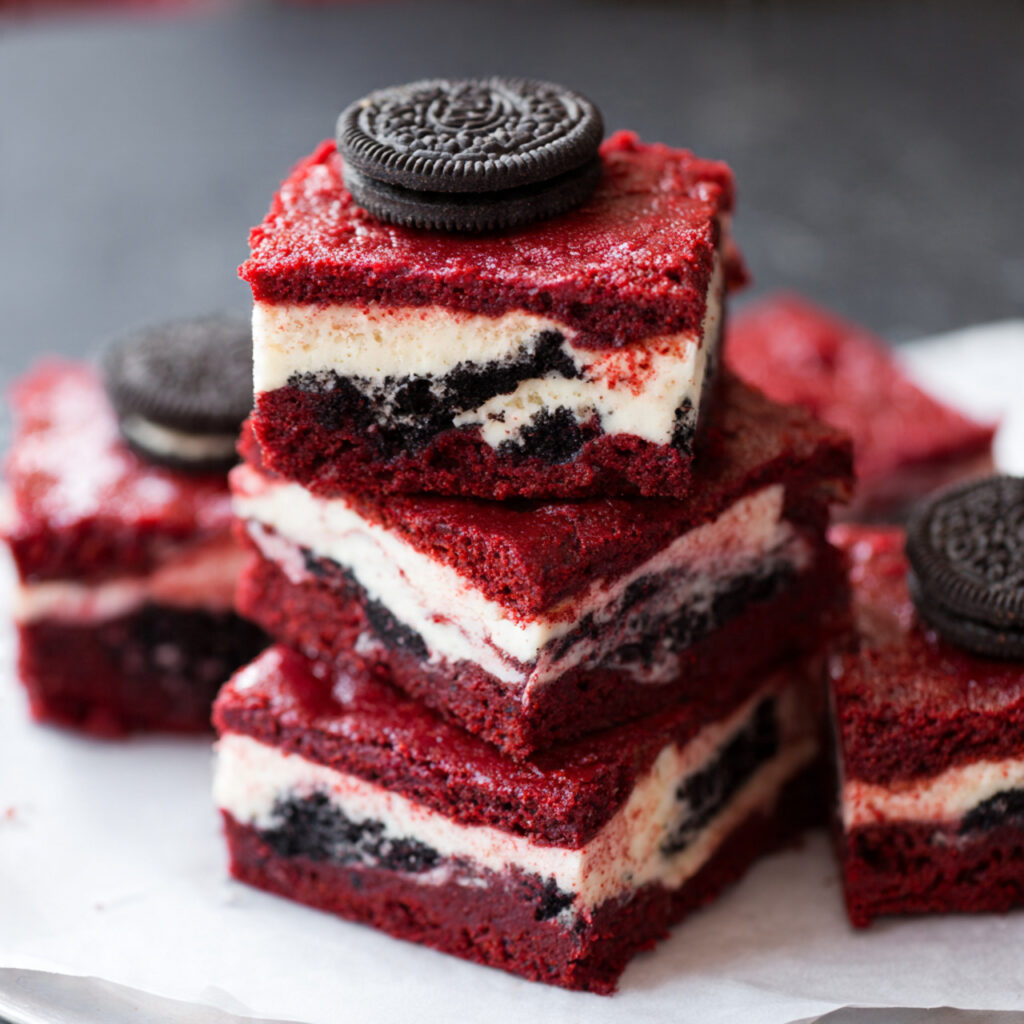
Oreo Red Velvet Cookie Bars are the dessert equivalent of a standing ovation—dramatic, unforgettable, and guaranteed to have everyone asking for the recipe. Imagine this: a layer of crushed Oreo cookies forming a chocolatey foundation, topped with a thick, fudgy red velvet cookie layer that’s both chewy and cake-like, all crowned with a luscious cream cheese frosting that melts on your tongue. If that doesn’t make your mouth water, I don’t know what will.
These bars represent everything we love about dessert mashups done right. Red velvet cake has been enchanting dessert lovers for generations with its subtle cocoa flavor, striking crimson color, and tender crumb. Oreo cookies need no introduction—they’re the world’s favorite sandwich cookie, beloved for that perfect contrast between crunchy chocolate wafers and sweet cream filling. And cream cheese frosting? It’s the silky, tangy component that ties everything together and elevates this treat from “really good” to “absolutely extraordinary.”
What makes Oreo Red Velvet Cookie Bars particularly brilliant is how they solve the age-old dessert dilemma: bars are infinitely easier to make and serve than layer cakes, yet they deliver that same impressive presentation and complex flavor profile. No fussy cake layers that need leveling, no structural engineering required for stacking, and no stress about whether your frosting job looks professional. Just press, spread, bake, frost, and cut into perfect squares that look as stunning as they taste.
Whether you’re preparing for a Valentine’s Day celebration, a birthday party, a holiday cookie exchange, or simply want to create something special for your family on a random Tuesday, these bars deliver the “wow factor” without demanding pastry chef-level skills. The vibrant red color makes them naturally festive, the Oreo layer adds textural intrigue, and the cream cheese frosting provides that signature tangy finish that keeps you reaching for just one more piece.
In this comprehensive guide, I’ll walk you through every detail of creating perfect Oreo Red Velvet Cookie Bars. From selecting the right ingredients to achieving that ideal fudgy texture, troubleshooting common issues, and customizing the recipe to suit your preferences, you’ll have all the information you need to master this showstopping dessert. Let’s dive into this triple-layer masterpiece!

Why This Oreo Red Velvet Cookie Bars Recipe Works
Before we get into the ingredients, let’s talk about what makes this particular combination so successful. Red velvet as a cookie bar (rather than a cake) creates a denser, fudgier texture that holds up beautifully when cut into squares. The Oreo crust provides structural support and a flavor foundation that complements rather than competes with the red velvet layer.
The magic ratios in this recipe ensure:
- A sturdy Oreo base that doesn’t crumble when cut
- A perfectly fudgy red velvet layer that’s not too cakey or too dense
- Enough cream cheese frosting to be generous without overwhelming
- Clean slicing with distinct, beautiful layers
- Balanced sweetness where no single element overpowers
The result is a dessert that looks professionally crafted but comes together with simple, straightforward techniques that any home baker can master.
Ingredients for Oreo Red Velvet Cookie Bars
For the Oreo Cookie Crust:
- 24 Oreo cookies (about 2½ cups when crushed) – Use regular Oreos, not Double Stuf
- 5 tablespoons (70g) unsalted butter, melted
- 2 tablespoons granulated sugar – Enhances sweetness and helps bind the crust
For the Red Velvet Cookie Layer:
- ½ cup (115g) unsalted butter, softened to room temperature
- 1 cup (200g) granulated sugar
- 1 large egg, room temperature
- 1 large egg yolk, room temperature (adds richness and fudginess)
- 2 tablespoons red food coloring (liquid or gel; gel is more concentrated)
- 1 teaspoon pure vanilla extract
- 1 teaspoon white vinegar (reacts with cocoa for that classic red velvet flavor)
- 1½ cups (190g) all-purpose flour
- 2 tablespoons (10g) unsweetened cocoa powder (not Dutch-processed)
- ½ teaspoon baking powder
- ¼ teaspoon salt
- ½ cup (90g) semi-sweet chocolate chips (optional but delicious)
For the Cream Cheese Frosting:
- 8 ounces (225g) cream cheese, softened to room temperature (full-fat for best results)
- ¼ cup (60g) unsalted butter, softened
- 2½ cups (315g) powdered sugar, sifted
- 1 teaspoon pure vanilla extract
- Pinch of salt
- 1-2 tablespoons heavy cream or milk (for adjusting consistency)
Optional Garnish:
- Crushed Oreo cookies for sprinkling on top
- Mini chocolate chips
- Red velvet cake crumbs
- White chocolate drizzle
Ingredient Notes and Substitutions
Oreo Cookies: Use regular Oreos, not Double Stuf, as the extra filling can make the crust too sweet and soft. Generic chocolate sandwich cookies work fine if you can’t find Oreos. You can also experiment with different Oreo flavors—Mint Oreos or Red Velvet Oreos create interesting variations.
Food Coloring: Gel food coloring is more concentrated than liquid, so you’ll need less (about 1-1½ tablespoons of gel versus 2 tablespoons of liquid). The amount affects only the color intensity, not the flavor, so adjust based on how vibrant you want your bars. Some natural food colorings work but may result in a less vivid red.
Butter: All butter should be unsalted so you can control the salt level. Salted butter can make the bars taste too salty, especially combined with the salt in Oreos. Room temperature means the butter should be soft enough to leave an indent when pressed but still hold its shape.
Cream Cheese: Use full-fat brick-style cream cheese, not spreadable or low-fat varieties. These alternative versions contain more moisture and stabilizers that can make your frosting too soft or give it an odd texture.
Cocoa Powder: Use natural (not Dutch-processed) cocoa powder. Dutch-processed cocoa has been treated to neutralize its acidity, which affects the chemical reaction with the vinegar that gives red velvet its characteristic flavor.

Step-by-Step Instructions for Perfect Oreo Red Velvet Cookie Bars
Step 1: Prepare Your Pan and Oreo Crust (15 minutes)
Preheat your oven to 350°F (175°C). Line a 9×13-inch baking pan with parchment paper, leaving an overhang on two opposite sides. This overhang acts as “handles” for lifting the entire dessert out of the pan later, making cutting much easier. Lightly spray the parchment with non-stick cooking spray.
Place your Oreo cookies (filling and all) into a food processor and pulse until you have fine, uniform crumbs. Alternatively, place cookies in a sealed plastic bag and crush them with a rolling pin—therapeutic and effective! You want the consistency of coarse sand with no large chunks remaining.
Transfer the Oreo crumbs to a medium bowl. Pour in the melted butter and add the 2 tablespoons of sugar. Stir with a fork or spatula until all the crumbs are evenly moistened. The mixture should hold together when pressed—if it seems dry, add another tablespoon of melted butter.
Press the Oreo mixture firmly and evenly into the bottom of your prepared pan. Use the bottom of a measuring cup or a flat glass to pack it down tightly. Pay special attention to the corners and edges. A compact crust prevents crumbling when you cut the bars later.
Bake the crust for 8 minutes. This pre-baking step sets the crust and creates a barrier that prevents the red velvet layer from making it soggy. Remove from the oven and let it cool while you prepare the red velvet layer. Keep the oven at 350°F.
Step 2: Make the Red Velvet Cookie Layer (15 minutes)
In a large mixing bowl, beat the softened butter and sugar together using an electric mixer on medium speed for 2-3 minutes. The mixture should become lighter in color and fluffy—this incorporates air that creates a tender texture.
Add the whole egg and egg yolk, beating until fully incorporated and smooth, about 1 minute. The mixture will look glossy and slightly thinner. Add the red food coloring, vanilla extract, and white vinegar. Beat again until the color is evenly distributed throughout with no streaks remaining. The batter should be a vibrant red color.
In a separate medium bowl, whisk together the flour, cocoa powder, baking powder, and salt. This dry mixture ensures even distribution of leavening and prevents cocoa clumps.
Add the dry ingredients to the wet ingredients in two additions, mixing on low speed just until combined after each addition. Don’t overmix—stop as soon as you no longer see streaks of flour. Overmixing develops gluten and creates tough, cakey bars instead of fudgy ones.
If using chocolate chips, fold them in gently with a spatula. The dough will be thick and somewhat sticky, similar to a thick brownie batter.
Step 3: Assemble and Bake (35-40 minutes)
Drop spoonfuls of the red velvet dough evenly over the pre-baked Oreo crust. Using an offset spatula or the back of a spoon (lightly greased or dampened to prevent sticking), gently spread the dough to cover the entire Oreo layer. Take your time to spread it evenly—uneven layers mean uneven baking.
Don’t worry if you see some Oreo crumbs mixing into the red velvet layer while spreading; this is normal and won’t affect the final result. Aim for an even thickness across the entire pan.
Bake for 28-33 minutes. The bars are done when the edges are set and slightly pulling away from the pan sides, the top looks mostly set with perhaps a slight jiggle in the very center, and a toothpick inserted into the center comes out with just a few moist crumbs (not wet batter, but not completely clean either).
Critical timing note: For fudgy bars, bake 28-30 minutes. For slightly firmer bars, bake 32-33 minutes. Do not overbake or the red velvet layer will become dry and cakey rather than fudgy.
Remove from the oven and let cool completely in the pan on a wire rack. This takes about 2 hours at room temperature, or you can speed it up by refrigerating for 45-60 minutes. The bars must be completely cool before frosting or the cream cheese frosting will melt.
Step 4: Make the Cream Cheese Frosting (10 minutes)
While the bars cool, prepare your frosting. In a large bowl, beat the softened cream cheese and butter together on medium speed for 2-3 minutes until completely smooth, creamy, and lump-free. Scrape down the bowl sides at least once.
Reduce mixer speed to low and gradually add the sifted powdered sugar, about ½ cup at a time. Once all the sugar is incorporated, increase speed to medium and beat for 2 minutes. Add the vanilla extract and a pinch of salt.
Check the consistency. The frosting should be thick and spreadable but not stiff. If it’s too thick, add heavy cream one tablespoon at a time until you reach the perfect consistency. If it’s too thin (this can happen if your cream cheese or butter was too soft), refrigerate for 15-20 minutes to firm up.
Step 5: Frost and Garnish (10 minutes)
Once the bars are completely cool, spread the cream cheese frosting evenly over the top using an offset spatula. Start by dolloping frosting in several spots across the surface, then spread it outward from each dollop to create an even layer. For a smooth finish, dip your spatula in hot water, wipe it dry, and run it across the frosting.
For a more rustic look, use the back of a spoon to create swoops and swirls in the frosting. Both presentations are beautiful!
If desired, sprinkle the top with crushed Oreos, mini chocolate chips, or red velvet cake crumbs immediately after frosting while it’s still soft. Press garnishes gently into the frosting so they stick.
Refrigerate the bars for at least 30 minutes to firm up the frosting before cutting. This makes slicing much cleaner and easier.
Step 6: Cut and Serve (5 minutes)
Using the parchment paper overhang as handles, carefully lift the entire block of bars out of the pan and place it on a cutting board. Use a large, sharp knife to cut into squares. For the cleanest cuts:
- Wipe the knife clean between each cut
- Use a gentle sawing motion rather than pressing straight down
- Cut into 24 squares (6 rows by 4 rows) for regular-sized portions, or 48 mini bars for parties
For extra-neat presentation, trim about ¼ inch from each edge before cutting—this removes any uneven edges and reveals those beautiful layers.

Pro Tips for Show-Stopping Oreo Red Velvet Cookie Bars
Achieve Perfect Layers
The key to Instagram-worthy layers is preventing them from bleeding together. Pre-baking the Oreo crust creates a barrier. When spreading the red velvet layer, work gently and deliberately to avoid digging into the crust. Using parchment paper allows you to lift out the entire dessert for clean, visible layers when you cut into it.
Room Temperature Ingredients Are Non-Negotiable
Cold eggs and cold butter don’t incorporate smoothly, leading to a lumpy batter that doesn’t spread evenly or bake uniformly. Take eggs out 30 minutes before baking, or quick-warm them by placing whole eggs (in shells) in a bowl of warm water for 5 minutes. Butter should be soft enough to leave an indent when pressed but still hold its shape—not melted or greasy.
Don’t Skip the Egg Yolk
The extra egg yolk in the red velvet layer might seem like an unnecessary complication, but it’s the secret to that ultra-fudgy texture. Egg yolks contain fat and emulsifiers that create richness and moisture. If you only use one whole egg, the bars will be more cake-like and less indulgent.
Food Coloring Amount Is Flexible
The amount of food coloring affects only appearance, not flavor or texture. For deep, dramatic red bars, use the full amount (or even slightly more). For a lighter, more muted red, reduce to 1-1½ tablespoons. If you’re concerned about artificial dyes, natural food colorings work but produce a more brownish-red color that’s less vibrant.
Proper Cooling Is Critical
This might be the hardest part—waiting! Spreading frosting on warm bars causes the frosting to melt into a soupy mess. Additionally, warm bars are fragile and fall apart easily when cut. Patience here pays off with beautiful, clean-cut bars with distinct layers.
Freeze Before Cutting for Professional Results
For absolutely pristine cuts worthy of a bakery display, freeze the frosted bars for 30-45 minutes before cutting (not fully frozen, just very firm). The cold makes everything more stable, and the knife glides through without dragging or creating ragged edges. Let cut bars come to room temperature before serving for best flavor and texture.
Create a Makeshift Piping Bag
Don’t have a piping bag for decorative frosting? No problem! Spoon frosting into a plastic storage bag, seal it, and snip off a small corner. Pipe decorative borders, rosettes, or swirls across the top. It’s easier than spreading and looks impressively professional.
Level Your Pan
Before baking, make sure your oven rack is level. An uneven pan leads to thicker bars on one side, meaning some pieces will be overbaked while others are underbaked. A carpenter’s level can check your oven rack if you’re not sure.
Common Mistakes to Avoid When Making Oreo Red Velvet Cookie Bars
Mistake #1: Using a Pan That’s Too Small or Too Large
This recipe is specifically calibrated for a 9×13-inch pan. Using a smaller pan makes the layers too thick, requiring significantly longer baking time and risking an overcooked top with an undercooked center. A larger pan makes layers too thin and dry. If you must use a different size, adjust baking time carefully and watch closely—8×8-inch pans need about 5-7 minutes more baking time.
Mistake #2: Not Pressing the Oreo Crust Firmly Enough
A loosely packed crust crumbles and falls apart when you cut the bars. Really press down hard when forming the crust—you can’t press too firmly. The butter and sugar act as a binder, but only if the crumbs are compacted enough to stick together. Use the bottom of a measuring cup to apply firm, even pressure.
Mistake #3: Overbaking the Red Velvet Layer
The single biggest mistake! These bars should be fudgy, not cakey. They’ll look slightly underdone when you remove them from the oven—that’s correct. They continue to set as they cool. A toothpick should come out with moist crumbs, not clean. Overbaked bars are dry, crumbly, and lose that decadent fudgy texture that makes them special.
Mistake #4: Frosting Warm Bars
The cream cheese frosting will melt into a puddle on warm bars, creating a mess instead of a beautiful layer. Even if the bars feel just slightly warm to the touch, wait longer. Cool bars also cut cleaner, so patience during this step improves both appearance and ease of serving.
Mistake #5: Using Pre-Softened or Whipped Cream Cheese
Spreadable cream cheese tubs and whipped cream cheese contain additional ingredients that change the frosting’s texture—it becomes too soft and won’t set properly, even when refrigerated. Always use brick-style, full-fat cream cheese. Yes, you need to plan ahead to soften it, but the results are worth it.
Mistake #6: Not Sifting Powdered Sugar
Powdered sugar develops lumps during storage. Unsifted powdered sugar creates a lumpy frosting with visible white specks and a grainy texture. Take 30 seconds to sift it—your smooth, professional-looking frosting will thank you.
Mistake #7: Cutting Without Cleaning the Knife
If you cut all your bars without wiping the knife between cuts, each successive cut drags frosting and crumbs through the bars, creating messy, sloppy-looking squares. Keep a damp paper towel nearby and wipe the knife clean after every single cut. This takes an extra 2 minutes but makes your bars look bakery-quality.
Mistake #8: Skipping the Parchment Paper
Attempting to cut and serve these bars directly from the pan is an exercise in frustration. Even well-greased pans can have sticky spots, and getting that first piece out intact is nearly impossible. Parchment paper with overhang allows you to lift the entire dessert out, making perfect cuts easy. Don’t skip this step!
Storage and Serving Suggestions for Oreo Red Velvet Cookie Bars
Refrigerator Storage
These bars must be stored in the refrigerator due to the cream cheese frosting. Place them in an airtight container or cover the pan tightly with plastic wrap. Properly stored, they’ll stay fresh for up to 5 days. The frosting firms up when cold, so let bars sit at room temperature for 15-20 minutes before serving for the best texture and flavor.
Layer parchment paper between stacked bars if storing multiple layers in one container to prevent sticking.
Freezing for Long-Term Storage
Oreo Red Velvet Cookie Bars freeze beautifully for up to 3 months. For best results:
Freezing Frosted Bars:
- Cut bars and arrange them on a parchment-lined baking sheet
- Freeze uncovered until solid (about 2 hours)
- Wrap each bar individually in plastic wrap
- Place wrapped bars in a freezer-safe container or bag
- Label with the date
To Thaw: Transfer desired number of bars to the refrigerator overnight, or let sit at room temperature for 1-2 hours. The frosting texture remains perfect after freezing!
Freezing Unfrosted Bars: You can also freeze the bars without frosting and add fresh frosting when serving. Wrap the cooled, unfrosted bars tightly in plastic wrap, then aluminum foil. Thaw completely before frosting.
Serving Suggestions for Maximum Impact
Classic Presentation: Cut into squares and arrange on a serving platter with garnishes visible. The contrasting layers are the star attraction, so make sure they’re visible.
Individual Plating: Serve bars on small dessert plates with a fork. Add a dollop of whipped cream and a few fresh raspberries for an elegant restaurant-style presentation.
Party-Ready Portions: Cut into smaller, bite-sized pieces (48 mini bars) for parties, showers, or events where guests are mingling. These two-bite treats are perfect for dessert tables.
À la Mode: Warm a bar in the microwave for 10-15 seconds and serve with a scoop of vanilla ice cream. The contrast of warm fudgy bar and cold ice cream is heavenly.
Drizzled Elegance: Before serving, drizzle bars with melted white chocolate or chocolate ganache for an extra layer of sophistication. Use a fork to drizzle in a back-and-forth motion.
Themed Decorating: For Valentine’s Day, top with pink and red sprinkles or heart-shaped candies. For Christmas, use red and white sprinkles. For birthdays, add birthday candles to individual bars.
Beverage Pairings
These rich bars pair beautifully with:
- Coffee: The subtle bitterness balances the sweetness
- Cold milk: Classic and perfect for kids and adults alike
- Hot chocolate: Creates an ultra-indulgent chocolate experience
- Dessert wine: A sweet Moscato or Port complements the cream cheese frosting
- Champagne: The bubbles cut through the richness for celebrations

Frequently Asked Questions About Oreo Red Velvet Cookie Bars
Can I make these bars without food coloring?
Absolutely! Without food coloring, you’ll have delicious chocolate cookie bars with Oreo crust and cream cheese frosting—still amazing, just not red. The food coloring is purely aesthetic and doesn’t affect flavor or texture. The bars will be a light brown color from the cocoa powder. Some bakers prefer this for a more natural approach, especially when serving to young children.
Why is my red velvet layer cakey instead of fudgy?
This happens for three main reasons:
- Overbaking – The most common culprit. Reduce baking time by 2-3 minutes next time.
- Too much flour – Make sure you’re measuring flour correctly (spoon and level, don’t scoop).
- Overmixing – Mix just until flour disappears; overmixing develops gluten, creating a more cake-like texture.
The bars should look slightly underdone when you remove them. They firm up during cooling.
Can I use a different cookie for the crust?
Yes! While Oreos are traditional and their flavor complements red velvet perfectly, you can experiment with:
- Chocolate wafer cookies (like Nabisco Famous Chocolate Wafers)
- Graham crackers – Use chocolate graham crackers for staying in the chocolate family
- Chocolate chip cookies – For an extra-indulgent crust
- Biscoff cookies – Creates an interesting flavor combination
Adjust sugar in the crust mixture based on the sweetness of your chosen cookie—Oreos are quite sweet, so if using less-sweet cookies, add an extra tablespoon of sugar.
How do I know when the bars are done baking?
Look for these signs:
- Edges are set and pulling slightly away from the pan sides
- Top has a matte finish rather than shiny/wet appearance
- A toothpick inserted in the center comes out with moist crumbs (not wet batter, but definitely not clean)
- The center might have a very slight jiggle when you gently shake the pan
Remember, these bars continue to bake and set as they cool. Underbaking slightly is far better than overbaking!
Can I make these in advance?
Yes! These bars are actually better the next day after the flavors have melded. You can:
- Make fully frosted bars up to 3 days in advance; store in the refrigerator
- Make unfrosted bars up to 5 days in advance; store at room temperature and frost before serving
- Make and freeze up to 3 months in advance (as detailed in the storage section)
For events, I recommend making them 1-2 days ahead. This actually makes them easier to cut cleanly and allows you to focus on other preparations on the day of your event.
My cream cheese frosting is too soft/runny. How do I fix it?
If your frosting won’t hold its shape:
- Refrigerate for 30 minutes – Often, time is all it needs to firm up
- Add more powdered sugar – Gradually beat in additional sugar, ¼ cup at a time, until thicker
- Check your cream cheese – Make sure you used full-fat brick cream cheese, not spreadable or low-fat varieties
Prevention tip: Make sure your cream cheese and butter are softened but still cool to the touch—not warm or greasy. If they’re too soft when you start, your frosting will be too soft to fix.
Can I double this recipe?
Yes! Use two 9×13-inch pans or one large sheet pan (18×13-inch half sheet pan). If using a half sheet pan, watch baking time carefully—it may need 5-7 minutes less since the layers will be slightly thinner. Don’t try to fit a double batch into one 9×13-inch pan; the layers will be too thick and won’t bake properly.
What’s the white vinegar for in red velvet?
White vinegar is a traditional red velvet ingredient that reacts with the cocoa powder and baking soda to create a subtle tangy flavor and enhance the red color. It also helps create a more tender texture. While it seems like a tiny amount, don’t skip it—it’s part of what makes red velvet taste like red velvet rather than just chocolate cake with food coloring.
Can I make these gluten-free?
Yes! Substitute the all-purpose flour with a 1:1 gluten-free baking flour blend (like Bob’s Red Mill or King Arthur). Make sure your Oreos are also gluten-free—you can use gluten-free chocolate sandwich cookies instead. The texture will be very similar to the original recipe. I recommend adding ¼ teaspoon xanthan gum if your flour blend doesn’t already contain it.
Conclusion: Your New Signature Dessert
Oreo Red Velvet Cookie Bars represent the perfect intersection of visual drama, incredible flavor, and manageable technique. While they look like something from a fancy bakery, they come together with straightforward steps that don’t require advanced baking skills or specialized equipment. The result is a dessert that makes people stop mid-conversation, pull out their phones for photos, and immediately ask for the recipe.
What makes these bars truly special is their versatility. They’re fancy enough for elegant dinner parties, festive enough for holiday celebrations, romantic enough for Valentine’s Day, yet casual enough for a weekend baking project with your kids. The three distinct layers create visual interest that doesn’t require piping skills or artistic talent—just careful assembly and a little patience during the cooling process.
As you make these bars repeatedly (and you will, because once people taste them, you’ll get requests), you’ll develop your own preferences and modifications. Maybe you’ll love them with extra Oreo garnish on top, or perhaps you’ll discover that a sprinkle of sea salt on the frosting takes them to the next level. You might experiment with different frosting flavors or add white chocolate chips to the red velvet layer.
The beauty of a great recipe is that it provides a solid foundation for creativity while delivering consistent, delicious results every time. These Oreo Red Velvet Cookie Bars do exactly that. They’re reliable enough to become your signature dessert and flexible enough to adapt to your taste preferences and the occasions you’re celebrating.
So gather your ingredients, preheat that oven, and get ready to create something that will have everyone convinced you’re a professional pastry chef. The combination of chocolate, red velvet, and cream cheese is simply irresistible, and when you cut into those beautiful layers, you’ll feel the satisfaction that comes from creating something truly spectacular.
Happy baking, and prepare yourself for the compliments that are coming your way!
Print
Oreo Red Velvet Cookie Bars: The Ultimate 3-Layer Dessert That’ll Steal Every Party
These stunning Oreo Red Velvet Cookie Bars feature three incredible layers: a crunchy Oreo cookie crust, a thick fudgy red velvet cookie layer, and a silky cream cheese frosting. They’re easier than making a layer cake but just as impressive, making them perfect for parties, holidays, or any time you want to create something special. The vibrant red color and classic flavor combination make these bars an instant crowd-pleaser.
- Total Time: 3 hours 10 minutes (includes cooling and frosting)
- Yield: 24 bars
Ingredients
Oreo Crust:
- 24 Oreo cookies (2½ cups crushed)
- 5 tablespoons unsalted butter, melted
- 2 tablespoons granulated sugar
Red Velvet Layer:
- ½ cup unsalted butter, softened
- 1 cup granulated sugar
- 1 large egg, room temperature
- 1 large egg yolk, room temperature
- 2 tablespoons red food coloring (liquid) or 1½ tablespoons (gel)
- 1 teaspoon vanilla extract
- 1 teaspoon white vinegar
- 1½ cups all-purpose flour
- 2 tablespoons unsweetened cocoa powder
- ½ teaspoon baking powder
- ¼ teaspoon salt
- ½ cup semi-sweet chocolate chips (optional)
Cream Cheese Frosting:
- 8 ounces cream cheese, softened
- ¼ cup unsalted butter, softened
- 2½ cups powdered sugar, sifted
- 1 teaspoon vanilla extract
- Pinch of salt
- 1-2 tablespoons heavy cream
Instructions
- Prepare Pan & Crust: Preheat oven to 350°F. Line a 9×13-inch pan with parchment paper, leaving overhang on two sides. Crush Oreos finely in a food processor. Mix crumbs with melted butter and sugar until evenly moistened. Press firmly into pan bottom. Bake 8 minutes, then cool. Keep oven at 350°F.
- Make Red Velvet Layer: Beat softened butter and sugar for 2-3 minutes until fluffy. Add egg and yolk, beat until smooth. Mix in food coloring, vanilla, and vinegar until evenly colored. In separate bowl, whisk together flour, cocoa powder, baking powder, and salt. Add dry ingredients to wet in two additions, mixing just until combined. Fold in chocolate chips if using.
- Assemble & Bake: Drop spoonfuls of red velvet dough over Oreo crust. Spread gently and evenly to cover completely. Bake 28-33 minutes until edges are set and toothpick comes out with moist crumbs (not wet batter). Cool completely in pan, about 2 hours at room temperature or 45 minutes refrigerated.
- Make Frosting: Beat cream cheese and butter for 2-3 minutes until smooth. Gradually add sifted powdered sugar on low speed. Increase to medium and beat 2 minutes. Add vanilla and salt. Add cream 1 tablespoon at a time if needed to reach spreadable consistency.
- Frost & Chill: Spread frosting evenly over completely cooled bars. Sprinkle with crushed Oreos if desired. Refrigerate 30 minutes to firm up frosting before cutting.
- Cut & Serve: Lift bars from pan using parchment overhang. Cut into 24 squares with a sharp knife, wiping clean between cuts. Let bars sit at room temperature 15 minutes before serving for best texture.
Notes
- Food Coloring: Gel food coloring is more concentrated; use 1-1½ tablespoons instead of 2 tablespoons liquid. Amount affects only color, not flavor.
- Fudgy Texture: Don’t overbake! Bars should look slightly underdone when removed from oven. They firm up while cooling.
- Room Temperature: All dairy and eggs should be room temperature for best mixing and texture.
- Crust Substitution: Can use chocolate wafer cookies or chocolate graham crackers instead of Oreos.
- Make Ahead: Bars taste even better the next day. Make up to 3 days ahead and store refrigerated.
- Freezing: Freeze frosted bars up to 3 months. Wrap individually in plastic wrap, then store in freezer bags.
- Prep Time: 38 minutes (8 min crust + 30 min bars)
- Cook Time: 30 minutes
- Category: Desserts
- Method: Baking
- Cuisine: American
- Diet: Gluten Free


1 Comment
[…] no-bake treat that transforms ordinary cookies into eye-catching Irish-themed delights with green chocolate coating, shamrock decorations, and playful sprinkles. These easy-to-make treats require no baking […]