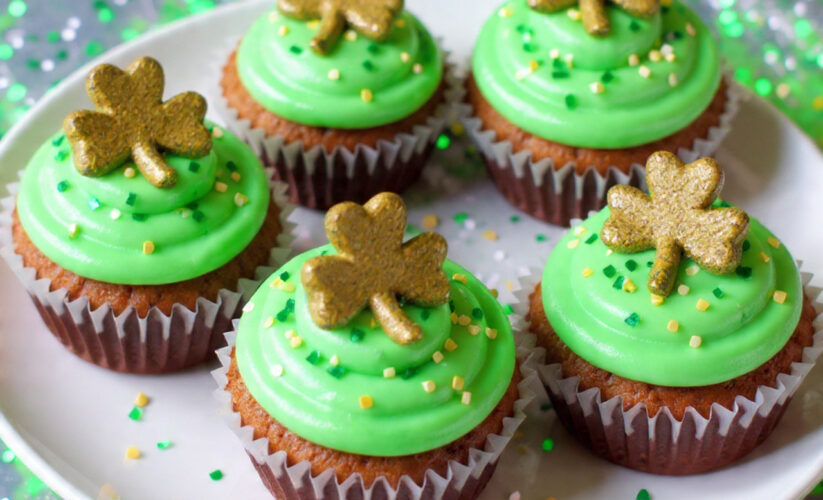
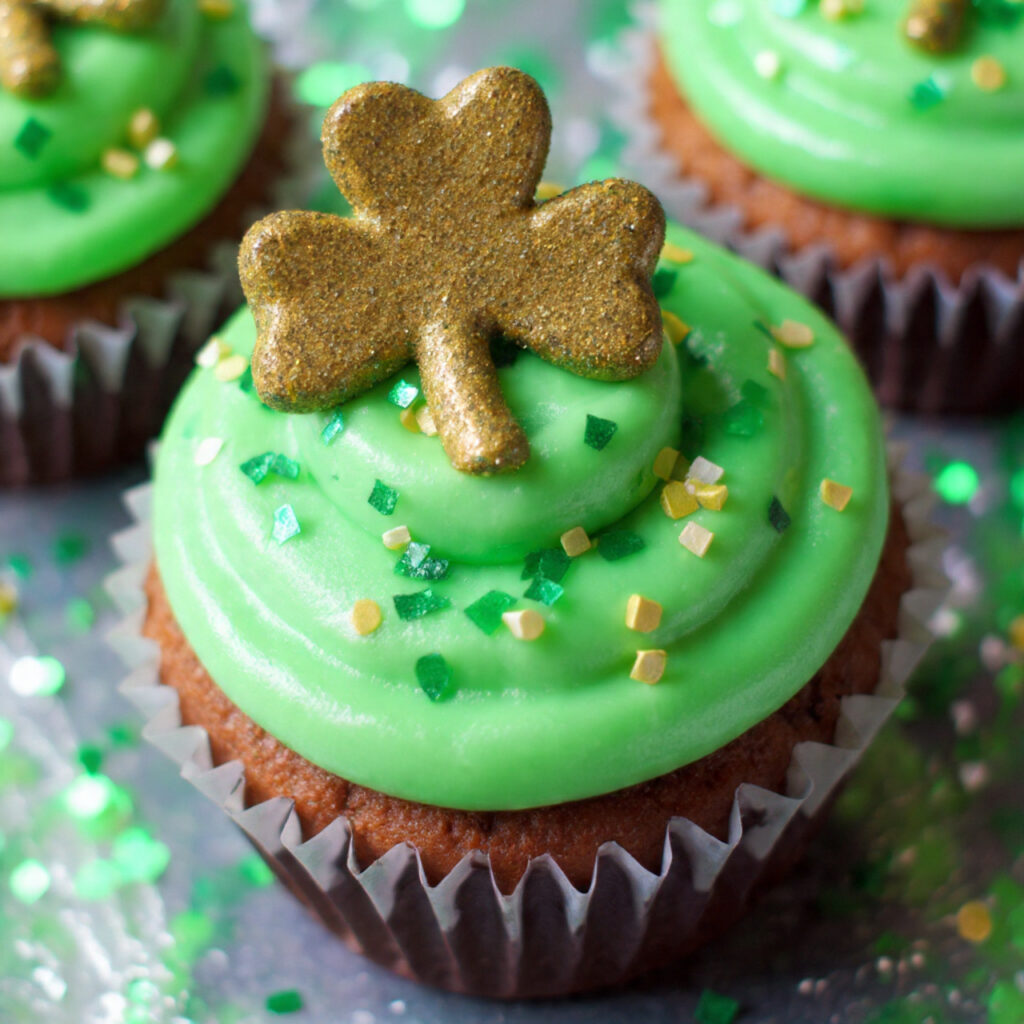
St. Patrick’s Day Cupcakes: Moist Vanilla Cupcakes with Green Buttercream Frosting
Introduction: Celebrate the Luck of the Irish with These Festive Cupcakes
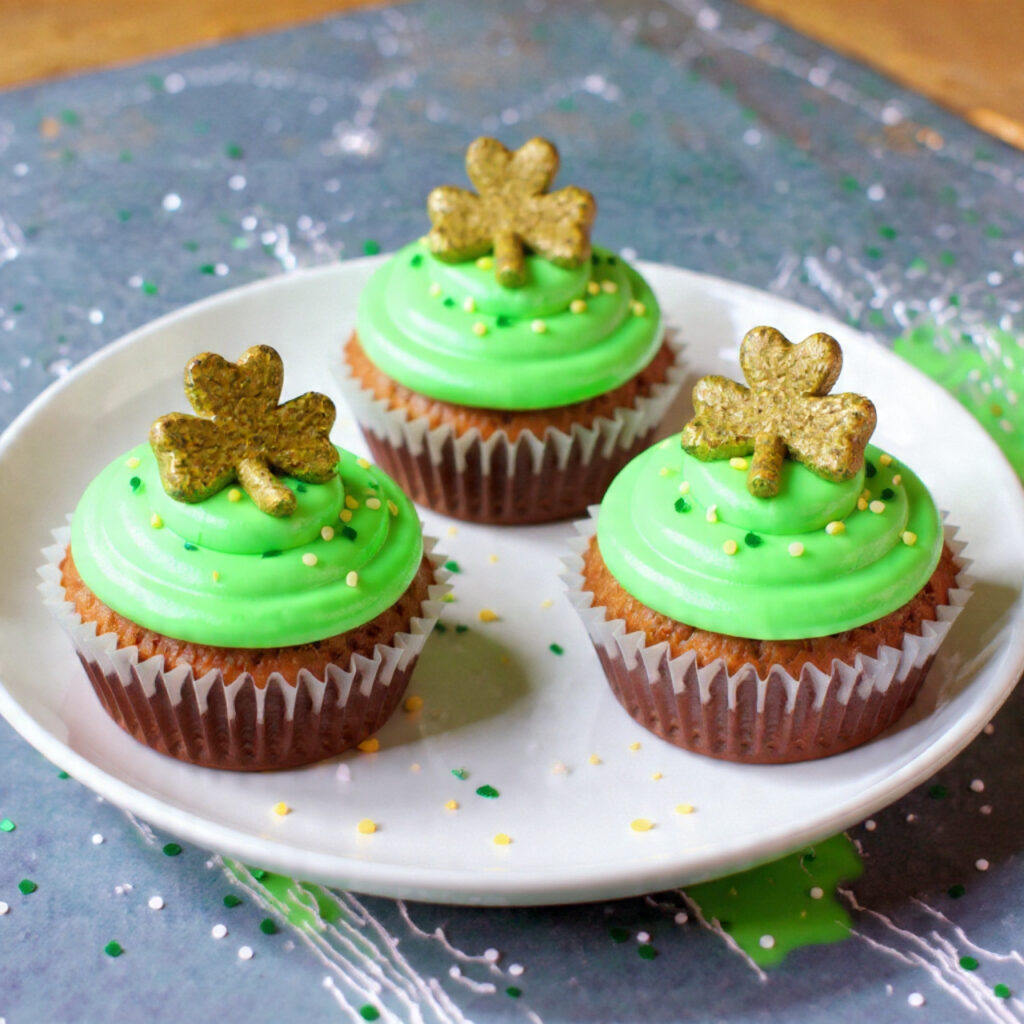
These St. Patrick’s Day Cupcakes are the ultimate way to celebrate March 17th with delicious, festive flair that captures the spirit of Ireland’s most beloved holiday. Whether you’re hosting a St. Patrick’s Day party, bringing treats to an office celebration, or simply wanting to add some Irish luck to your dessert table, these vibrant green cupcakes deliver everything you need: moist vanilla cake, fluffy buttercream frosting in the perfect shade of emerald, and endless decorating possibilities that will have everyone feeling a little bit Irish.
What sets these St. Patrick’s Day Cupcakes apart from ordinary cupcakes is their perfect balance of flavor and festivity. The base is a classic vanilla cupcake recipe that’s been perfected over years of baking—tender, moist, and flavorful enough to stand on its own while still being the ideal canvas for creative decorations. The real magic happens with the buttercream frosting, which gets transformed into a vibrant green that immediately signals St. Patrick’s Day celebration mode. But this isn’t just about appearances; the frosting is silky-smooth, perfectly sweetened, and pipes beautifully into swirls, rosettes, or shamrock shapes.
The beauty of this recipe lies in its versatility and approachability. Experienced bakers will appreciate the reliable technique that produces consistent results, while beginners will find the straightforward instructions easy to follow without any intimidating steps. You don’t need specialized equipment beyond standard baking tools, and the decorating can be as simple or elaborate as you choose. Top these cupcakes with store-bought shamrock sprinkles for a quick finish, or get creative with fondant decorations, gold dust, and miniature rainbow accents.
St. Patrick’s Day deserves desserts that taste as good as they look, and these cupcakes absolutely deliver on both fronts. The vanilla cake base provides that comforting, nostalgic flavor that appeals to all ages, while the vibrant green frosting creates instant visual impact that screams celebration. Kids love the festive colors and fun toppings, while adults appreciate the balanced sweetness and quality ingredients. These cupcakes work equally well for classroom parties, adult gatherings, bake sales, or family celebrations.
Beyond their delicious taste, these St. Patrick’s Day Cupcakes offer something even more valuable: the opportunity to create memories and traditions. Baking together as a family, letting children help with decorating, and sharing these treats with friends and neighbors are the moments that make holidays meaningful. The process of transforming simple ingredients into festive cupcakes brings joy that extends far beyond the final bite.
Why This St. Patrick’s Day Cupcakes Recipe Works Perfectly
The success of these St. Patrick’s Day Cupcakes comes down to several carefully considered elements that work together harmoniously. First, the cupcake base uses the reverse creaming method—a professional baking technique that produces exceptionally tender crumbs. Unlike traditional creaming where butter and sugar are beaten first, this method coats the flour particles with fat before adding wet ingredients, resulting in less gluten development and a softer texture that stays moist for days.
Second, the ingredient ratios have been precisely calibrated for optimal rise and structure. The balance of baking powder and baking soda creates the perfect lift without any bitter aftertaste. The combination of whole milk and sour cream adds richness and tanginess that enhances the vanilla flavor while keeping the cupcakes incredibly moist. Each component serves a specific purpose in creating that ideal cupcake texture—soft enough to be tender but structured enough to support generous frosting.
Third, the buttercream frosting recipe uses a higher ratio of butter to sugar than many recipes, creating a less cloyingly sweet frosting that actually tastes like butter rather than pure sugar. This American buttercream pipes beautifully, holds its shape at room temperature, and provides the perfect creamy contrast to the cake without overwhelming the overall dessert. The addition of heavy cream creates a smoother, more luxurious mouthfeel that elevates this frosting above typical versions.
Fourth, the recipe scales beautifully and produces consistent results every time. Whether you’re making a single batch for your immediate family or tripling the recipe for a large party, the proportions remain reliable. The cupcakes bake evenly, rise uniformly, and cool without sinking or developing odd textures. This consistency means you can confidently make these cupcakes for any occasion without worrying about unpredictable results.
Finally, the decorating process is designed to be flexible and forgiving. The frosting’s consistency can be adjusted easily—add more cream for softer frosting that’s easier to spread, or use it as-is for firm frosting that holds detailed piping designs. The vibrant green color provides the perfect backdrop for various toppings, from simple sprinkles to elaborate fondant shamrocks, giving you complete creative control over the final presentation.
Ingredients You’ll Need for Perfect St. Patrick’s Day Cupcakes
For the Vanilla Cupcakes
All-Purpose Flour (1¾ cups / 220g): The foundation of your cupcakes, all-purpose flour provides the necessary structure. Measure carefully using the spoon-and-level method rather than scooping directly from the bag, which can pack too much flour and create dry cupcakes. Sift the flour if you notice any lumps to ensure even distribution.
Granulated Sugar (1½ cups / 300g): Provides sweetness and helps create tender texture through its interaction with the butter. The sugar also contributes to the golden color of the cupcake interior and helps the tops brown beautifully.
Baking Powder (1½ teaspoons): The primary leavening agent that creates rise and fluffy texture. Make sure your baking powder is fresh (check the expiration date) as old leavening agents lose potency and won’t give proper lift.
Baking Soda (½ teaspoon): Works in conjunction with the sour cream’s acidity to create additional rise and help with browning. The small amount also neutralizes any acidic flavors.
Salt (½ teaspoon): Essential for enhancing all the other flavors and preventing the cupcakes from tasting flat. Don’t skip the salt—it makes a significant difference in overall flavor complexity.
Unsalted Butter (½ cup / 113g, softened): Provides rich flavor, tender crumb, and moisture. Use unsalted butter so you can control the exact salt level in your recipe. The butter should be softened to room temperature—it should give slightly when pressed but not be greasy or melted.
Large Eggs (2, room temperature): Act as binders and add structure, moisture, and richness. Room temperature eggs incorporate more easily into the batter and create better emulsification. Set your eggs out 30 minutes before baking or place them in warm water for 5 minutes.
Whole Milk (½ cup / 120ml, room temperature): Adds moisture and creates tender texture. Whole milk provides the best flavor and richness, though 2% milk can be substituted if needed.
Sour Cream (½ cup / 120g, room temperature): The secret ingredient that makes these cupcakes incredibly moist and tender. The acidity tenderizes the gluten and adds a subtle tang that enhances the vanilla flavor.
Pure Vanilla Extract (2 teaspoons): Use real vanilla extract rather than imitation for the best flavor. The vanilla should be prominent and complement the butter’s richness.
Vegetable Oil (2 tablespoons): Keeps the cupcakes moist even after refrigeration. Oil doesn’t solidify like butter, which means these cupcakes maintain their soft texture even when chilled.
For the Green Buttercream Frosting
Unsalted Butter (1 cup / 226g, softened): The star of buttercream frosting, quality butter makes all the difference. European-style butter with higher fat content creates even richer, more luxurious frosting.
Powdered Sugar (4 cups / 480g, sifted): Also called confectioners’ sugar or icing sugar, this provides sweetness and structure to the frosting. Sifting prevents lumps and creates silky-smooth texture.
Heavy Cream (3-4 tablespoons): Thins the frosting to the perfect consistency for piping and adds extra creaminess. Add gradually until you reach your desired consistency.
Pure Vanilla Extract (2 teaspoons): Enhances the butter flavor and adds depth. Quality vanilla extract makes a noticeable difference in buttercream.
Salt (Pinch): Balances the sweetness and brings out all the other flavors. Just a tiny pinch transforms the frosting from one-dimensional to complex.
Green Gel Food Coloring: Gel food coloring is vastly superior to liquid coloring for achieving vibrant colors without altering frosting consistency. Start with a small amount and add gradually until you reach your desired shade of green. For St. Patrick’s Day, aim for emerald or Kelly green.
Decorations and Toppings
- Green sprinkles (jimmies, nonpareils, or sanding sugar)
- Shamrock-shaped sprinkles or sugar decorations
- Gold edible glitter or gold sanding sugar
- Mini chocolate gold coins
- Green M&Ms or chocolate candies
- Fondant shamrocks (homemade or store-bought)
- Rainbow candy strips or fruit leather
- Edible gold leaf for elegant presentation
- White chocolate shamrocks
Step-by-Step Instructions for Making St. Patrick’s Day Cupcakes
Step 1: Prepare Your Baking Setup
Preheat your oven to 350°F (175°C) and position a rack in the center of the oven for even heat distribution. Line two standard 12-cup muffin tins with paper cupcake liners. Choose white liners to show off the cake color, or use green liners for extra festive presentation. Avoid dark-colored pans if possible, as they can cause over-browning on the bottoms and edges.
Set out all your ingredients and allow the butter, eggs, milk, and sour cream to come to room temperature. This step is crucial for proper incorporation and even baking. Room temperature ingredients emulsify together smoothly, creating a homogeneous batter that bakes evenly. Cold ingredients can cause the butter to seize up and create a lumpy batter that produces dense cupcakes.
Gather all your measuring cups, spoons, mixing bowls, and electric mixer. Having everything ready before you start mixing ensures smooth workflow and prevents you from forgetting ingredients or steps in the middle of the process.
Step 2: Mix the Dry Ingredients
In a large mixing bowl, whisk together the flour, sugar, baking powder, baking soda, and salt. Whisk vigorously for about 30 seconds to ensure all the ingredients are thoroughly combined and the leavening agents are evenly distributed throughout the flour. This dry ingredient mixture can be prepared up to a day in advance and stored covered at room temperature.
Add the softened butter to the dry ingredients. Using an electric mixer fitted with the paddle attachment, beat on low speed for about 3 minutes. The mixture should resemble coarse sand or breadcrumbs, with the butter evenly coating all the flour particles. This reverse creaming method creates a tender crumb by coating the flour with fat before adding liquid, which limits gluten development.
Step 3: Combine Wet Ingredients
In a separate medium bowl or large measuring cup, whisk together the eggs, milk, sour cream, vanilla extract, and vegetable oil. Whisk until completely smooth and homogeneous—you shouldn’t see any distinct egg or sour cream streaks. The mixture should be pale yellow and slightly frothy.
This wet ingredient mixture emulsifies more easily when all components are at room temperature. The uniform mixture will incorporate seamlessly into the dry ingredients, creating smooth batter without overmixing.
Step 4: Create the Cupcake Batter
With your mixer running on low speed, slowly pour the wet ingredients into the butter-flour mixture. Add the wet ingredients in two or three additions, mixing just until incorporated between each addition. Once all the wet ingredients are added, increase the speed to medium and beat for exactly 1 minute. The batter should be smooth, thick, and pale, with a glossy appearance.
Stop the mixer and scrape down the sides and bottom of the bowl with a rubber spatula, ensuring no pockets of unmixed ingredients remain. Give the batter a few final stirs by hand. The finished batter should be thick but pourable, similar to very thick pancake batter.
Step 5: Fill and Bake the Cupcakes
Using a large cookie scoop (about 3 tablespoons capacity) or a ¼-cup measuring cup, divide the batter evenly among the prepared cupcake liners. Fill each liner about two-thirds full—this allows room for the cupcakes to rise without overflowing. Consistency in portion size ensures all cupcakes bake evenly and finish at the same time.
Tap the muffin tins gently on the counter once or twice to release any air bubbles trapped in the batter. This simple step prevents large holes from forming inside your cupcakes.
Bake for 18-20 minutes, rotating the pans halfway through baking time for even browning. The cupcakes are done when a toothpick inserted into the center comes out clean or with just a few moist crumbs, and the tops spring back when lightly pressed. The cupcakes should be golden on top with slightly domed crowns.
Step 6: Cool the Cupcakes Completely
Remove the cupcake tins from the oven and let them cool in the pans for 5 minutes. This brief rest allows the structure to set and makes the cupcakes easier to remove without falling apart. After 5 minutes, transfer the cupcakes to a wire cooling rack.
Allow the cupcakes to cool completely before frosting—this takes approximately 30-45 minutes. Attempting to frost warm cupcakes will cause the buttercream to melt and slide off, creating a messy disaster. The cupcakes should be completely cool to the touch, including the bottoms.
If you’re in a hurry, you can place the completely cooled cupcakes in the refrigerator for 10-15 minutes to chill them slightly. Cold cupcakes actually frost even more easily than room temperature ones.
Step 7: Make the Green Buttercream Frosting
In a large mixing bowl, beat the softened butter with an electric mixer on medium speed for 2-3 minutes until light, fluffy, and pale in color. The butter should increase in volume and look almost white. Properly creamed butter creates the lightest, most luxurious buttercream.
Add the sifted powdered sugar one cup at a time, mixing on low speed after each addition to prevent a sugar cloud explosion. Once all the sugar is added, beat on medium-high speed for 3-4 minutes. The frosting will look dry and crumbly at first—this is normal.
Add the vanilla extract, salt, and 3 tablespoons of heavy cream. Beat on medium-high speed for 2-3 minutes until the frosting is light, fluffy, and smooth. If the frosting seems too thick for piping or spreading, add the additional tablespoon of cream and beat again. The finished frosting should be spreadable but firm enough to hold its shape.
Add green gel food coloring one tiny drop or toothpick-amount at a time, mixing thoroughly between additions until you achieve your desired shade of green. For traditional St. Patrick’s Day green, you’ll want a vibrant emerald or Kelly green shade. Remember that colors often deepen slightly as the frosting sits.
Step 8: Frost and Decorate the Cupcakes
Transfer the green buttercream to a piping bag fitted with your favorite decorating tip. Popular choices for St. Patrick’s Day include large star tips (for swirled rosettes), round tips (for classic swirls), or petal tips (for flower designs). If you don’t have piping equipment, you can simply spread the frosting with an offset spatula or butter knife for a rustic look.
Hold the cupcake in one hand and the piping bag in the other. Start piping from the outer edge of the cupcake, working your way inward in a circular motion, and ending with a peak in the center. Apply steady, even pressure for the most professional-looking swirls.
Immediately after frosting each cupcake (while the buttercream is still soft), add your decorations. Sprinkle with green sprinkles, press a fondant shamrock into the center, dust with edible gold glitter, or arrange mini gold coins around the edges. The decorating possibilities are limited only by your imagination and the St. Patrick’s Day supplies available at your local craft store.
For a rainbow effect, add a small piece of rainbow candy or fruit leather tucked into the frosting on one side, creating the classic St. Patrick’s Day rainbow-and-pot-of-gold imagery.

Pro Tips for Perfect St. Patrick’s Day Cupcakes Every Time
Achieve the Perfect Cupcake Dome
The ideal cupcake has a gentle dome shape—not completely flat and certainly not peaked like a mountain. To achieve this perfect dome, ensure your oven temperature is accurate by using an oven thermometer. Ovens that run too hot cause cupcakes to rise too quickly and form peaked tops that often crack. Fill your cupcake liners consistently to two-thirds full so all cupcakes rise to the same height.
Avoid opening the oven door during the first 15 minutes of baking, as temperature fluctuations can cause cupcakes to sink. The structure needs time to set before being exposed to cooler air. When you do check for doneness, work quickly and close the oven door promptly.
Create the Perfect Buttercream Consistency
Buttercream consistency can make or break your decorating efforts. For piping detailed designs, you want frosting that’s firm enough to hold its shape—it should stand up in stiff peaks when you lift the beaters. For a more rustic swirl or knife-spread frosting, slightly thinner consistency works better.
If your frosting becomes too soft (perhaps from a warm kitchen), refrigerate it for 10-15 minutes, then beat it again before using. If it’s too stiff and difficult to pipe, add cream one teaspoon at a time until you reach the desired consistency. Temperature matters too—frosting that’s too cold is difficult to pipe, while frosting that’s too warm becomes soupy.
Master the Art of Food Coloring
Achieving the perfect St. Patrick’s Day green takes patience and the right coloring product. Gel food coloring provides the most vibrant colors without thinning your frosting. Start with just a tiny amount—you can always add more, but you can’t take color away.
For traditional Kelly green, you’ll need more coloring than you might expect. Add small amounts, mixing thoroughly between additions, until you reach your desired shade. Remember that buttercream often darkens slightly as it sits, so don’t over-color initially. If you want a lighter mint green, use much less coloring for a softer, more pastel effect.
To create two-tone or ombre effects, divide your frosting into portions and color each one differently. Load multiple colors into the same piping bag for automatic color variation as you pipe.
Make-Ahead Strategy for Stress-Free Celebration
These St. Patrick’s Day Cupcakes are perfect for advance preparation. Bake the unfrosted cupcakes up to two days ahead, let them cool completely, then store them in an airtight container at room temperature. The cupcakes actually become slightly more moist and flavorful after resting overnight.
Prepare the buttercream frosting up to three days in advance and refrigerate in an airtight container. When ready to use, let it come to room temperature for about an hour, then beat it with an electric mixer for 1-2 minutes to restore the fluffy texture. The re-whipped frosting will look and taste freshly made.
For maximum freshness, frost the cupcakes the morning of or the night before your event. Fully decorated cupcakes can be stored at room temperature (if your kitchen is cool) or in the refrigerator for up to 2 days.
Troubleshooting Common Cupcake Issues
Dense, heavy cupcakes: This usually results from overmixing the batter after adding the flour, which develops too much gluten. Mix just until ingredients are combined—the batter doesn’t need to be perfectly smooth. Dense cupcakes can also come from expired baking powder or baking soda, so check those dates.
Dry cupcakes: Often caused by overbaking or using too much flour. Set a timer and check cupcakes at the minimum baking time. When measuring flour, use the spoon-and-level method rather than scooping, which packs in excess flour.
Cupcakes that sink in the middle: Usually caused by underbaking, opening the oven door too early, or too much leavening agent. Ensure your oven temperature is accurate and resist checking the cupcakes until at least 15 minutes have passed.
Common Mistakes to Avoid When Making St. Patrick’s Day Cupcakes
Mistake #1: Using Cold Ingredients
This is perhaps the most common mistake home bakers make when preparing cupcakes. Cold butter doesn’t cream properly with sugar, cold eggs can cause butter to seize and create lumpy batter, and cold milk and sour cream don’t incorporate smoothly. These temperature issues result in cupcakes with uneven texture, poor rise, and dense crumb.
Always set your refrigerated ingredients out 30-60 minutes before baking. If you forget, you can bring eggs to room temperature quickly by placing them in a bowl of warm (not hot) water for 5 minutes. Microwave butter for just 5-10 seconds at 50% power, checking frequently—you want softened butter, not melted.
Mistake #2: Overfilling the Cupcake Liners
It’s tempting to fill those cupcake liners all the way to the top to create bigger cupcakes, but this backfires spectacularly. Overfilled liners cause batter to overflow during baking, creating mushroom-topped cupcakes with uneven edges, or worse, a mess that bakes onto your pan. The cupcakes may also have raw centers because the excess batter doesn’t bake through properly.
Stick to filling liners two-thirds full—this provides the perfect amount of batter for beautifully domed cupcakes with neat edges. Use a cookie scoop or measuring cup for consistent portions that ensure all your cupcakes look uniform.
Mistake #3: Opening the Oven Door Too Soon
Every time you open the oven door, the temperature drops significantly, which disrupts the baking process. Opening the door during the critical first 15 minutes of baking can cause cupcakes to collapse, sink, or bake unevenly. The structure hasn’t set yet, and the sudden temperature change causes havoc with the rising process.
Set a timer and resist the urge to peek before at least 15 minutes have elapsed. When you do check for doneness, work quickly—test with a toothpick, check the results, and close the door immediately. If the cupcakes need more time, set another timer for 2-3 minutes and repeat.
Mistake #4: Frosting Warm Cupcakes
This mistake seems obvious, yet it’s committed surprisingly often, usually due to impatience. Frosting warm cupcakes causes the buttercream to melt into a soupy mess that slides off the cupcake and pools at the bottom. You’ll end up with a sticky disaster instead of beautifully frosted cupcakes.
Always let cupcakes cool completely—they should be room temperature all the way through, including the bottoms. This typically takes 30-45 minutes on a cooling rack. If you’re pressed for time, you can refrigerate cooled (but not warm) cupcakes for 15 minutes to chill them further.
Mistake #5: Using Liquid Food Coloring
Liquid food coloring is cheap and widely available, but it’s terrible for frosting projects. You need to use so much liquid coloring to achieve vibrant colors that you end up thinning your frosting significantly, changing its consistency from perfectly pipeable to runny and difficult to work with. Plus, liquid coloring often has a slightly bitter aftertaste.
Invest in gel food coloring—it’s concentrated, comes in beautiful colors, and doesn’t alter frosting consistency. A small container lasts for years since you only need tiny amounts. Professional gel colors (available at craft stores or online) produce the most vibrant, true-to-color results.
Storage and Serving Suggestions for St. Patrick’s Day Cupcakes
Proper Storage Techniques
Store unfrosted cupcakes in an airtight container at room temperature for up to 3 days. The airtight seal prevents them from drying out while maintaining their soft, tender texture. If your kitchen is particularly warm or humid, refrigerate them instead, though refrigeration can dry out cupcakes slightly.
Frosted cupcakes can be stored at room temperature (if your kitchen is cool, below 70°F) for up to 2 days, or refrigerated for up to 5 days. When refrigerating, place them in a single layer in a large airtight container to prevent the frosting from getting smashed or picking up refrigerator odors. Buttercream frosting hardens slightly in the refrigerator, so allow frosted cupcakes to sit at room temperature for 30 minutes before serving for the best texture.
These cupcakes freeze beautifully, making them perfect for advance preparation. Freeze unfrosted cupcakes wrapped individually in plastic wrap, then placed in a freezer bag or container for up to 3 months. Thaw overnight in the refrigerator or for 1-2 hours at room temperature, then frost as usual. You can also freeze fully frosted cupcakes—freeze them unwrapped on a baking sheet until solid, then transfer to an airtight container with parchment paper between layers.
Creative Serving Presentations
Transform your St. Patrick’s Day Cupcakes into the centerpiece of your celebration with thoughtful presentation. Arrange them on a tiered cupcake stand for dramatic visual impact, alternating plain green-frosted cupcakes with elaborately decorated ones for variety and interest. The height created by a tiered stand makes even a dozen cupcakes look impressive and party-worthy.
Create a “pot of gold” display by arranging cupcakes in a circle with a small pot (real or decorative) filled with gold-wrapped chocolate coins in the center. Add rainbow decorations arching from the cupcakes to the pot for the complete St. Patrick’s Day imagery. This themed display works wonderfully for parties and becomes a conversation piece.
For individual servings at dinner parties or plated desserts, serve each cupcake on a small white plate with a drizzle of chocolate or caramel sauce, a dusting of cocoa powder, and a sprig of fresh mint. This elevated presentation transforms the humble cupcake into restaurant-quality dessert.
Package individual cupcakes in clear cupcake containers tied with green ribbon for party favors, teacher gifts, or care packages. The clear containers show off your beautiful decorating work while protecting the frosting during transport. Add a small tag with a St. Patrick’s Day message for a personal touch.
Pairing Suggestions
While these cupcakes are delicious on their own, they pair wonderfully with complementary beverages and accompaniments:
- Irish coffee: For adult gatherings, the coffee and Irish whiskey combination complements the vanilla cupcakes beautifully
- Cold milk: Classic and perfect, especially for children’s parties
- Mint hot chocolate: The mint enhances the St. Patrick’s Day theme
- Vanilla ice cream: Serve slightly warm cupcakes (without frosting) with a scoop of ice cream for a decadent dessert
- Fresh berries: Strawberries or raspberries add bright color and cut through the sweetness
Frequently Asked Questions About St. Patrick’s Day Cupcakes
Can I make these cupcakes without sour cream?
Yes, you can substitute Greek yogurt for the sour cream in equal amounts. Full-fat Greek yogurt works best and provides similar tanginess and moisture to the cupcakes. The texture will be nearly identical, though the flavor will be slightly different—still delicious, just subtly distinct. If you don’t have either sour cream or Greek yogurt, you can use an equal amount of additional whole milk, though the cupcakes won’t be quite as moist or tender.
How do I get the frosting perfectly smooth?
Achieving silky-smooth buttercream requires three key steps: sifting your powdered sugar to remove all lumps, beating the butter alone for several minutes until it’s light and fluffy before adding sugar, and adding enough liquid (heavy cream) to reach the right consistency. After mixing, let the frosting sit for a few minutes so air bubbles rise to the surface, then give it a final gentle stir. If you notice any remaining air bubbles, press them out with a spatula. For ultra-smooth frosting, some bakers use a technique called “smoothing” where they beat the frosting on low speed for an additional minute after it’s mixed—this pops air bubbles and creates an extra-smooth texture.
Can I use a different flavor for the cupcakes?
Absolutely! This versatile cupcake base works beautifully with flavor additions. Add ½ teaspoon of peppermint extract to create mint chocolate cupcakes (use chocolate buttercream instead of green). Replace the vanilla with almond extract for almond cupcakes. Stir in ½ cup of mini chocolate chips for chocolate chip cupcakes. Add 2 tablespoons of Irish cream liqueur (reduce milk by 2 tablespoons) for adult Irish cream cupcakes. You can even make chocolate cupcakes by replacing ½ cup of flour with cocoa powder, though you’ll need to adjust the baking time slightly.
Why did my cupcakes turn out flat instead of domed?
Flat cupcakes usually result from one of several issues: expired or insufficient leavening agents (check that your baking powder and baking soda are fresh), overmixing the batter after adding flour (which develops too much gluten and creates tough, flat cupcakes), oven temperature too low (causing slow, even rise instead of the quick rise that creates domes), or opening the oven door too early. To fix flat cupcakes in future batches, check your leavening agent expiration dates, mix gently just until ingredients combine, verify your oven temperature with an oven thermometer, and avoid opening the door for the first 15 minutes of baking.
How do I transport frosted cupcakes without ruining them?
Transporting frosted cupcakes requires the right container and technique. Use a cupcake carrier with fitted compartments that hold each cupcake securely in place—these are available at most kitchen supply stores and prevent sliding during transport. If you don’t have a carrier, a large, shallow cardboard box works well. Place cupcakes in the box without touching each other, then gently slide wooden skewers or straws through the box sides about an inch above the cupcakes to create a “roof” that prevents anything from touching the frosting. Cover the skewers with plastic wrap or aluminum foil. Always transport cupcakes in the cabin of your car (not the trunk) where you can control temperature, and avoid hot days when buttercream might soften.
Can I make these cupcakes dairy-free or vegan?
Yes, with a few substitutions. For dairy-free cupcakes, replace the butter with vegan butter or coconut oil (melted and cooled), use dairy-free milk (oat, almond, or soy), and substitute the sour cream with dairy-free yogurt or additional dairy-free milk mixed with 1 tablespoon of lemon juice. For the frosting, use vegan butter and dairy-free cream or coconut cream. The flavor will be slightly different but still delicious. For fully vegan cupcakes, you’ll also need to replace the eggs—use flax eggs (2 tablespoons ground flaxseed mixed with 6 tablespoons water, let sit 5 minutes) or commercial egg replacer. Vegan cupcakes may have a slightly denser texture but are still tasty and festive.
What’s the best way to store leftover buttercream?
Leftover buttercream frosting stores beautifully in an airtight container in the refrigerator for up to 2 weeks or in the freezer for up to 3 months. To use refrigerated frosting, let it come to room temperature for about an hour, then beat it with an electric mixer for 1-2 minutes until light and fluffy again. Frozen frosting should be thawed in the refrigerator overnight, then brought to room temperature and re-whipped. The re-whipped frosting will look and taste freshly made. This makes it easy to make frosting in advance or save extra frosting for future baking projects.
Final Thoughts on These Festive St. Patrick’s Day Cupcakes
These St. Patrick’s Day Cupcakes represent the perfect intersection of delicious baking and festive celebration. The tender, moist vanilla cupcakes provide a canvas that’s flavorful enough to stand alone yet versatile enough to pair beautifully with vibrant green frosting and creative decorations. Whether you’re an experienced baker or just starting your baking journey, this recipe offers reliable results that will make you look like a professional.
The true magic of these cupcakes extends beyond their taste and appearance—they create opportunities for connection and celebration. Baking together as a family, decorating with children, sharing treats with neighbors, or bringing cupcakes to office parties all contribute to the community spirit that makes St. Patrick’s Day special. These small acts of homemade celebration carry more meaning than any store-bought alternative.
As March 17th approaches each year, you’ll find yourself returning to this recipe, perhaps developing your own signature decorating style or family traditions around their preparation. The process of transforming simple ingredients into festive cupcakes becomes part of your St. Patrick’s Day celebration, creating memories that last far longer than the treats themselves.
So gather your ingredients, preheat your oven, and prepare to create some St. Patrick’s Day magic. Whether you’re celebrating Irish heritage, enjoying the arrival of spring, or simply looking for an excuse to bake something festive and delicious, these cupcakes deliver on every level. May the luck of the Irish be with you in all your baking adventures! Happy St. Patrick’s Day! 🍀
Print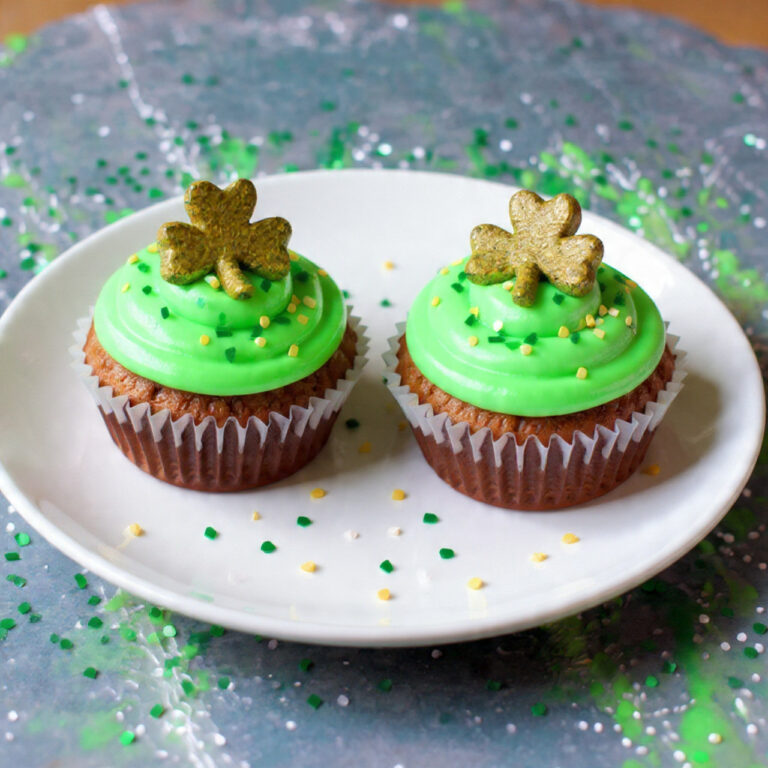
St. Patrick’s Day Cupcakes: Moist Vanilla Cupcakes with Green Buttercream Frosting
These festive St. Patrick’s Day Cupcakes feature incredibly moist vanilla cupcakes topped with vibrant green buttercream frosting and festive decorations.
- Total Time: 1 hour 5 minutes
- Yield: 24 cupcakes
Ingredients
For the Cupcakes:
- 1¾ cups (220g) all-purpose flour
- 1½ cups (300g) granulated sugar
- 1½ teaspoons baking powder
- ½ teaspoon baking soda
- ½ teaspoon salt
- ½ cup (113g) unsalted butter, softened to room temperature
- 2 large eggs, room temperature
- ½ cup (120ml) whole milk, room temperature
- ½ cup (120g) sour cream, room temperature
- 2 teaspoons pure vanilla extract
- 2 tablespoons vegetable oil
For the Green Buttercream Frosting:
- 1 cup (226g) unsalted butter, softened to room temperature
- 4 cups (480g) powdered sugar, sifted
- 3-4 tablespoons heavy cream
- 2 teaspoons pure vanilla extract
- Pinch of salt
- Green gel food coloring
Decorations:
- Green sprinkles, shamrock decorations, gold edible glitter, or other St. Patrick’s Day toppings
Instructions
- Preheat and prepare: Preheat oven to 350°F (175°C). Line two 12-cup muffin tins with cupcake liners.
- Mix dry ingredients: In a large bowl, whisk together flour, sugar, baking powder, baking soda, and salt. Add softened butter and beat on low speed for 3 minutes until mixture resembles coarse sand.
- Combine wet ingredients: In a separate bowl, whisk together eggs, milk, sour cream, vanilla, and oil until smooth.
- Create batter: Add wet ingredients to dry ingredients in two additions, mixing on low speed just until combined. Increase to medium speed and beat for 1 minute. Scrape bowl and mix briefly by hand.
- Fill and bake: Divide batter evenly among cupcake liners, filling each about two-thirds full. Bake for 18-20 minutes, rotating pans halfway through, until a toothpick comes out clean.
- Cool completely: Cool cupcakes in pans for 5 minutes, then transfer to a wire rack to cool completely (30-45 minutes).
- Make frosting: Beat butter on medium speed for 2-3 minutes until fluffy. Add powdered sugar one cup at a time, mixing on low after each addition. Add vanilla, salt, and 3 tablespoons cream. Beat on medium-high for 3 minutes until light and fluffy. Add more cream if needed for desired consistency. Mix in green food coloring until desired shade is achieved.
- Frost and decorate: Pipe or spread frosting onto cooled cupcakes. Add green sprinkles, shamrock decorations, or other St. Patrick’s Day toppings while frosting is still soft.
Notes
- All ingredients must be at room temperature for best results
- Don’t overmix batter after adding flour—mix just until combined
- Cupcakes must be completely cool before frosting
- Use gel food coloring for vibrant green without thinning frosting
- Store unfrosted cupcakes at room temperature up to 3 days
- Store frosted cupcakes at room temperature 2 days or refrigerated 5 days
- Freeze unfrosted cupcakes up to 3 months
- For chocolate cupcakes, replace ½ cup flour with cocoa powder
- Can substitute Greek yogurt for sour cream in equal amounts
- Prep Time: 20 minutes
- Cook Time: 45 minutes
- Category: Desserts
- Method: Baking, Reverse Creaming
- Cuisine: American
- Diet: Vegetarian