

Sugar Cookie Bars: The Ultimate Easy Dessert Recipe (Ready in 30 Minutes!)
Introduction
Sugar Cookie Bars are the foolproof answer to your cookie cravings without all the fuss of rolling, cutting, and baking individual cookies. I discovered this recipe during one particularly hectic holiday season when I needed to bring dessert to three different gatherings in one week. Traditional sugar cookies would have taken hours, but these bars? They came together in less than 30 minutes from start to finish, and honestly, they disappeared faster than any batch of cookies I’ve ever made.
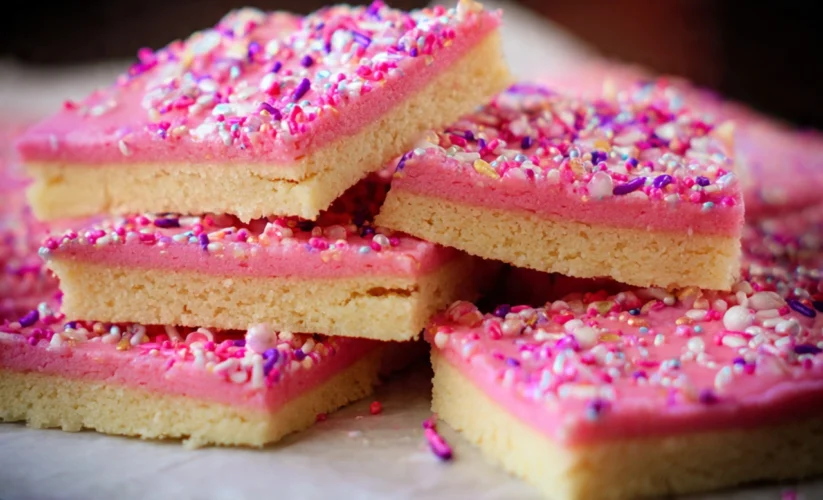
What makes these bars so special is their perfect texture—soft and chewy in the center with slightly crisp edges that provide just the right amount of contrast. They’re buttery, sweet, and completely customizable with your favorite mix-ins or toppings. Whether you’re baking for a bake sale, potluck, birthday party, or just because it’s Tuesday and you deserve something sweet, these sugar cookie bars deliver every single time.
The beauty of this recipe lies in its simplicity. While traditional sugar cookies require chilling the dough, rolling it out, cutting shapes, and baking in multiple batches, these bars use a single pan and bake all at once. You get that classic sugar cookie flavor with a fraction of the effort, making them perfect for busy families, beginner bakers, or anyone who values their time but refuses to compromise on taste.
Why You’ll Love This Sugar Cookie Bars Recipe
Before we dive into the ingredients, let me share why this recipe has become my go-to dessert:
- Time-saving magic: No chilling, rolling, or cutting required
- Consistent results: Every bar comes out perfectly baked
- Feeds a crowd: One pan makes 16-24 bars depending on your preferred size
- Endlessly customizable: Add sprinkles, chocolate chips, frosting, or keep them simple
- Freezer-friendly: Make ahead and store for up to three months
- Kid-approved: Simple enough for young bakers to help with
Ingredients
For the Cookie Bars:
- 1 cup (2 sticks) unsalted butter, softened to room temperature
- 1½ cups granulated sugar
- 2 large eggs, room temperature
- 2 teaspoons pure vanilla extract
- 3 cups all-purpose flour, spooned and leveled
- 2 teaspoons baking powder
- ½ teaspoon salt
- 3 tablespoons milk (whole milk works best)
Optional Toppings and Mix-ins:
- Colorful sprinkles (jimmies, nonpareils, or sanding sugar)
- Vanilla buttercream frosting
- Chocolate chips (white, milk, or dark)
- Lemon zest for a citrus twist
- Almond extract (substitute ½ teaspoon for vanilla)
Equipment Needed:
- 9×13-inch baking pan
- Parchment paper or cooking spray
- Large mixing bowl
- Electric mixer (stand or hand mixer)
- Rubber spatula
- Wire cooling rack

Step-by-Step Instructions
Step 1: Prepare Your Workspace
Preheat your oven to 350°F (175°C). Line a 9×13-inch baking pan with parchment paper, leaving an overhang on two sides for easy removal later. Alternatively, you can grease the pan generously with butter or cooking spray. The parchment paper method is my preferred approach because it makes cutting the bars so much cleaner.
Step 2: Cream the Butter and Sugar
In a large mixing bowl, combine the softened butter and granulated sugar. Using an electric mixer on medium-high speed, beat them together for 3-4 minutes until the mixture becomes light, fluffy, and pale in color. This creaming process is crucial—it incorporates air into the batter, which creates that perfect tender texture we’re after. Don’t rush this step; properly creamed butter and sugar make all the difference.
Step 3: Add Eggs and Vanilla
Reduce the mixer speed to medium and add the eggs one at a time, beating well after each addition. Scrape down the sides of the bowl with a rubber spatula to ensure everything is incorporated. Add the vanilla extract and mix until just combined. The mixture should look smooth and cohesive at this point.
Step 4: Combine Dry Ingredients
In a separate medium bowl, whisk together the flour, baking powder, and salt. This step ensures the leavening agent is evenly distributed throughout the flour, which prevents uneven rising and texture issues in your finished bars.
Step 5: Mix the Dough
With your mixer on low speed, gradually add the dry ingredients to the wet ingredients in three additions, alternating with the milk. Start and end with the flour mixture. Mix just until no white streaks remain—overmixing at this stage can lead to tough, dense bars. The dough will be thick and slightly sticky, which is exactly what you want.
Step 6: Spread in the Pan
Transfer the dough to your prepared baking pan. Using a rubber spatula or your hands (lightly dampened to prevent sticking), spread the dough evenly across the entire pan. This is where some people struggle—the dough is thick, so it takes a bit of patience. Press it into the corners and smooth the top as evenly as possible. An offset spatula works wonderfully for this if you have one.
Step 7: Add Toppings (Optional)
If you’re using sprinkles or other toppings, now’s the time to add them. Gently press them into the surface of the dough so they stick during baking. I usually add sprinkles before baking for a classic look, but you can also frost the bars after they cool and add decorations then.
Step 8: Bake to Perfection
Place the pan in your preheated oven and bake for 22-28 minutes. You’re looking for edges that are just starting to turn golden brown and a center that looks set but still slightly soft. The bars will continue to cook a bit as they cool, so don’t overbake them. A toothpick inserted in the center should come out with just a few moist crumbs—not wet batter, but not completely clean either.
Step 9: Cool Completely
This is the hardest part—waiting! Remove the pan from the oven and place it on a wire cooling rack. Let the bars cool in the pan for at least 30 minutes before attempting to cut them. For the cleanest cuts, I actually recommend cooling them completely, which takes about 2 hours. If you’re impatient like me, you can speed this up by placing the pan in the refrigerator after the initial 30-minute cooling period.
Step 10: Cut and Serve
Once cooled, use the parchment paper overhang to lift the entire slab of cookie bars out of the pan. Place it on a cutting board and use a sharp knife to cut into squares or rectangles. For the cleanest cuts, wipe your knife clean between each slice. You should get 16-24 bars depending on your preferred size.
Pro Tips for Perfect Sugar Cookie Bars
After making these bars dozens of times and troubleshooting every possible issue, here are my insider tips:
Temperature Matters
Room temperature ingredients are non-negotiable for the best texture. Cold butter won’t cream properly, and cold eggs can cause the batter to seize. Take your butter and eggs out of the refrigerator 45-60 minutes before you plan to bake.
Don’t Overmix
Once you add the flour, mix only until combined. Overmixing develops the gluten in the flour, which creates tough, cake-like bars instead of tender, cookie-like ones. As soon as you no longer see white streaks of flour, stop mixing.
The Toothpick Test Isn’t Perfect
Unlike cakes, cookie bars should have a few moist crumbs on the toothpick. If it comes out completely clean, you’ve likely overbaked them. They’ll firm up as they cool, so trust the process and pull them when they still look slightly underdone in the center.
Measure Flour Correctly
Too much flour is the number one reason these bars turn out dry and crumbly. Always spoon flour into your measuring cup and level it off with a knife—never scoop directly from the bag, which compacts the flour and gives you up to 25% more than the recipe calls for.
Customize Thoughtfully
When adding mix-ins like chocolate chips or nuts, fold them in gently at the end and don’t exceed 1 cup total. Too many add-ins can prevent the bars from holding together properly.
Line Your Pan
Even if you think your pan is well-greased, use parchment paper. It makes removing the bars infinitely easier and ensures you get perfect, intact squares every time.
Cool Before Frosting
If you plan to frost your bars, make absolutely sure they’re completely cool first. Even slightly warm bars will melt your frosting, creating a mess. I learned this the hard way at a bake sale when my beautiful frosted bars turned into a puddle.

Common Mistakes to Avoid
Mistake #1: Using Melted Butter
I know it’s tempting to speed things up by melting the butter, but don’t do it. Melted butter creates a completely different texture—more greasy and flat. You need softened (not melted) butter to create the proper structure through the creaming process.
Mistake #2: Opening the Oven Door Too Early
Every time you open the oven door, the temperature drops by about 25 degrees. This causes uneven baking and can lead to sunken centers. Resist the urge to check on your bars until at least 20 minutes have passed.
Mistake #3: Cutting While Warm
I know they smell amazing and you want to dive in immediately, but cutting warm bars leads to crumbling, messy squares. The bars need time to set up and firm as they cool. Practice patience—it’s worth it.
Mistake #4: Not Spreading Evenly
Uneven dough means uneven baking. Take the time to spread the dough uniformly across the pan, paying special attention to the corners. Thinner spots will overbake while thicker spots stay underdone.
Mistake #5: Skipping the Salt
Never omit the salt! It might seem like a tiny amount, but salt is essential for balancing the sweetness and enhancing all the other flavors. Without it, your bars will taste flat and one-dimensional.
Mistake #6: Storing Incorrectly
These bars can dry out quickly if not stored properly. Always keep them in an airtight container with a piece of bread (yes, really!) to maintain moisture. The bread releases moisture that the bars absorb, keeping them soft.
Storage and Serving Suggestions
Room Temperature Storage
Store your sugar cookie bars in an airtight container at room temperature for up to 5 days. Layer them with parchment paper if you’re stacking multiple rows to prevent sticking. Add a slice of bread to the container to keep them extra soft—replace the bread every couple of days.
Refrigerator Storage
While not necessary, you can refrigerate the bars for up to 10 days. Just know that refrigeration can make them slightly firmer. Let them sit at room temperature for 15-20 minutes before serving for the best texture.
Freezer Storage
These bars freeze beautifully! Wrap individual bars in plastic wrap, then place them in a freezer-safe bag or container. They’ll keep for up to 3 months. Thaw at room temperature for about 30 minutes, or warm briefly in the microwave for that fresh-baked taste.
Serving Ideas
While these bars are absolutely delicious on their own, here are some creative serving suggestions:
- À la mode: Serve warm with a scoop of vanilla ice cream
- Sundae bar: Use as the base for an ice cream sundae with hot fudge and whipped cream
- Sandwich cookies: Spread frosting between two bars
- Crumbled topping: Break into chunks and use as a topping for yogurt or pudding
- Party platter: Frost with different colored icings and cut into small squares for a dessert board
Flavor Variations to Try
Once you’ve mastered the classic version, experiment with these delicious variations:
Lemon Sugar Cookie Bars
Add 2 tablespoons of fresh lemon zest to the dough and replace 1 teaspoon of vanilla with lemon extract. Top with a simple lemon glaze made from powdered sugar and lemon juice.
Brown Butter Sugar Cookie Bars
Brown your butter before using it (remember to cool it back to room temperature first). This adds an incredible nutty, caramel-like depth to the bars.
Funfetti Sugar Cookie Bars
Fold in ½ cup of rainbow sprinkles to the dough for a festive, birthday cake-inspired version.
Almond Sugar Cookie Bars
Replace 1 teaspoon of vanilla extract with almond extract and top with sliced almonds before baking.
Cinnamon Sugar Cookie Bars
Add 1 tablespoon of ground cinnamon to the dry ingredients and sprinkle the top with cinnamon sugar before baking.

Frequently Asked Questions (FAQ)
Can I make these sugar cookie bars without eggs?
Yes, you can substitute each egg with a “flax egg” (1 tablespoon ground flaxseed mixed with 3 tablespoons water, let sit for 5 minutes) or use a commercial egg replacer. The texture will be slightly different—a bit denser—but they’ll still be delicious. I’ve also had success using ¼ cup unsweetened applesauce per egg for a softer, cake-like texture.
Why did my sugar cookie bars turn out dry and crumbly?
The most common culprit is too much flour. Make sure you’re measuring correctly by spooning flour into your measuring cup rather than scooping. Overbaking is the second most likely cause—remember, these should come out of the oven when they’re still slightly soft in the center. They firm up considerably as they cool.
Can I use salted butter instead of unsalted?
You can, but I’d recommend reducing the added salt to just a pinch (about ⅛ teaspoon) to prevent the bars from tasting too salty. Unsalted butter gives you better control over the final flavor, which is why most baking recipes call for it.
How do I know when the bars are done baking?
Look for edges that are just beginning to turn golden brown and a center that looks set but not dry. The top should no longer look wet or shiny. When you gently touch the center, it should spring back slightly. A toothpick inserted in the middle should come out with a few moist crumbs—not wet batter, but not completely clean.
Can I double this recipe?
Absolutely! Double all the ingredients and use two 9×13-inch pans. The baking time will remain the same since you’re still baking the same thickness. Just make sure your oven has room for both pans and rotate them halfway through baking for even results. Alternatively, you can use a half-sheet pan (18×13 inches) for thinner, crispier bars—reduce baking time by 3-5 minutes.
What’s the best way to frost sugar cookie bars?
Wait until the bars are completely cool, then spread your frosting of choice over the top. Vanilla buttercream is classic, but cream cheese frosting is delicious too. For the neatest application, frost the entire slab before cutting, then use a hot, clean knife to slice through the frosting cleanly. Wipe the knife between each cut for professional-looking results.
Can I make these bars gluten-free?
Yes! Substitute a 1:1 gluten-free flour blend (like King Arthur or Bob’s Red Mill) for the all-purpose flour. Make sure your blend contains xanthan gum or add ½ teaspoon to the recipe. The texture will be slightly different but still delicious. I’ve tested this with several readers who have celiac disease, and they’ve all reported great results.
Why are my bars spreading too much or too little?
Spreading issues usually relate to butter temperature or flour measurement. If they spread too much, your butter may have been too soft (almost melted) or you didn’t use enough flour. If they don’t spread enough and seem thick and cakey, you may have used too much flour or your butter was too cold when you started.
Final Thoughts
Sugar Cookie Bars have become my secret weapon for every occasion that calls for a sweet treat. They’re the recipe I turn to when I need something reliable, delicious, and impressive without spending hours in the kitchen. The best part? Everyone thinks you worked much harder than you actually did.
Whether you’re a seasoned baker or just starting your baking journey, this recipe is forgiving, flexible, and absolutely foolproof. Make them for your next potluck, bake sale, or random Tuesday afternoon when you need a little sweetness in your life. Trust me, one batch will never be enough—you’ll find yourself making these bars again and again.
So preheat that oven, grab your mixing bowl, and get ready to experience the magic of sugar cookie bars. Your kitchen is about to smell absolutely incredible, and your taste buds are in for a real treat. Happy baking!
Print
Sugar Cookie Bars: The Ultimate Easy Dessert Recipe (Ready in 30 Minutes!)
These Sugar Cookie Bars are the easiest way to get that classic sugar cookie flavor without rolling, cutting, or baking multiple batches. Soft, buttery, and perfectly sweet, they’re ready in just 30 minutes and feed a crowd!
- Total Time: 40 minutes
- Yield: 16-24 bars
Ingredients
- 1 cup (2 sticks) unsalted butter, softened
- 1½ cups granulated sugar
- 2 large eggs, room temperature
- 2 teaspoons pure vanilla extract
- 3 cups all-purpose flour, spooned and leveled
- 2 teaspoons baking powder
- ½ teaspoon salt
- 3 tablespoons milk
- Optional: sprinkles, frosting, or mix-ins
Instructions
- Preheat oven to 350°F. Line a 9×13-inch pan with parchment paper.
- Cream butter and sugar for 3-4 minutes until light and fluffy.
- Add eggs one at a time, then vanilla, beating well after each addition.
- Whisk together flour, baking powder, and salt in a separate bowl.
- Gradually add dry ingredients to wet ingredients, alternating with milk, mixing just until combined.
- Spread dough evenly in prepared pan.
- Add sprinkles or toppings if desired.
- Bake 22-28 minutes until edges are golden and center is set.
- Cool completely in pan before cutting into squares.
Notes
- For cleanest cuts, cool bars completely and use a sharp knife wiped clean between each slice
- Store in an airtight container for up to 5 days at room temperature
- These bars freeze beautifully for up to 3 months
- Don’t overmix once flour is added to keep bars tender
- Bars will firm up as they cool, so don’t overbake
- Prep Time: 15 minutes
- Cook Time: 25 minutes
- Category: Desserts
- Method: Baking
- Cuisine: American
- Diet: Vegetarian


1 Comment
[…] elegant pink cookies have captured hearts worldwide with their signature smooth tops, ruffled feet, and that perfect chewy-yet-crispy texture that melts on your tongue. While macarons have earned a reputation for […]
Comments are closed.