Chocolate Lava Cake: 15 Game-Changing Secrets for Perfect Molten Center (2026)
Introduction
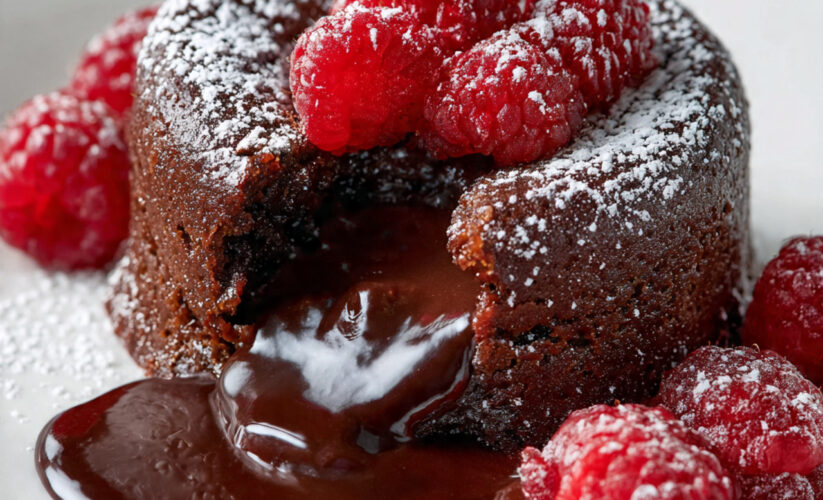
Chocolate Lava Cake is the ultimate showstopper dessert that never fails to impress with its dramatic molten chocolate center that flows like liquid gold when you break through the perfectly baked exterior. This decadent French dessert, also known as molten chocolate cake or chocolate fondant, combines the best of both worlds—a tender, cake-like outer shell with a luxuriously gooey, intensely chocolatey center.
What makes Chocolate Lava Cake so captivating is that magical moment when your spoon breaks through the surface and warm chocolate sauce oozes out onto the plate. It’s pure dessert theater that looks incredibly sophisticated yet is surprisingly achievable for home bakers.
The beauty of this recipe lies in its simplicity and speed. With just six basic ingredients and about 30 minutes from start to finish, you can create an elegant restaurant-quality dessert that tastes like you spent hours in the kitchen. Perfect for Valentine’s Day, dinner parties, or any time you want to end a meal with unforgettable indulgence.
Why This Chocolate Lava Cake Recipe Works Every Time
This recipe has been tested and refined to deliver consistent results with that coveted molten center. The secret lies in the precise ratio of ingredients, the exact baking temperature, and most importantly, the timing—which I’ll guide you through step by step.
Unlike many recipes that can leave you with either fully cooked cake or raw batter, this version uses high-quality chocolate and the right balance of eggs and flour to create that perfect contrast between set exterior and flowing interior. The technique ensures you get the molten center every single time without guesswork.
This recipe also includes foolproof timing cues and visual indicators, so even if your oven runs hot or cool, you’ll know exactly when to pull your cakes out for perfect results. Whether you’re making these for the first time or the fiftieth, you’ll achieve consistent, impressive outcomes.
Ingredients
For the Chocolate Lava Cakes:
- 6 ounces (170g) high-quality dark chocolate (60-70% cocoa), chopped
- ½ cup (113g) unsalted butter, cut into pieces
- 2 large eggs, at room temperature
- 2 large egg yolks, at room temperature
- ¼ cup (50g) granulated sugar
- Pinch of salt
- 2 tablespoons all-purpose flour
- 1 teaspoon vanilla extract
- 1 teaspoon espresso powder (optional, enhances chocolate flavor)
For Preparing Ramekins:
- 1 tablespoon softened butter for greasing
- 2 tablespoons cocoa powder for dusting
For Serving:
- Vanilla ice cream or gelato
- Fresh raspberries or strawberries
- Whipped cream
- Powdered sugar for dusting
- Fresh mint leaves
- Chocolate shavings or cocoa nibs
- Caramel or raspberry sauce
- Sea salt flakes
Optional Flavor Variations:
- Orange zest (1 teaspoon)
- Peppermint extract (¼ teaspoon)
- Liqueur (1 tablespoon Grand Marnier, Kahlua, or Bailey’s)
- Cinnamon (¼ teaspoon)
- Chili powder (pinch for Mexican chocolate)
Step-by-Step Instructions
Step 1: Prepare Your Ramekins Perfectly
This step is crucial and often overlooked. Generously butter four 6-ounce ramekins, making sure to coat every surface including the rim. Use your fingers or a pastry brush to get into all the corners.
Add about a tablespoon of cocoa powder to one ramekin, then tilt and rotate it to coat all surfaces completely. Tap out the excess cocoa into the next ramekin and repeat. This double coating of butter and cocoa creates a non-stick barrier that ensures your cakes release perfectly.
Place the prepared ramekins on a baking sheet for easy handling. Refrigerate them while you prepare the batter—this helps the butter coating set and creates an even better release.
Step 2: Melt the Chocolate and Butter
Create a double boiler by placing a heatproof bowl over a saucepan of simmering water, making sure the bottom of the bowl doesn’t touch the water. Add chopped chocolate and butter pieces to the bowl.
Stir occasionally with a rubber spatula until completely melted and smooth—this takes about 3-5 minutes. The mixture should look glossy and homogeneous.
Remove from heat and let cool for 5 minutes. This cooling period is important—if the mixture is too hot when you add the eggs, they’ll scramble. It should feel warm to the touch but not hot.
Step 3: Prepare the Egg Mixture
While the chocolate cools, whisk together whole eggs, egg yolks, sugar, and salt in a medium bowl. Use a whisk or electric mixer on medium speed and beat for about 2-3 minutes until the mixture becomes pale yellow, thick, and fluffy.
The eggs should reach the ribbon stage—when you lift the whisk, the mixture should fall in thick ribbons that sit on the surface for a few seconds before disappearing. This incorporation of air helps create the cake-like texture around the molten center.
Add vanilla extract and espresso powder (if using) to the egg mixture and whisk to combine. The espresso doesn’t make the cakes taste like coffee—it intensifies the chocolate flavor significantly.
Step 4: Combine and Add Flour
Pour the slightly cooled chocolate mixture into the egg mixture. Using a rubber spatula, gently fold together with broad, sweeping motions from the bottom of the bowl up and over. Continue until completely combined and no streaks remain.
Sift the flour over the chocolate mixture. This prevents lumps and ensures even distribution. Gently fold the flour in with just a few strokes—about 8-10 folds total.
Stop mixing as soon as the flour disappears. Overmixing develops gluten, which can make the cakes tough rather than tender. The batter should be smooth, glossy, and pourable.
Step 5: Fill and Chill (Optional but Recommended)
Remove your prepared ramekins from the refrigerator. Divide the batter evenly among the four ramekins, filling each about three-quarters full. A small ladle or measuring cup helps with even distribution.
At this point, you can either bake immediately or refrigerate the filled ramekins for up to 24 hours. Chilling actually improves results—it allows the batter to set slightly, creating an even better contrast between the cooked exterior and molten center.
If baking from chilled, add 1-2 extra minutes to the baking time. Let them sit at room temperature for 10 minutes before baking for more even cooking.
Step 6: Bake to Molten Perfection
Preheat your oven to 450°F (230°C). This high temperature is essential—it creates a set exterior while keeping the center molten.
Place the baking sheet with ramekins on the center rack. Bake for exactly 12-14 minutes. At 12 minutes, the edges should be set and pulling away slightly from the sides, while the center should still jiggle when you gently shake the pan.
Here’s the critical part: the tops should look set with a thin crust, but the center should appear slightly underbaked with a subtle jiggle. This is exactly what you want!
Remove from the oven immediately when you see these signs. Even 30 seconds of extra baking can mean the difference between molten centers and fully cooked cake.
Step 7: The Dramatic Reveal
Let the cakes rest in their ramekins for exactly 1 minute—no more, no less. This brief rest allows the edges to firm up slightly, making them easier to unmold while keeping the centers perfectly molten.
Run a thin knife around the edge of each ramekin to loosen. Place a serving plate upside down on top of each ramekin, then carefully flip both together in one confident motion. Gently lift off the ramekin.
If a cake doesn’t release immediately, give the ramekin a gentle shake or tap on the bottom. The cake should slide out perfectly onto the plate, revealing that beautiful domed shape.
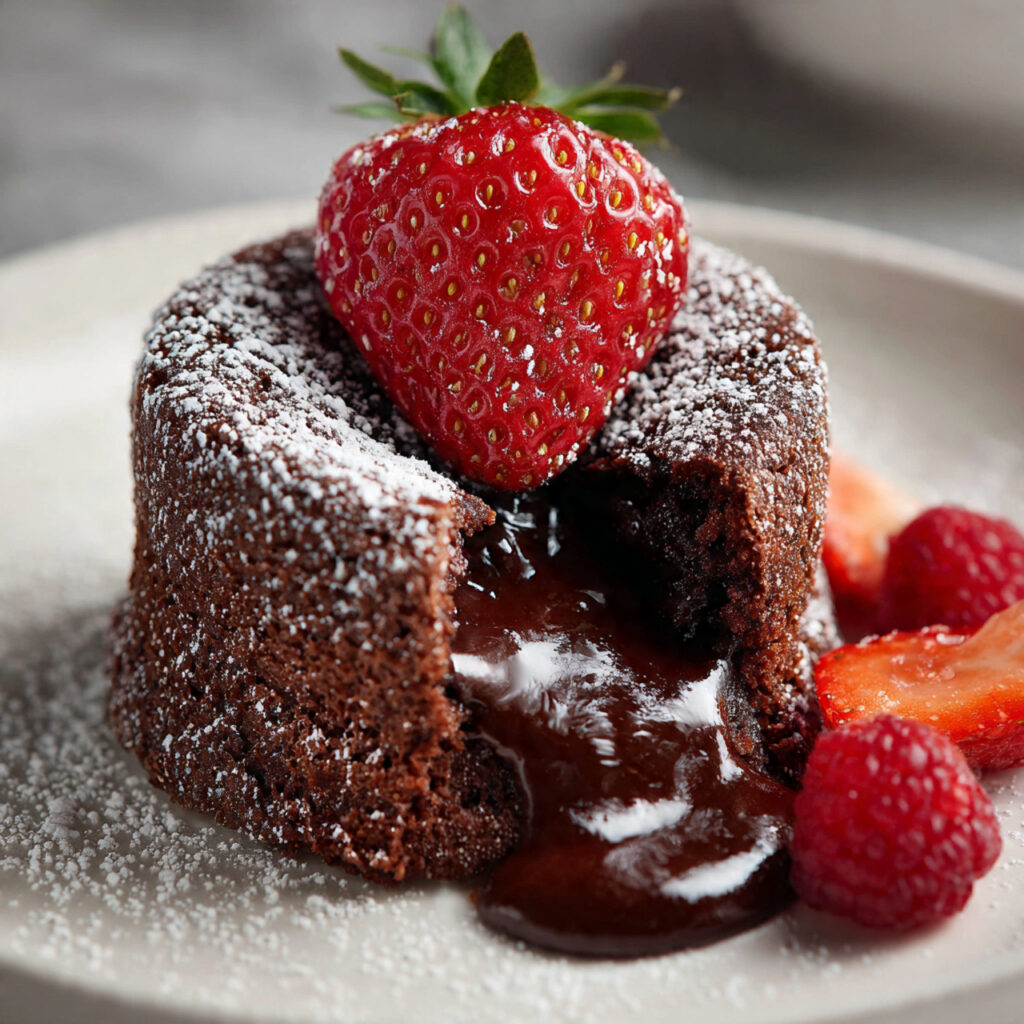
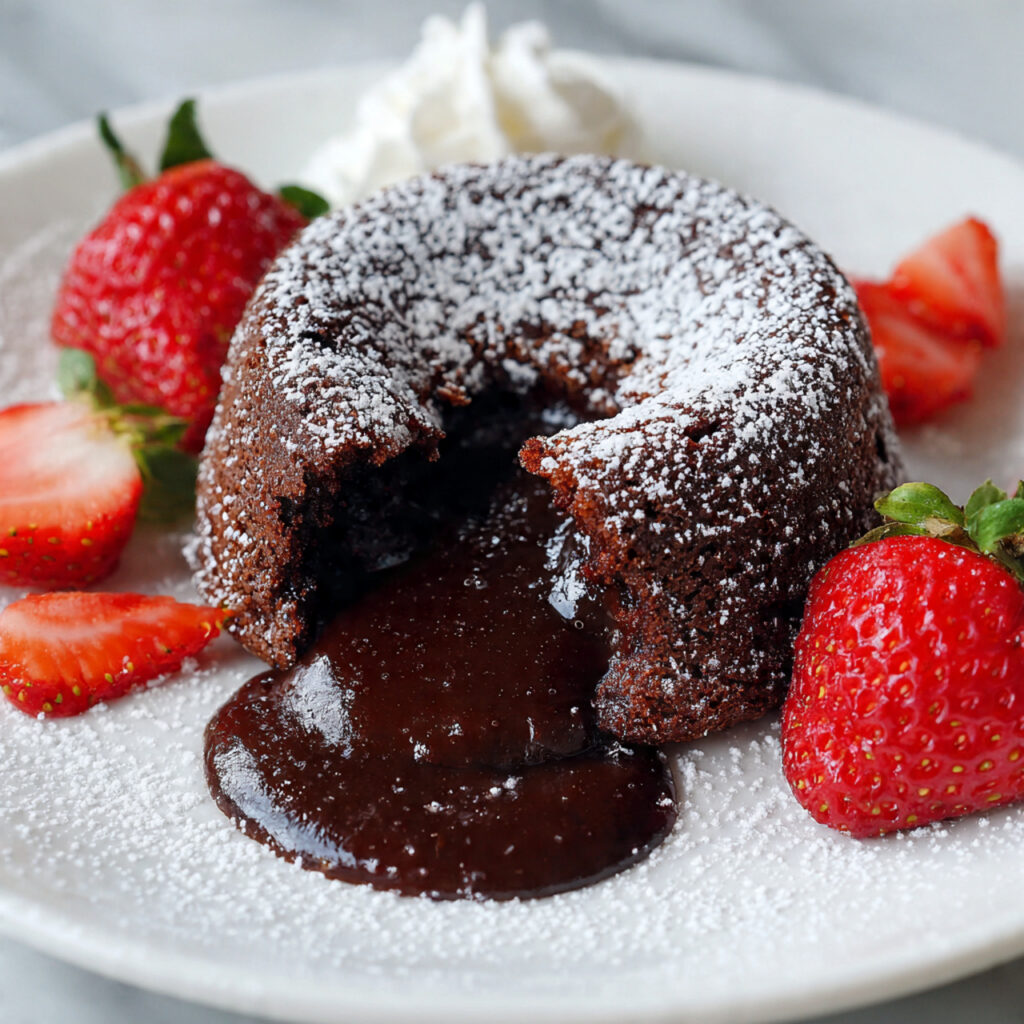
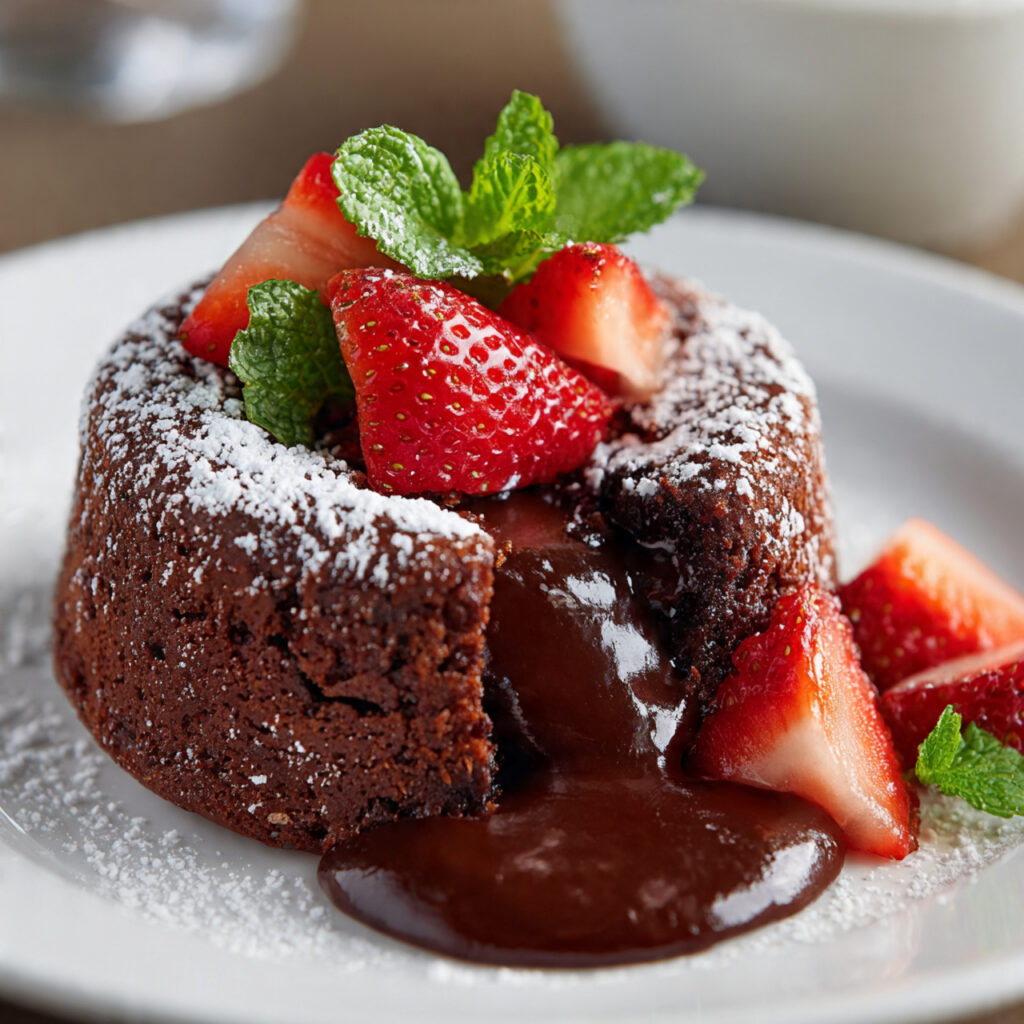
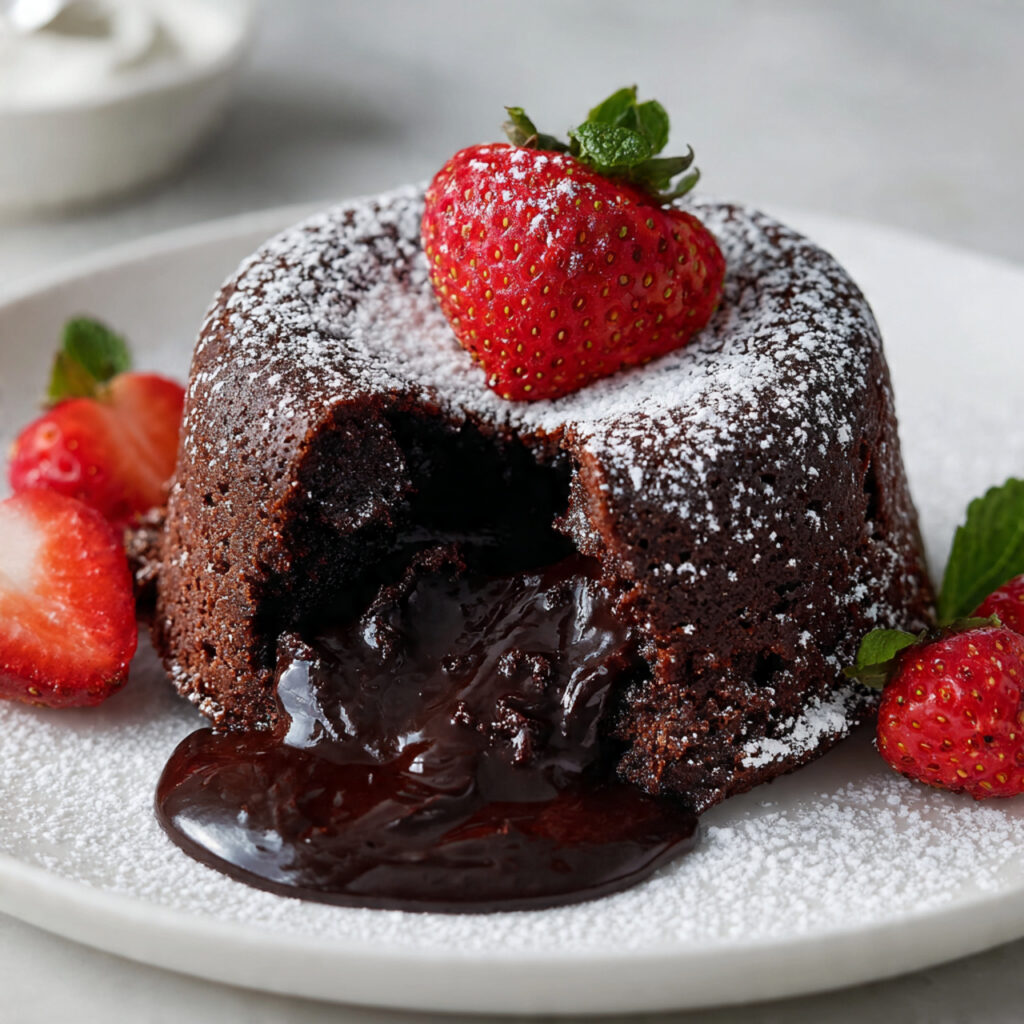
Dust with powdered sugar, add a scoop of vanilla ice cream, garnish with berries or mint, and serve immediately while the center is still molten and flowing.

Pro Tips for Perfect Chocolate Lava Cake
Use Quality Chocolate: This dessert is all about chocolate, so quality matters enormously. Use good baking chocolate with 60-70% cocoa content, not chocolate chips which contain stabilizers.
Room Temperature Eggs: Cold eggs don’t whip as well and can cause the melted chocolate to seize. Let them sit out for 30 minutes before using.
Don’t Skip the Cocoa Dusting: Buttering alone isn’t enough. The cocoa powder creates a barrier that ensures perfect release and adds extra chocolate flavor to the exterior.
Master the Timing: Every oven is different. The first time you make these, check at 11 minutes, then every 30 seconds after. Note your perfect time for future batches.
The Jiggle Test: When you gently shake the pan, the edges should be completely set but the center should jiggle like jello. That jiggle = molten perfection.
Make Ahead Magic: Fill the ramekins and refrigerate up to 24 hours before baking. This is perfect for dinner parties—no last-minute stress!
Size Matters: This recipe is calibrated for 6-ounce ramekins. If using different sizes, adjust timing: smaller ramekins need less time, larger ones need more.
Preheat Properly: A fully preheated oven is essential. Give it at least 20 minutes to reach temperature for consistent results.
Single Rack Baking: Always bake on the center rack with nothing else in the oven for even heat distribution.
Serve Immediately: These cakes wait for no one! The molten center begins to set as they cool, so serve within 2-3 minutes of unmolding.
Temperature Contrast: Serving with cold ice cream against the warm cake creates an incredible sensory experience. The contrast is part of the magic.
Espresso Enhancement: Even if you’re not a coffee person, that tiny bit of espresso powder makes the chocolate taste exponentially more intense without any coffee flavor.
Test Run First: If making these for an important occasion, do a practice batch to nail down your oven’s exact timing.
Individual Portions: The beauty of lava cakes is that they’re individually portioned, making them perfect for dinner parties—no slicing or serving drama.
Freeze for Later: You can freeze unbaked batter in prepared ramekins for up to 1 month. Bake directly from frozen, adding 3-4 minutes to the time.
Common Mistakes to Avoid
Overbaking: This is the #1 lava cake killer. Even one extra minute can mean a fully baked cake with no molten center. Trust the jiggle and remove from the oven when there’s still movement in the center.
Using Chocolate Chips: Chocolate chips contain stabilizers that prevent proper melting. Use high-quality bar chocolate chopped into pieces for best results.
Inadequate Greasing: Skimping on butter or forgetting the cocoa dust means stuck cakes. Be generous with both—this is not the time to skimp.
Wrong Ramekin Size: Using significantly smaller or larger ramekins throws off the baking time completely. Stick to 6-ounce ramekins or adjust timing accordingly.
Cold Batter in Hot Oven: If baking from refrigerated, let the ramekins sit at room temperature for 10 minutes first, or add extra baking time.
Oven Temperature Issues: An oven that’s too cool won’t set the exterior properly; too hot will overcook the outside before the center warms. Use an oven thermometer.
Opening the Oven Door: Don’t open the oven door to check on them before 11 minutes. Every opening releases heat and affects baking time.
Overmixing the Batter: Once you add the flour, mix gently and minimally. Overmixing develops gluten, creating tough, dense cakes instead of tender ones.
Waiting Too Long to Unmold: If you let cakes sit in ramekins for more than 2 minutes, they become harder to release and the center starts setting.
Wrong Chocolate Percentage: Milk chocolate is too sweet and doesn’t provide enough structure; very dark chocolate (85%+) can be too bitter and dry. Aim for 60-70%.
Storage and Serving Suggestions
Immediate Serving: Chocolate Lava Cake is at its absolute best served within 2-3 minutes of coming out of the oven when the center is perfectly molten and flowing.
Can’t Store Baked Cakes: Once baked, these cakes must be served immediately. The molten center is the whole point, and it sets as the cakes cool, losing that signature lava effect.
Storing Unbaked Batter:
- Refrigerator: Fill prepared ramekins, cover with plastic wrap, refrigerate up to 24 hours before baking
- Freezer: Wrap filled ramekins tightly in plastic wrap then foil, freeze up to 1 month
Baking from Frozen: No need to thaw! Bake directly from frozen at 450°F (230°C) for 15-17 minutes. The exterior will be set while the center remains gloriously molten.
Make-Ahead Strategy for Entertaining:
- Prepare ramekins in the morning
- Make batter and fill ramekins
- Refrigerate until dessert time
- Bake while clearing dinner plates
- Plate and serve immediately
Serving Suggestions:
Classic Presentation:
- Dust with powdered sugar through a fine sieve
- Add a scoop of vanilla ice cream or gelato
- Garnish with fresh mint sprig
- Serve on a white plate for elegant contrast
Elevated Presentations:
- Drizzle plate with raspberry or caramel sauce before placing cake
- Add fresh berries around the base
- Top with chocolate shavings or gold leaf
- Sprinkle with sea salt flakes for sophisticated contrast
- Serve with coffee or espresso for Italian-style finale
Flavor Combinations:
- Coffee ice cream for mocha lovers
- Raspberry sauce for fruity contrast
- Salted caramel sauce for sweet-salty balance
- Fresh strawberries for classic pairing
- Whipped cream with orange zest for citrus notes
Wine Pairings:
- Port wine (classic pairing)
- Late harvest Zinfandel
- Ruby or Tawny port
- Dessert wine like Banyuls
- Coffee or espresso for non-alcoholic option
Temperature Contrast: The magic of Chocolate Lava Cake lies in temperature contrasts—warm, flowing chocolate against cold ice cream creates an incredible sensory experience that’s greater than the sum of its parts.
Plating for Wow Factor:
- Use white plates to showcase the dark chocolate
- Cut into the cake at the table for dramatic lava flow
- Place sauce or ice cream on the side, not on top (unless using the lava as sauce)
- Keep garnishes minimal—the cake is the star
Frequently Asked Questions (FAQ)
Q: Why is my Chocolate Lava Cake center not molten? A: The most common reason is overbaking. Every oven is different, so your perfect time might be 11 minutes or 14 minutes. Look for these signs: edges should be set and pulling away slightly, but the center should still jiggle when you gently shake the pan. If there’s no jiggle, you’ve overbaked. Try reducing your baking time by 1 minute next time. Also, ensure your oven is fully preheated to 450°F.
Q: Can I make Chocolate Lava Cake ahead of time? A: You absolutely can prepare the batter in ramekins up to 24 hours ahead and refrigerate, or even freeze them for up to a month. However, once baked, they must be served immediately while the center is still molten. The beauty of this dessert is that you can have everything ready to go, then bake while you’re eating dinner so they’re perfectly timed for dessert.
Q: What size ramekins should I use for Chocolate Lava Cake? A: This recipe is designed for 6-ounce ramekins, which create the perfect ratio of baked exterior to molten center. If you only have 4-ounce ramekins, reduce baking time to 9-11 minutes. For 8-ounce ramekins, increase to 14-16 minutes. Always watch for the jiggle test rather than relying solely on time, as ramekin size affects baking significantly.
Q: Can I make Chocolate Lava Cake without eggs? A: Eggs are crucial to the structure and texture of lava cakes, making them very difficult to substitute successfully. However, some bakers have had luck using aquafaba (chickpea liquid) or commercial egg replacer, though results won’t be quite the same. For best vegan results, look for recipes specifically designed as vegan from the start, as they use different techniques to achieve the molten center.
Q: Why did my cakes stick to the ramekins? A: Insufficient or improper greasing is the culprit. You need two layers of protection: first, generously butter every surface of the ramekin including the rim. Second, dust thoroughly with cocoa powder, tapping out excess. Don’t skip either step! Also, make sure to run a knife around the edges before unmolding, and flip with confidence—hesitation can cause sticking.
Q: Can I use milk chocolate instead of dark chocolate? A: While possible, milk chocolate isn’t ideal for lava cakes. It’s too sweet and lacks the structure that dark chocolate provides, often resulting in overly sweet cakes with less defined centers. For best results, use dark chocolate with 60-70% cocoa content. If you prefer sweeter chocolate, try using 55-60% cocoa, but I wouldn’t go lower than that.
Q: How do I know when Chocolate Lava Cake is done? A: Look for three signs: (1) The edges are set and pulling away slightly from the ramekin sides, (2) The tops look dry with a thin crust, and (3) When you gently shake the pan, the centers jiggle like jello but the edges remain firm. That center jiggle is your guarantee of a molten center. If the whole cake is firm, you’ve overbaked.
Q: Can I make one large Chocolate Lava Cake instead of individual ones? A: Individual ramekins are ideal because they create the perfect ratio of exterior to center and bake evenly. A large lava cake is technically possible but very tricky—the outside tends to overbake before the center is set properly, and timing becomes much more difficult. If you must, use an 8-inch cake pan and extend baking to about 20-25 minutes, but results are less reliable.
Q: What’s the difference between Chocolate Lava Cake and chocolate fondant? A: They’re essentially the same dessert! “Molten chocolate cake” and “chocolate lava cake” are American terms, while “chocolate fondant” is the French term (fondant au chocolat). All refer to the same magical dessert with a molten center. Some recipes may have slight variations in proportions, but the concept is identical.
Conclusion: The Ultimate Chocolate Experience
Chocolate Lava Cake represents everything we love about dessert—pure indulgence, dramatic presentation, and that perfect moment when warm chocolate flows across your plate like liquid happiness. This isn’t just a dessert; it’s an experience that creates memories around dinner tables and brings out childlike excitement in grown adults.
What makes these cakes so special is that they deliver restaurant-level sophistication with surprisingly accessible home cooking techniques. You don’t need specialized equipment, professional training, or exotic ingredients. Just quality chocolate, basic baking staples, and attention to timing will reward you with desserts that rival anything from a high-end restaurant.
The beauty of mastering Chocolate Lava Cake lies in how it transforms you into the kind of cook people remember. Make these once for dinner guests, and you’ll be asked to bring them to every gathering thereafter. They’re the dessert that makes you look like a culinary wizard while secretly being one of the simplest elegant desserts you can make.
Beyond the impressive factor, there’s something deeply satisfying about perfecting the technique. Learning to recognize that crucial moment when the edges are set but the center still jiggles, understanding your oven’s quirks, and developing the confidence to pull them out at exactly the right moment—these skills make you a better, more intuitive baker overall.
Consider making Chocolate Lava Cake your signature dessert. Every cook needs one showstopper in their repertoire—that go-to recipe that never fails to impress and that you can make with your eyes closed. This could be yours. The recipe is forgiving enough for experimentation (try different chocolates, add flavor extracts, play with the toppings) while remaining reliably impressive.
The make-ahead capability makes these cakes perfect for entertaining without stress. Fill your ramekins in the morning or even days ahead, refrigerate or freeze them, then pop them in the oven while you’re clearing dinner plates. Twelve minutes later, you’re serving hot, fresh, molten-centered chocolate perfection.
Don’t be discouraged if your first batch isn’t perfect. Every oven is different, and finding your exact timing might take one or two tries. But once you’ve nailed it, you’ll have a foolproof technique that works every single time. Keep notes on your perfect timing, and soon you’ll be making these with the kind of casual confidence that makes others think you’re a professional pastry chef.
Remember that cooking is about creating joy—for yourself and others. The moment someone’s spoon breaks through that exterior and warm chocolate flows out, their face lights up with genuine delight. That moment of surprise and pleasure? That’s what cooking is all about. You’re not just serving dessert; you’re creating a small moment of magic.
So preheat that oven, break out your best chocolate, and prepare to master one of the most impressive yet achievable desserts in the culinary world. Whether this becomes your Valentine’s Day tradition, your dinner party finale, or your stress-relief baking project, you’re about to discover why Chocolate Lava Cake has captured hearts (and taste buds) around the globe.
Happy baking, and may your centers always be perfectly molten, your chocolate luxuriously flowing, and your dinner guests absolutely amazed. Now get in that kitchen and create some chocolatey magic—one perfectly timed, gloriously gooey lava cake at a time!
Print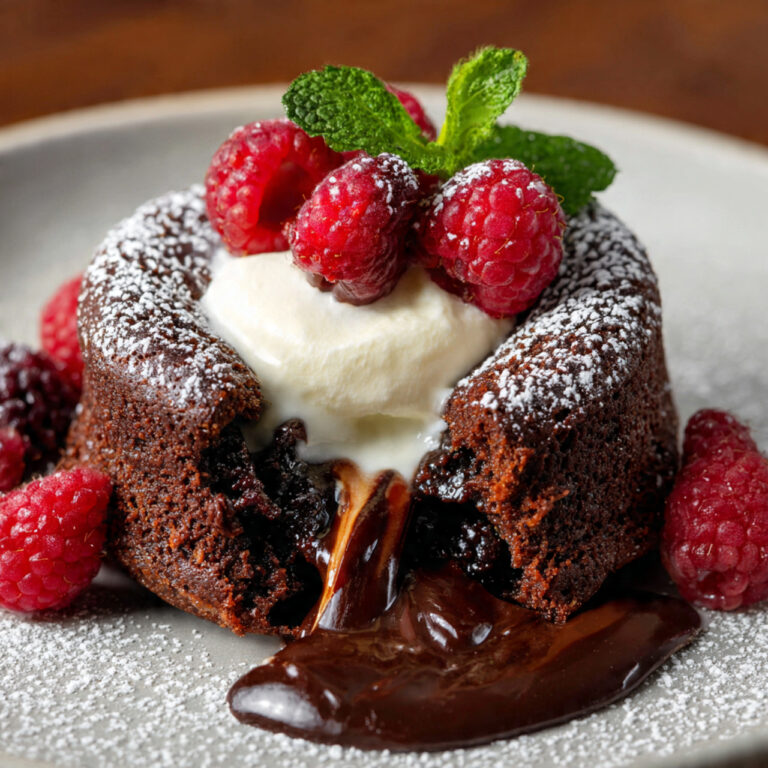
Chocolate Lava Cake: 15 Game-Changing Secrets for Perfect Molten Center (2026)
Decadent Chocolate Lava Cake features a perfectly baked exterior with a molten, flowing chocolate center that creates pure dessert magic. This restaurant-quality dessert is surprisingly easy to make at home with just six ingredients and foolproof timing techniques for guaranteed success.
- Total Time: 35 minutes
- Yield: 4 individual lava cakes
Ingredients
- Main: high-quality dark chocolate, unsalted butter, eggs, egg yolks, sugar, flour, vanilla, salt
- For ramekins: butter and cocoa powder for preparation
- Serving: vanilla ice cream, berries, powdered sugar, whipped cream, mint
- Optional: espresso powder, orange zest, liqueur, sea salt
Instructions
Generously butter and cocoa-dust four 6-oz ramekins, then refrigerate. Melt chocolate and butter in double boiler, cool slightly. Whisk eggs, yolks, sugar and salt until thick and pale. Fold in chocolate mixture, then gently fold in sifted flour. Divide batter among ramekins. Bake at 450°F for 12-14 minutes until edges are set but centers jiggle. Rest 1 minute, then invert onto plates. Serve immediately with ice cream.
Notes
Use 60-70% cocoa chocolate for best results. Don’t overbake—center should jiggle when done. Can refrigerate filled ramekins up to 24 hours or freeze up to 1 month before baking. Add 1-2 minutes if baking from chilled, 3-4 minutes from frozen. Serve immediately for molten center. Every oven differs—note your perfect timing for future batches.
- Prep Time: 15 minutes
- Cook Time: 20 minutes
- Category: Dessert
- Method: Baking
- Cuisine: French
- Diet: Vegetarian