Vanilla Milkshake (7 Simple Tricks) | Irresistibly Thick & Creamy

Introduction: The Timeless Appeal of a Perfect Vanilla Milkshake
A vanilla milkshake is more than just a simple dessert—it’s an American icon that evokes memories of retro diners, summer afternoons, and pure, uncomplicated pleasure. Despite its simplicity, creating the perfect vanilla milkshake requires understanding the delicate balance between thickness and drinkability, sweetness and vanilla intensity, and achieving that signature creamy texture that coats your straw just right.
What separates an exceptional vanilla milkshake from a mediocre one isn’t complicated—it’s about quality ingredients, proper ratios, and a few professional techniques that most home cooks overlook. This isn’t just blending ice cream with milk and hoping for the best. The perfect vanilla milkshake has a specific viscosity that’s thick enough to eat with a spoon but smooth enough to sip through a straw. It should taste intensely of real vanilla, not artificial flavoring, and have that luxurious mouthfeel that makes every sip satisfying.
Throughout my career developing recipes for restaurants and publications, I’ve tested countless milkshake variations and techniques. I’ve learned that the smallest details make the biggest differences—the temperature of your ingredients, the order you add them to the blender, how long you blend, even the type of vanilla you use. These seemingly minor choices determine whether you end up with a watery disappointment or a thick, creamy masterpiece.
This comprehensive guide will teach you everything you need to know to make vanilla milkshakes that rival the best diners and ice cream shops. Whether you’re making them for nostalgic reasons, to cool down on a hot day, or to impress your family with a special treat, this recipe and the techniques behind it will ensure perfect results every single time.
Understanding What Makes a Great Vanilla Milkshake
Before we dive into the recipe, let’s talk about what defines milkshake excellence. The texture should be thick and creamy—when you insert a straw and release it, the straw should stand upright on its own. Yet it shouldn’t be so thick that it’s impossible to drink without significant effort. This balance is crucial and depends on the ice cream-to-milk ratio.
The flavor profile should be dominated by rich, authentic vanilla. Not the one-dimensional sweetness of artificial vanilla flavoring, but the complex, almost floral notes of real vanilla extract or vanilla bean. The sweetness should be present but not cloying, allowing the dairy flavors and vanilla to shine through.
Temperature matters more than most people realize. A properly cold milkshake should be enjoyed immediately and should maintain its consistency for at least 5-10 minutes without separating or becoming too melted. This requires starting with very cold ingredients and not over-blending, which introduces warmth through friction.
Finally, there’s the visual appeal. A beautiful vanilla milkshake should have a pale cream color, possibly with tiny vanilla bean flecks if you’re using vanilla bean paste or seeds. It should look inviting and substantial, not thin or watery. When poured into a glass, it should have a subtle sheen and perhaps a few small air bubbles on the surface from blending.
Essential Ingredients for the Perfect Vanilla Milkshake
Primary Ingredients
Premium Vanilla Ice Cream (3 cups or about 450g): This is the star of the show, so quality matters enormously. Choose a high-quality vanilla ice cream with a high butterfat content (premium or super-premium brands typically have 14-16% butterfat versus 10-12% for standard). The ingredient list should be simple: cream, milk, sugar, egg yolks, and vanilla. Avoid ice creams with lots of stabilizers or artificial ingredients. French vanilla ice cream works beautifully for an extra-rich shake with its custard base.
Whole Milk (½ cup or 120ml, plus more for consistency adjustment): Whole milk provides the liquid necessary to blend the shake while maintaining richness. Using 2% or skim milk will result in a thinner, less satisfying shake. The fat content in whole milk is essential for that creamy mouthfeel. Start with ½ cup and add more gradually if needed—it’s easier to thin a shake than to thicken it.
Pure Vanilla Extract (1½ teaspoons): Even though you’re using vanilla ice cream, adding extra vanilla extract intensifies the flavor significantly. Use pure vanilla extract, never imitation. The real stuff contains hundreds of flavor compounds that artificial vanilla simply cannot replicate. Madagascar bourbon vanilla is the classic choice, but Tahitian vanilla offers a more floral profile if you want something different.
Optional Flavor Enhancers
Heavy Cream (2 tablespoons): For an ultra-luxurious shake with extra richness, add a splash of heavy cream. This is restaurant secret number one—that tablespoon or two of cream transforms a good shake into an extraordinary one.
Vanilla Bean Paste (½ teaspoon) or Vanilla Bean Seeds (from ½ vanilla bean): For visual appeal and even more intense vanilla flavor, vanilla bean paste or fresh vanilla bean seeds add those attractive speckles and complex flavor notes. Scrape the seeds from half a vanilla bean or use store-bought vanilla bean paste.
Sugar or Honey (1-2 tablespoons, optional): Most premium ice creams are sweet enough on their own, but if you prefer sweeter shakes or your ice cream isn’t very sweet, add a tablespoon of sugar or honey. Honey adds subtle floral notes that complement vanilla beautifully.
Malted Milk Powder (2 tablespoons, optional): Transform your vanilla shake into a classic malted by adding malted milk powder. This adds a subtle, toasty complexity that’s nostalgic and delicious.
Salt (tiny pinch): A barely perceptible pinch of salt enhances all the other flavors and prevents the shake from tasting flat. This is a professional technique that makes a surprising difference.
For Serving and Garnish
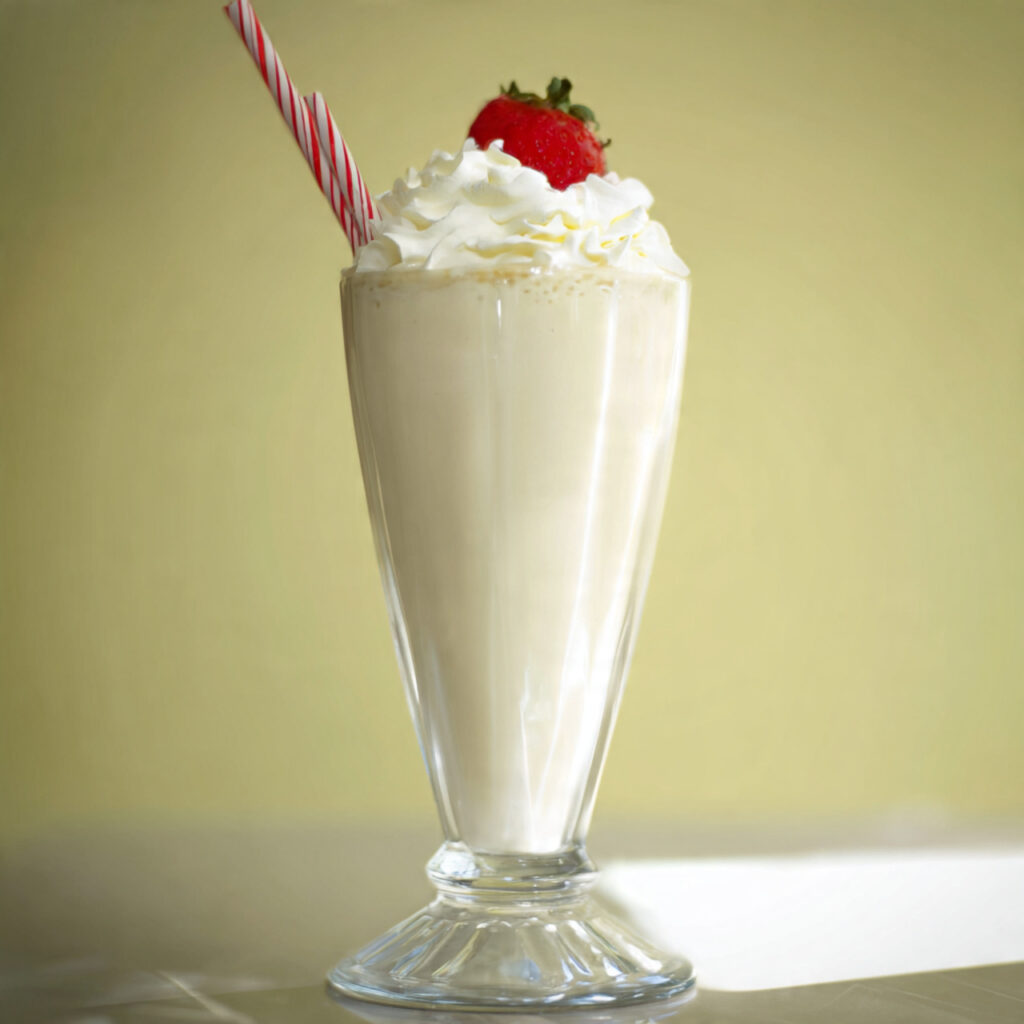
Whipped Cream (homemade or store-bought): A generous dollop of whipped cream is traditional and delicious. Homemade whipped cream tastes significantly better than aerosol versions.
Maraschino Cherry: The classic garnish that completes the retro diner aesthetic.
Vanilla Bean or Vanilla Wafer Cookie: For elegant presentation, garnish with a whole vanilla bean pod or a vanilla wafer cookie on the rim.
Chocolate Shavings or Sprinkles: While not traditional for vanilla, some people enjoy a little visual interest and texture contrast.
Step-by-Step Instructions for a Perfect Vanilla Milkshake
Step 1: Chill Your Equipment
This step is often overlooked but makes a real difference. Place your blender jar (if it’s glass or metal) and your serving glasses in the freezer for 15-20 minutes before making your shake. Cold equipment helps maintain the ideal thick consistency and prevents the shake from melting too quickly. If you can’t chill your blender jar, at least chill your serving glasses.
Step 2: Soften Your Ice Cream (Slightly)
Here’s a counterintuitive tip: let your ice cream sit at room temperature for exactly 5 minutes before using it. Ice cream straight from the freezer is too hard to blend properly, which forces you to over-blend (creating a thinner shake) or add more liquid. Five minutes of softening makes it perfectly scoopable and blendable. It should yield easily when you press a spoon into it but still be quite firm.
Step 3: Measure Your Ingredients Precisely
Add 3 cups of ice cream to your blender first. Pack it in loosely without pressing down—you want to maintain the air that’s already incorporated. Add ½ cup of whole milk. If using heavy cream, add it now. Add the vanilla extract, and any optional flavorings like vanilla bean paste, sugar, or malted milk powder. Finally, add that tiny pinch of salt.
The order matters. By adding ice cream first, you create a cushion that prevents liquid from getting stuck under the blades. This order promotes better blending with less liquid needed.
Step 4: Blend with Precision
Start your blender on the lowest speed setting. Let it run for about 5 seconds, just until the ingredients begin to combine. Using a spoon or blender tamper (if your blender has one), gently push the ice cream toward the blades. Increase to medium speed and blend for another 10-15 seconds, no more.
The key is minimal blending. Over-blending introduces heat and air, which melts your shake and creates a foamy, thin texture. You’re looking for a thick, homogeneous mixture that moves slowly in the blender. If the mixture won’t blend, add milk 1 tablespoon at a time, blending briefly between additions, until it just comes together.
Stop the blender frequently to check consistency. When you lift the blender and the mixture flows extremely slowly back down the sides, you’ve hit the sweet spot.
Step 5: Assess and Adjust Consistency
Pour a small amount into a spoon and hold it upright. The shake should slowly ooze off the spoon over several seconds—not run off immediately, but not stay firmly in place either. Insert a thick straw into the blender. When you release it, it should stand straight up or tilt very slowly.
If it’s too thick: Add milk 1 tablespoon at a time, pulsing briefly after each addition. It’s easy to go too far, so add conservatively.
If it’s too thin: Add more ice cream ¼ cup at a time and pulse briefly. You can also place the blender jar (covered) in the freezer for 5 minutes to firm up.
Step 6: Serve Immediately
Pour the milkshake into your chilled glasses immediately. The pour should be slow and thick, almost like soft-serve ice cream. Don’t be surprised if you need to scoop the last bit out with a spoon—that’s the sign of a properly thick shake.
Fill glasses about ¾ full to leave room for toppings. Insert a thick straw (paper straws don’t work well with thick milkshakes; use reusable metal or sturdy plastic straws).
Step 7: Add Toppings and Serve
Top with a generous swirl of whipped cream, using either a piping bag for an elegant spiral or simply spooning it on. Add your cherry on top, pressing it gently into the whipped cream so it stays put. If using other garnishes like cookie pieces, vanilla beans, or sprinkles, add them now.
Serve immediately with a long spoon and a thick straw. The milkshake is at its absolute best within the first 10 minutes. After that, it begins to melt and separate, losing that perfect texture.
Pro Tips for Vanilla Milkshake Mastery
Use the Three-to-One Ratio: The golden rule for thick milkshakes is three parts ice cream to one part milk. For this recipe, that’s 3 cups ice cream to ½ cup milk. Adjust from there based on your texture preference, but always start with this ratio.
Invest in Quality Ice Cream: The difference between a shake made with premium ice cream versus bargain brands is night and day. Premium ice cream has higher butterfat, fewer air bubbles (less overrun), and better quality ingredients. Brands like Häagen-Dazs, Ben & Jerry’s, or local craft ice cream makers produce vastly superior shakes.
Add Sweetened Condensed Milk: For an incredibly rich, almost candy-like shake, replace 2 tablespoons of the milk with sweetened condensed milk. This adds thickness, sweetness, and a subtle caramel note that’s absolutely delicious.
Use Vanilla Bean Ice Cream: If your store carries vanilla bean ice cream (with visible vanilla bean specks), use it instead of regular vanilla. The visual appeal and enhanced flavor are worth the small additional cost.
Try the Soft-Serve Method: For the absolute thickest shake, use soft-serve vanilla ice cream if you have access to a machine, or let your ice cream soften more (about 10 minutes) and use slightly less milk (start with ⅓ cup). This creates a shake so thick you’ll need to eat most of it with a spoon.
Layer Your Shake: For Instagram-worthy presentation, make two small batches—one slightly thicker than the other. Pour the thinner shake halfway up your glass, then add the thicker shake on top. This creates a beautiful layered effect.
Make it Boozy: For adults, add 1-2 ounces of vanilla vodka, bourbon, rum, or Irish cream liqueur. Reduce the milk by 2 tablespoons to compensate for the liquid. The alcohol will make the shake slightly thinner and slower to freeze.
Create a Milkshake Bar: Set out various toppings—crushed cookies, candy pieces, flavored syrups, nuts, sprinkles—and let everyone customize their shake. This is perfect for parties or family dessert nights.
Blend in Additions Carefully: If adding cookies, candy, or other mix-ins, chop them into small pieces first and pulse them in at the very end with just 2-3 one-second pulses. Over-blending mix-ins can create unpleasant texture.
Use the Freezer Rescue: If your shake gets too melted, pour it into a shallow container and place it in the freezer for 10-15 minutes, stirring every 5 minutes. It will firm back up to proper consistency.
Common Mistakes to Avoid When Making Vanilla Milkshakes
Using Low-Fat Dairy: This is the number one mistake home milkshake makers commit. Skim milk or low-fat ice cream simply cannot produce a rich, creamy shake. The fat content is essential for texture, mouthfeel, and flavor. If you’re concerned about calories, make a smaller shake with full-fat ingredients rather than a larger shake with low-fat ones—the satisfaction factor will be much higher.
Over-Blending: More blending does not equal better results. Over-blending melts your ice cream through friction heat and incorporates too much air, creating a foamy, thin shake. Blend only as much as necessary to combine ingredients—15-20 seconds maximum.
Adding Too Much Liquid at Once: Milk should be added gradually. If you dump in too much at the start, you’ll end up with a thin shake and no way to fix it without adding significantly more ice cream. Start with less liquid than you think you need.
Using Artificial Vanilla: Imitation vanilla extract tastes nothing like real vanilla. It has a harsh, one-dimensional sweetness that becomes more pronounced in simple recipes where vanilla is the star flavor. Real vanilla extract is more expensive but absolutely essential.
Ignoring Ice Cream Temperature: Using ice cream that’s too hard forces you to over-blend or add excess liquid. Using ice cream that’s too soft creates a thin shake from the start. That 5-minute softening window is important.
Making Milkshakes Too Far in Advance: Milkshakes are meant to be enjoyed immediately. The texture deteriorates rapidly—within 15-20 minutes, you’ll have a thin, separated mess. Make them right before serving, not ahead of time.
Using a Weak Blender: Standard home blenders often struggle with thick milkshake consistency. If your blender motor starts to strain or smell hot, you’re over-blending. A high-powered blender (like a Vitamix or Blendtec) makes the process much easier.
Forgetting the Salt: That tiny pinch of salt might seem unnecessary, but it dramatically enhances flavor perception. Without it, milkshakes can taste flat and one-dimensional.
Not Chilling Your Glasses: Room temperature glasses immediately begin melting your shake, thinning it before you can even enjoy it. Always use chilled glasses for best results.
Using Frozen Milk or Ice Cubes: Some recipes suggest adding ice cubes to thicken shakes. Don’t do this. Ice cubes water down the flavor and create an icy, unpleasant texture. Proper thickness comes from the right ice cream-to-milk ratio, not from frozen water.
Storage and Serving Suggestions for Vanilla Milkshakes
Storage Reality
Let’s be honest: vanilla milkshakes don’t store well. They’re meant to be consumed immediately. However, if you absolutely must store one, here’s what to do:
Short-Term (1-2 hours): Pour into an airtight container, press plastic wrap directly onto the surface to prevent ice crystals, seal tightly, and refrigerate. When ready to serve, stir vigorously or give it a quick re-blend with a few ice cubes. The texture won’t be as good as fresh, but it’s drinkable.
Longer Storage: Don’t. The ingredients separate, ice crystals form, and the texture becomes grainy and unpleasant. If you have leftover shake, consider pouring it into popsicle molds and freezing for milkshake popsicles—a completely different treat but still delicious.
Leftover Ice Cream: If you’ve softened your ice cream and have some left over, cover the container tightly and return it to the freezer immediately. It will develop ice crystals from thawing and refreezing, so use it soon in another shake or dessert where texture isn’t critical.
Serving Suggestions
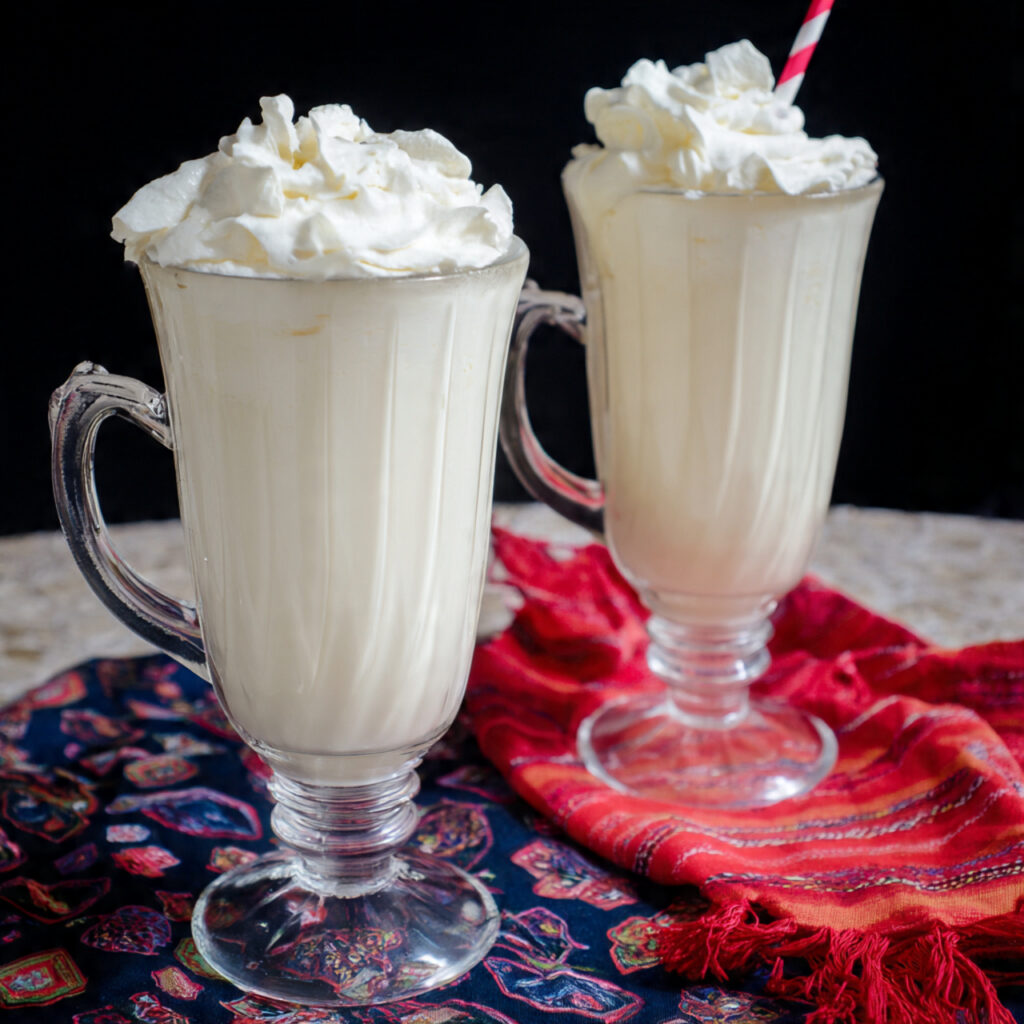
Classic Diner Style: Serve in a tall, chilled glass with whipped cream, a cherry, and two straws. Include a long spoon for scraping the sides and bottom. This is the iconic presentation that never goes out of style.
Float Variation: Place a scoop of vanilla ice cream in a glass, then pour your milkshake over it. This creates a milkshake float with extra texture interest.
Affogato-Style: Pour a shot of hot espresso over a thick vanilla milkshake. The contrast between hot and cold, bitter and sweet, is exceptional.
With Desserts: Vanilla milkshakes pair beautifully with brownies, warm chocolate chip cookies, pie, or cake. The cool, creamy shake balances rich, warm desserts perfectly.
Breakfast Treat: Believe it or not, a vanilla milkshake can be part of a balanced breakfast when served with whole grain toast and fruit. The milk and ice cream provide protein and calcium.
Movie Night: Serve in insulated cups to maintain temperature longer during a movie. Provide thick straws and spoons for the full experience.
Party Presentation: Create a milkshake bar where guests can customize their vanilla base with various syrups, mix-ins, and toppings. Provide small glasses so people can try multiple variations.
Elegant Dessert: Serve in champagne coupes or martini glasses for a sophisticated presentation. Garnish with a vanilla bean pod and edible flowers for special occasions.
Frequently Asked Questions About Vanilla Milkshakes
What’s the difference between a milkshake and a frappe?
A milkshake is made with ice cream and milk, creating a thick, creamy beverage. A frappe (in most of the US) is made with ice cream, milk, and ice, creating a thinner, icier drink, or in New England specifically, it refers to what others call a milkshake. The term “cabinet” in Rhode Island also refers to a milkshake. Regional terminology varies, but the classic milkshake is always ice cream-based without added ice.
Can I make a vanilla milkshake without a blender?
Yes, though it’s more work. Let your ice cream soften significantly (about 15 minutes at room temperature). In a large bowl, use a strong whisk or hand mixer to beat the ice cream until smooth. Gradually whisk in milk until you reach desired consistency. The result won’t be quite as smooth as a blended shake, but it’s perfectly acceptable. You can also use an immersion blender directly in a tall container.
Why is my milkshake foamy instead of creamy?
Foam develops from over-blending, which incorporates too much air. It can also result from using ice cream with high overrun (cheap ice cream brands pump their products full of air). The solution is to blend less—just 15-20 seconds—and use premium ice cream with lower air content. If your shake is already foamy, let it sit for 5 minutes and the foam will settle somewhat.
Can I make vanilla milkshakes dairy-free?
Absolutely! Use high-quality dairy-free vanilla ice cream (brands like So Delicious, Oatly, or Ben & Jerry’s dairy-free line work well) and substitute the milk with your preferred non-dairy milk—oat milk or cashew milk work best for creaminess. Use the same ratios and techniques. The result will be slightly different but still delicious.
How do I make my milkshake thicker without adding more ice cream?
Several options: Add 2 tablespoons of instant vanilla pudding mix, use less milk (start with ⅓ cup instead of ½ cup), add a tablespoon of malted milk powder (which also thickens), or include 2 tablespoons of heavy cream. You can also place the finished shake in the freezer for 5-10 minutes to firm up.
What’s the best way to make milkshakes for a crowd?
Make them in batches of 2-3 servings at a time rather than one large batch—large batches don’t blend evenly. Keep glasses chilled in the freezer and work quickly. Alternatively, make a semi-homemade version by pre-scooping ice cream into individual glasses and freezing them, then blending each portion with milk right before serving.
Can I use vanilla frozen yogurt instead of ice cream?
Yes, but the result will be tangier and less rich. Frozen yogurt has less fat than ice cream, so your shake will be thinner and less creamy. Compensate by using less milk (start with ⅓ cup) and consider adding a tablespoon of heavy cream for richness.
How do restaurants make their milkshakes so thick?
Professional establishments use specialized milkshake machines that blend at controlled speeds, preventing over-blending. They also use commercial ice cream with specific ratios of fat and overrun designed for milkshakes. At home, you can replicate this thickness by using premium ice cream, minimal milk, brief blending, and very cold equipment.
What can I do with a milkshake that’s too thin?
Add more ice cream ¼ cup at a time and pulse briefly, or place the shake in the freezer for 10-15 minutes, stirring every 5 minutes. In a pinch, you can add a tablespoon of instant pudding mix or a few tablespoons of malted milk powder and blend briefly—both act as thickeners.
Are vanilla milkshakes gluten-free?
Basic vanilla milkshakes made with ice cream, milk, and vanilla extract are naturally gluten-free. However, always check your ice cream label—some brands use gluten-containing additives or are processed on equipment with gluten. Avoid adding malted milk powder or cookie mix-ins unless they’re certified gluten-free.
Final Thoughts on the Perfect Vanilla Milkshake
There’s a reason the vanilla milkshake has remained an American classic for nearly a century—it’s simple, satisfying, and endlessly appealing. In a world of increasingly complex desserts with exotic ingredients and elaborate presentations, there’s something deeply comforting about the straightforward pleasure of a well-made vanilla shake.
What I love most about this recipe is its accessibility. You don’t need special equipment beyond a standard blender, exotic ingredients, or advanced culinary skills. What you do need is attention to detail—using quality ingredients, following proper ratios, and resisting the urge to over-blend. These small considerations separate an average shake from an exceptional one.
The vanilla milkshake is also wonderfully versatile despite its simplicity. It serves as the perfect canvas for creativity—add a shot of espresso, swirl in some caramel, blend in fresh strawberries, or spike it with bourbon. Or keep it pure and simple, letting quality vanilla ice cream shine in all its glory. Both approaches are equally valid and delicious.
I encourage you to make this recipe your own. Adjust the thickness to your preference. Experiment with different premium ice cream brands to find your favorite. Try Madagascar vanilla one time and Tahitian vanilla the next. Add that pinch of salt, or don’t. The beauty of homemade milkshakes is that you’re in complete control.
Most importantly, enjoy the process. There’s something almost meditative about the ritual of making milkshakes—the sound of the blender, the thick pour into chilled glasses, that first perfect sip through a straw. It’s a small pleasure that connects us to generations of milkshake lovers who came before us.
So grab your blender, invest in some good ice cream, and prepare to make the best vanilla milkshake of your life. Whether you’re cooling down on a sweltering summer day, treating yourself after a long week, or creating memories with your kids, this recipe will deliver happiness in a glass every single time.
Here’s to simple pleasures and perfect vanilla milkshakes!
Print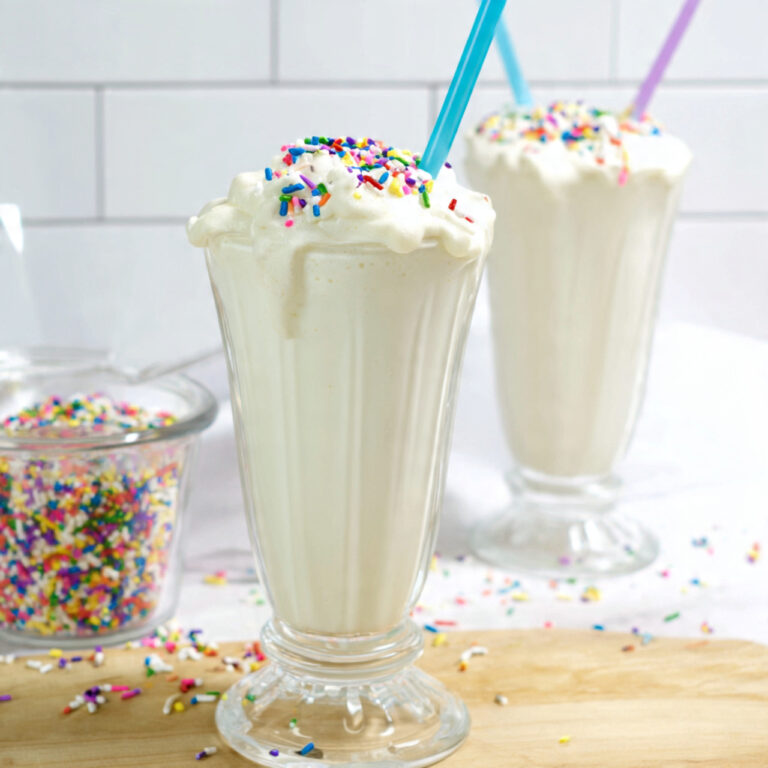
Vanilla Milkshake (7 Simple Tricks) | Irresistibly Thick & Creamy
This classic vanilla milkshake delivers thick, creamy perfection with intense vanilla flavor. Made with just three main ingredients and a few pro techniques, it rivals the best diner shakes you’ve ever had. Perfect for hot days, nostalgic treats, or anytime you crave something cold and indulgent.
- Total Time: 5 minutes
- Yield: 2 large servings or 3 medium servings
Ingredients
For the Milkshake:
- 3 cups (450g) premium vanilla ice cream, slightly softened
- ½ cup (120ml) cold whole milk, plus more as needed
- 1½ teaspoons pure vanilla extract
- 2 tablespoons heavy cream (optional, for extra richness)
- ½ teaspoon vanilla bean paste (optional, for visual appeal)
- 1-2 tablespoons sugar or honey (optional, for extra sweetness)
- Tiny pinch of salt
For Serving:
- Whipped cream
- Maraschino cherries
- Vanilla wafers or cookies (optional)
Instructions
- Chill Equipment: Place blender jar and serving glasses in freezer for 15-20 minutes.
- Soften Ice Cream: Remove ice cream from freezer and let sit at room temperature for exactly 5 minutes until slightly softened but still firm.
- Add Ingredients: Place ice cream in blender first, followed by milk, vanilla extract, and optional ingredients (cream, vanilla bean paste, sugar, salt).
- Blend Minimally: Start blender on lowest speed for 5 seconds. Increase to medium and blend for only 10-15 seconds total, until just combined. Use a tamper or spoon to push ingredients toward blades if needed.
- Check Consistency: Mixture should be very thick and flow slowly. Add milk 1 tablespoon at a time if too thick, or more ice cream if too thin.
- Serve Immediately: Pour into chilled glasses, filling about ¾ full. The shake should pour slowly and thickly.
- Add Toppings: Top with whipped cream and a cherry. Insert thick straws and serve with long spoons.
- Enjoy: Consume immediately for best texture and temperature.
Notes
- Use premium ice cream with high butterfat content for best results
- Don’t over-blend—15-20 seconds maximum
- Start with less milk than you think you need; you can always add more
- Shake is best consumed within 10 minutes of making
- For thicker shake, use less milk (⅓ cup) or add 2 tablespoons instant pudding mix
- Can be made dairy-free with non-dairy ice cream and milk alternatives
- Add 2 tablespoons malted milk powder for a classic malted shake
- Prep Time: 5 minutes
- Cook Time: 0 minutes
- Category: Desserts
- Method: Blending
- Cuisine: American
- Diet: Vegetarian