Strawberry Scones: The Ultimate Guide to Baking Buttery, Flaky Perfection
Introduction: Why Strawberry Scones Will Become Your New Favorite Bake
Strawberry scones are the quintessential treat that bridges the gap between elegant afternoon tea and casual weekend brunch. These buttery, tender pastries studded with juicy fresh strawberries offer the perfect balance of sweetness and texture—crispy golden edges giving way to a soft, pillowy interior that practically melts on your tongue.
I’ll never forget the first time I bit into a truly exceptional strawberry scone at a small café in the Cotswolds. The delicate crumb, the burst of berry flavor, and that impossibly crisp exterior completely changed my understanding of what a scone could be. That experience sent me on a decade-long journey to perfect my own recipe, and I’m thrilled to share everything I’ve learned with you today.
Whether you’re planning a Mother’s Day brunch, looking for the perfect accompaniment to your morning coffee, or simply want to fill your kitchen with the intoxicating aroma of fresh-baked pastries, this comprehensive guide will teach you exactly how to create bakery-quality strawberry scones in your own home. We’ll cover everything from ingredient selection and mixing techniques to troubleshooting common problems and storing your scones for maximum freshness.
The beauty of homemade strawberry scones lies not just in their superior taste compared to store-bought versions, but in the therapeutic process of creating something wonderful with your own hands. There’s something deeply satisfying about cutting butter into flour, watching the dough come together, and pulling golden-brown scones from your oven while your family eagerly waits at the kitchen counter.
What Makes These Strawberry Scones Special
This recipe produces scones with a texture that’s authentically British—slightly crumbly yet tender, never dry or cake-like. The key differences that set these apart include using cold ingredients to create those coveted flaky layers, incorporating buttermilk for tang and tenderness, and treating the strawberries properly so they don’t turn your dough into a soggy mess.
Unlike many American-style scones that tend toward sweetness and density, these strike the perfect balance. They’re sweet enough to satisfy without overwhelming the delicate strawberry flavor, and their texture is substantial yet light. The exterior develops a beautiful golden crust with just a hint of sweetness from the egg wash and coarse sugar, while the interior remains impossibly tender.
Essential Ingredients for Perfect Strawberry Scones
Dry Ingredients
All-Purpose Flour (3 cups): The foundation of your scones. I recommend using unbleached all-purpose flour for the best flavor and texture. Avoid over-measuring by spooning flour into your measuring cup and leveling it off rather than scooping directly from the bag.
Granulated Sugar (⅓ cup): Provides just enough sweetness without making the scones dessert-like. You can adjust this slightly based on how sweet your strawberries are.
Baking Powder (1 tablespoon): The leavening agent that gives your scones their lift. Make sure yours is fresh—baking powder loses potency over time.
Salt (½ teaspoon): Essential for balancing flavors and enhancing the strawberry taste.
Fat Component
Cold Unsalted Butter (½ cup or 8 tablespoons): This is absolutely crucial. The butter must be cold—ideally straight from the refrigerator, cut into small cubes. Some bakers even freeze their butter and grate it into the flour. The cold butter creates steam pockets during baking, resulting in those beautiful flaky layers.
Wet Ingredients
Cold Buttermilk (¾ cup): Buttermilk adds tang, tenderness, and helps activate the baking powder. The acidity also helps create a tender crumb. If you don’t have buttermilk, you can make a substitute by adding 1 tablespoon of lemon juice or white vinegar to ¾ cup of regular milk and letting it sit for 5 minutes.
Large Egg (1): Binds the ingredients and adds richness. You’ll use part of it in the dough and save some for the egg wash.
Vanilla Extract (1 teaspoon): Enhances the overall flavor profile and complements the strawberries beautifully.
Star Ingredient
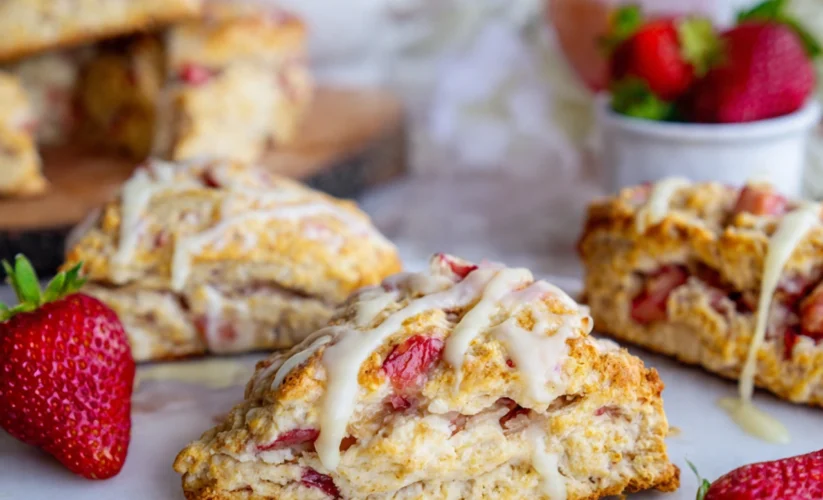
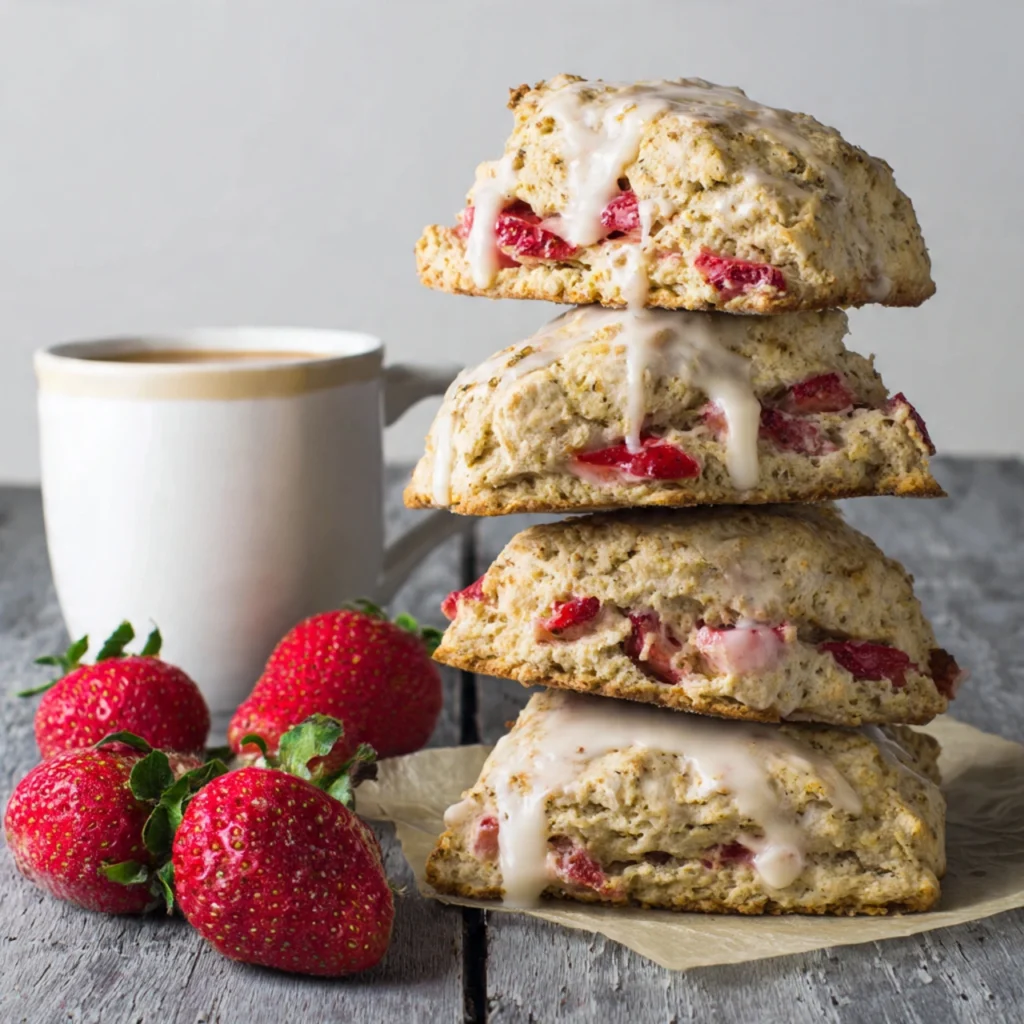
Fresh Strawberries (1½ cups, diced): Use ripe but firm strawberries. Overly soft berries will release too much moisture. I recommend dicing them into ¼-inch to ½-inch pieces and patting them dry with paper towels before folding into the dough.
For Topping
Heavy Cream or Milk (2 tablespoons): For brushing the tops Coarse Sugar or Turbinado Sugar (2 tablespoons): Creates a delightful sweet crunch on top

Step-by-Step Instructions for Strawberry Scones
Step 1: Prepare Your Ingredients and Equipment
Preheat your oven to 400°F (200°C). Line a large baking sheet with parchment paper or a silicone baking mat. This prevents sticking and ensures even browning.
Cut your cold butter into ½-inch cubes and return it to the refrigerator until you’re ready to use it. Wash, hull, and dice your strawberries, then spread them on paper towels to remove excess moisture. This step is critical for preventing soggy scones.
Step 2: Combine the Dry Ingredients
In a large mixing bowl, whisk together the flour, sugar, baking powder, and salt until thoroughly combined. This ensures even distribution of the leavening agent throughout your scones. Whisking also aerates the flour, contributing to a lighter texture.
Step 3: Cut in the Butter
Add your cold butter cubes to the flour mixture. Using a pastry cutter, two knives, or your fingertips, work the butter into the flour until the mixture resembles coarse crumbs with some pea-sized pieces of butter remaining. This should take about 3-4 minutes.
Here’s the secret many recipes don’t tell you: you don’t want the butter completely incorporated. Those visible pieces of butter are what create flaky layers. When the scones bake, the butter melts and creates steam, forming pockets that give you that coveted flaky texture.
If you’re using your hands, work quickly to prevent the butter from warming up. Some bakers keep a bowl of ice water nearby to dip their fingers in periodically, keeping everything cold.
Step 4: Mix the Wet Ingredients
In a separate bowl or large measuring cup, whisk together the cold buttermilk, egg (reserve about 1 tablespoon for the egg wash), and vanilla extract until well combined.
Step 5: Bring the Dough Together
Make a well in the center of your flour-butter mixture and pour in the wet ingredients all at once. Using a wooden spoon or rubber spatula, stir gently just until the dough begins to come together. It should still look shaggy and somewhat dry—this is exactly what you want.
Gently fold in your diced strawberries, distributing them as evenly as possible throughout the dough. Be careful not to overmix, as this develops gluten and results in tough, dense scones.
Step 6: Shape the Dough
Turn the dough out onto a lightly floured surface. It will seem dry and crumbly—don’t panic. Gently knead it 3-4 times, just until it holds together. The dough should remain slightly rough and shaggy.
Pat the dough into a circle about 8 inches in diameter and roughly 1 inch thick. For traditional wedge-shaped scones, use a sharp knife or bench scraper to cut the circle into 8 equal triangular pieces, like cutting a pizza.
Alternatively, you can pat the dough into a rectangle and use a round biscuit cutter for circular scones, though you’ll need to re-roll scraps, which can make those scones slightly tougher.
Step 7: Prepare for Baking
Transfer your scones to the prepared baking sheet, spacing them about 2 inches apart to allow for spreading. Mix the reserved egg with the heavy cream or milk, then brush this mixture over the top of each scone. This creates a beautiful golden-brown finish.
Sprinkle the tops generously with coarse sugar. This adds a delightful textural contrast and a hint of extra sweetness.
Step 8: Bake to Golden Perfection
Place the baking sheet in your preheated oven and bake for 18-22 minutes, or until the scones are golden brown on top and a toothpick inserted into the center comes out clean or with just a few moist crumbs.
The exact baking time depends on your oven and how thickly you’ve shaped your scones. Start checking at 18 minutes to avoid overbaking, which leads to dry scones.
Step 9: Cool and Serve
Remove the scones from the oven and let them cool on the baking sheet for 5 minutes before transferring to a wire cooling rack. This brief resting period allows the structure to set while keeping the scones tender.
Strawberry scones are best enjoyed slightly warm, slathered with clotted cream, butter, or strawberry jam. Some people love the classic combination of jam and cream, while others prefer them plain to fully appreciate the strawberry flavor.
Pro Tips for Perfect Strawberry Scones
Keep Everything Cold
Temperature control is the single most important factor in achieving flaky scones. Use cold butter, cold buttermilk, and even consider chilling your mixing bowl and flour for 15 minutes before starting. If your kitchen is particularly warm, you can even chill the shaped scones for 15-20 minutes before baking.
Don’t Overmix the Dough
Overworking scone dough develops gluten, resulting in tough, chewy pastries instead of tender, crumbly ones. Mix just until the ingredients come together, even if the dough looks rough. Those little bits of unincorporated flour will hydrate during the resting period.
Use a Light Touch When Handling
Think of yourself as gently coaxing the dough together rather than forcing it. The less you handle it, the better. When patting out the dough, use your palms rather than your fingers, applying even, gentle pressure.
Choose the Right Strawberries
Select strawberries that are ripe but still firm. Mushy berries release too much moisture during baking, making your scones soggy. If your strawberries seem particularly juicy, toss them with a teaspoon of flour before folding them into the dough—this helps absorb excess moisture.
Cut Clean Edges
When cutting your scones, use a sharp knife or bench scraper and cut straight down without twisting. Twisting seals the edges and prevents the scones from rising properly. Clean your knife between cuts to ensure sharp, clean edges.
Create Steam in Your Oven
For an extra boost of rise, place a small pan of water on the bottom rack of your oven while baking. The steam helps the scones rise higher and creates a slightly crispier exterior.
Experiment with Flavor Variations
Once you’ve mastered the basic recipe, try adding lemon zest to the dough for strawberry lemon scones, or fold in white chocolate chips for extra decadence. Fresh basil and strawberry also make a surprisingly sophisticated combination.
Make Ahead for Fresh-Baked Mornings
You can shape the scones, place them on a parchment-lined baking sheet, and freeze them solid. Once frozen, transfer to a freezer bag. Bake straight from frozen, adding 3-5 minutes to the baking time. This way, you can have fresh scones any morning without the early morning prep work.
Common Mistakes to Avoid When Making Strawberry Scones
Mistake 1: Using Warm Ingredients
This is the number one culprit behind flat, dense scones. When butter is too warm, it incorporates completely into the dough instead of creating those distinct pockets of fat that produce flaky layers. Always start with cold ingredients and work quickly.
Mistake 2: Overworking the Dough
Every extra stir, knead, or pat develops more gluten, turning your tender scones into hockey pucks. Mix only until the ingredients barely come together. The dough should look shaggy and rough, not smooth and uniform.
Mistake 3: Measuring Flour Incorrectly
Scooping flour directly from the bag compacts it, leading to too much flour in your recipe. This creates dry, crumbly scones. Always spoon flour into your measuring cup and level it off with a straight edge, or better yet, weigh your flour (360 grams for 3 cups).
Mistake 4: Skipping the Egg Wash
The egg wash isn’t just decorative—it creates a beautiful golden-brown crust and helps the sugar topping adhere. Without it, your scones will look pale and unappetizing, even if they taste wonderful.
Mistake 5: Crowding the Baking Sheet
Scones need space to expand. If they’re touching when you place them in the oven, they’ll steam rather than bake, resulting in pale, soggy sides. Leave at least 2 inches between each scone.
Mistake 6: Using Frozen Strawberries Without Adjustments
Frozen strawberries contain much more moisture than fresh ones. If you must use frozen berries, don’t thaw them first. Toss them frozen directly into the dough and add 2-3 minutes to the baking time. Even so, fresh strawberries yield far superior results.
Mistake 7: Overbaking
It’s better to slightly underbake scones than overbake them. They’ll continue cooking slightly as they cool. Overbaked scones are dry and crumbly in an unpleasant way. Remove them when they’re just golden and still feel slightly soft in the center.
Mistake 8: Storing Improperly
Scones are best the day they’re made, but improper storage can ruin them even faster. Never store them in an airtight container while still warm—the trapped steam makes them soggy. Cool completely first, and even then, a slightly open container is better for maintaining texture.
Storage and Serving Suggestions
Serving Your Strawberry Scones
Strawberry scones are incredibly versatile. Here are my favorite ways to serve them:
Classic Cream Tea Style: Split the scone horizontally and spread with clotted cream and strawberry jam. The Cornish way places cream first, then jam, while the Devon method reverses this order. Either way is delicious.
Simple Butter and Jam: For a less rich option, simply butter your scone and add a dollop of your favorite jam or preserves.
With Fresh Fruit: Serve alongside a bowl of fresh berries and yogurt for a complete breakfast.
Whipped Honey Butter: Beat softened butter with honey and a pinch of salt for a sweet, spreadable topping.
Lemon Curd: The tartness of lemon curd beautifully complements the sweet strawberries.
As a Shortcake Base: Split the scone, layer with whipped cream and fresh strawberries for a twist on classic strawberry shortcake.
Short-Term Storage
Strawberry scones are absolutely best enjoyed the day they’re made, preferably within 4-6 hours of baking. However, they’ll remain good for up to 2 days when stored properly.
Once completely cooled, store scones in a paper bag or loosely covered container at room temperature for up to 2 days. Avoid airtight containers, which trap moisture and make the scones soggy. If you want to refresh day-old scones, warm them in a 300°F oven for 5-7 minutes.
Freezing Baked Scones
Baked scones freeze surprisingly well. Once completely cooled, place them in a single layer in a freezer bag or airtight container with parchment paper between layers. They’ll keep for up to 2 months.
To serve, thaw at room temperature for 1-2 hours, then refresh in a 300°F oven for 8-10 minutes. They won’t be quite as good as fresh, but they’re still far better than anything you’d buy at a grocery store.
Freezing Unbaked Scones
This is my preferred method for make-ahead scones. Shape the scones completely, place them on a parchment-lined baking sheet, and freeze until solid (about 2 hours). Transfer to a freezer bag.
When ready to bake, place frozen scones on a parchment-lined baking sheet, brush with egg wash, sprinkle with sugar, and bake at 400°F for 22-25 minutes—no thawing required. You’ll have fresh scones with minimal morning effort.

Frequently Asked Questions About Strawberry Scones
Can I make strawberry scones without buttermilk?
Absolutely. You can substitute regular milk mixed with lemon juice (1 tablespoon lemon juice plus enough milk to make ¾ cup total, let sit 5 minutes), or use plain yogurt thinned with a bit of milk to reach the right consistency. Heavy cream also works, though it creates a richer, denser scone. The acidity in buttermilk helps create tenderness, so homemade “buttermilk” using the lemon juice method is your best substitute.
Why are my strawberry scones dry and crumbly?
Dry scones usually result from too much flour, overbaking, or insufficient fat. Make sure you’re measuring flour correctly by spooning it into your measuring cup rather than scooping. Check your scones a few minutes before the suggested baking time to avoid overbaking. Finally, don’t skip the butter or reduce the amount—that fat is essential for tender, moist scones. Cutting the butter into larger pieces also helps maintain moisture.
Can I use frozen strawberries instead of fresh?
Fresh strawberries work best because they contain less moisture. If you must use frozen berries, do not thaw them first. Add them to the dough while still frozen and expect slightly more moisture in your final scones. You may need to bake them 2-3 minutes longer. For best results, try to use fresh strawberries during peak season and freeze shaped unbaked scones instead.
How do I know when my strawberry scones are done baking?
Properly baked scones should be golden brown on top and around the edges. A toothpick inserted into the center should come out clean or with just a few moist crumbs—not wet batter. The scones should feel firm on the edges but may still feel slightly soft in the center when you first remove them from the oven. They’ll firm up as they cool. If you’re unsure, it’s better to slightly underbake than overbake.
Can I make strawberry scones ahead of time?
Yes, with several methods. You can make the dough, shape it, and refrigerate for up to 24 hours before baking—just add 2-3 minutes to the baking time. For longer storage, freeze shaped unbaked scones for up to 3 months and bake directly from frozen. Alternatively, you can bake the scones completely and freeze them for up to 2 months, reheating in a low oven before serving. Unbaked frozen scones yield the freshest-tasting results.
What’s the difference between American and British scones?
British scones tend to be less sweet, with a drier, more crumbly texture designed to be served with jam and cream. American scones are often sweeter, more cake-like, and sometimes include glaze or icing. This recipe leans toward the British style with a tender, slightly crumbly texture and moderate sweetness, though it’s perfectly delicious on its own without accompaniments. British scones are also traditionally smaller and less triangular than their American counterparts.
Why didn’t my scones rise properly?
Several factors can prevent proper rise. First, check that your baking powder is fresh—it loses potency after about 6 months. Make sure you’re not overmixing the dough, which develops gluten and prevents rise. Your oven temperature may be inaccurate—use an oven thermometer to verify. Also, ensure you’re cutting straight down when shaping scones rather than twisting, which seals the edges. Finally, make sure all ingredients are properly cold to create steam during baking.
Can I add other mix-ins to strawberry scones?
Definitely. White chocolate chips complement strawberries beautifully. Lemon zest adds brightness. A handful of chopped nuts provides textural contrast. Just keep total mix-ins (including strawberries) to about 1½ to 2 cups maximum, or the dough won’t hold together properly. Replace some strawberries with your chosen addition rather than adding more volume to the base recipe.
Approximate Nutrition Information
Per serving (1 scone, recipe makes 8):
- Calories: 285
- Total Fat: 12g
- Saturated Fat: 7g
- Trans Fat: 0g
- Cholesterol: 50mg
- Sodium: 280mg
- Total Carbohydrates: 39g
- Dietary Fiber: 1g
- Sugars: 12g
- Protein: 5g
- Vitamin C: 15% DV
- Calcium: 8% DV
- Iron: 10% DV
Note: Nutrition information is approximate and calculated based on standard ingredient measurements. Actual values may vary depending on specific brands used and serving size variations. These values do not include optional toppings like butter, jam, or clotted cream.
Final Thoughts on Making Strawberry Scones
Making strawberry scones from scratch is one of those kitchen accomplishments that seems intimidating but is actually quite forgiving once you understand the basic principles. The key takeaways are simple: keep everything cold, handle the dough minimally, and don’t be afraid of a slightly rough, shaggy appearance.
These scones represent comfort, care, and the simple pleasure of homemade baking. They’re equally appropriate for a special occasion brunch or a quiet Sunday morning at home with the newspaper and a cup of tea. The smell of them baking will draw everyone in your house to the kitchen, and the first bite of a warm, butter-slathered scone studded with sweet strawberries is pure bliss.
I encourage you to make this recipe your own. Once you’ve mastered the basic technique, experiment with different berries, add-ins, and toppings. Try them with blueberries in summer, dried cranberries in winter, or chocolate chips year-round. The fundamental method remains the same, and each variation brings its own delicious personality.
Whether you’re a experienced baker or just beginning your journey, I hope this guide gives you the confidence to create exceptional strawberry scones. The satisfaction of pulling a tray of golden, fragrant scones from your own oven is something everyone should experience. Happy baking!
Print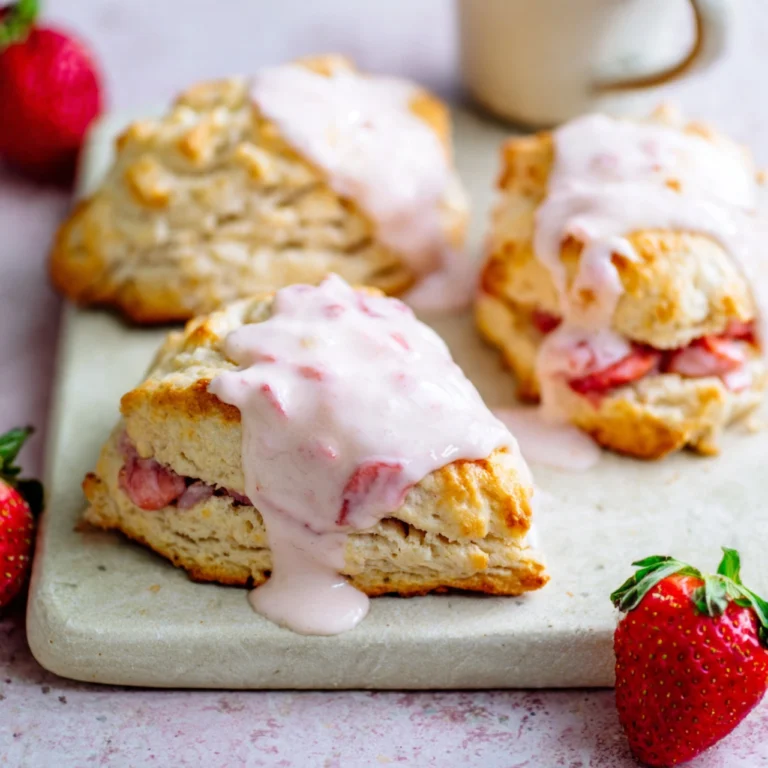
Strawberry Scones: The Ultimate Guide to Baking Buttery, Flaky Perfection
These buttery, flaky strawberry scones feature fresh berries folded into tender dough for the perfect balance of sweet and tangy. With a golden, crispy exterior and soft, pillowy interior, they’re ideal for breakfast, brunch, or afternoon tea.
Ingredients
- 3 cups all-purpose flour
- ⅓ cup granulated sugar
- 1 tablespoon baking powder
- ½ teaspoon salt
- ½ cup cold unsalted butter, cubed
- ¾ cup cold buttermilk
- 1 large egg
- 1 teaspoon vanilla extract
- 1½ cups fresh strawberries, diced and patted dry
- 2 tablespoons heavy cream or milk (for brushing)
- 2 tablespoons coarse sugar (for topping)
Instructions
- Preheat oven to 400°F. Line a baking sheet with parchment paper.
- Whisk together flour, sugar, baking powder, and salt in a large bowl.
- Cut cold butter into flour mixture until it resembles coarse crumbs with pea-sized pieces.
- In a separate bowl, whisk buttermilk, egg (reserve 1 tablespoon for wash), and vanilla.
- Pour wet ingredients into dry and stir just until combined. Fold in strawberries gently.
- Turn dough onto floured surface and pat into an 8-inch circle, 1-inch thick.
- Cut into 8 wedges and place on prepared baking sheet.
- Brush tops with reserved egg mixed with cream, sprinkle with coarse sugar.
- Bake 18-22 minutes until golden brown. Cool 5 minutes before serving.
Notes
- Keep all ingredients cold for flakiest texture
- Don’t overmix the dough—it should look shaggy
- Pat strawberries dry to prevent soggy scones
- Scones can be frozen unbaked for up to 3 months
- Best served warm the day they’re made
- Category: Desserts
- Method: Baking
- Cuisine: American
- Diet: Vegetarian