Salted Caramel Cupcakes: The Ultimate Guide to Perfect Sweet and Salty Treats (9 Pro Secrets)
Introduction
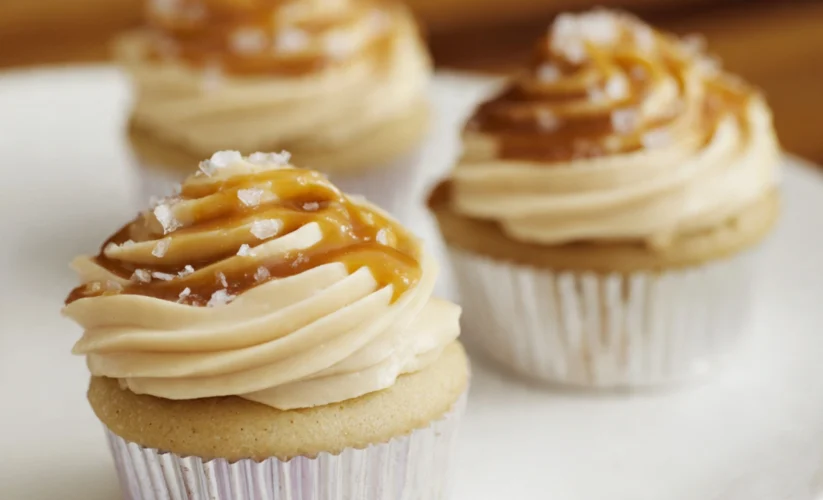
Salted caramel cupcakes represent the perfect marriage of sweet and salty, combining tender vanilla cake with rich caramel buttercream and a drizzle of homemade salted caramel sauce. These show-stopping treats have become the darling of bakeries and Pinterest boards everywhere, and for good reason—that first bite delivers an explosion of buttery caramel sweetness balanced perfectly by flaky sea salt that makes your taste buds sing. Unlike simple chocolate or vanilla cupcakes, salted caramel cupcakes offer sophisticated flavor complexity that appeals to both kids and adults.
I’ve been perfecting this recipe for over a decade, testing countless variations in my quest for the ultimate salted caramel cupcake. What I’ve discovered is that success lies in three critical components: a moist, sturdy vanilla base that won’t collapse under generous frosting, a silky caramel buttercream that’s sweet but not cloying, and a properly cooked caramel sauce with just the right amount of salt. Get these elements right, and you’ll have people begging for your recipe at every gathering.
The beauty of salted caramel cupcakes extends beyond their incredible taste. They’re visually stunning with golden caramel drips cascading down swirls of buttercream, crowned with a sprinkle of flaky sea salt that catches the light. Whether you’re baking for birthdays, weddings, baby showers, or simply because Tuesday needs brightening, these cupcakes deliver professional bakery quality from your home kitchen. Let me walk you through every step, tip, and trick to ensure your salted caramel cupcakes turn out absolutely perfect every single time.
Ingredients
For the Vanilla Cupcakes:
- 1 3/4 cups (220g) all-purpose flour – Spooned and leveled, not packed
- 1 1/2 teaspoons baking powder – Fresh, not expired
- 1/2 teaspoon baking soda
- 1/2 teaspoon salt
- 1/2 cup (113g) unsalted butter – Room temperature, cut into pieces
- 1 cup (200g) granulated sugar
- 2 large eggs – Room temperature
- 2 teaspoons pure vanilla extract – Never imitation
- 1/2 cup (120g) sour cream – Full-fat for best texture
- 1/2 cup (120ml) whole milk – Room temperature
For the Salted Caramel Sauce:
- 1 cup (200g) granulated sugar
- 6 tablespoons (85g) unsalted butter – Cut into pieces, room temperature
- 1/2 cup (120ml) heavy cream – Room temperature
- 1 teaspoon sea salt – Plus extra for sprinkling
- 1/2 teaspoon vanilla extract
For the Caramel Buttercream Frosting:
- 1 cup (226g) unsalted butter – Softened to room temperature
- 4 cups (480g) powdered sugar – Sifted to remove lumps
- 1/2 cup (120ml) salted caramel sauce – From recipe above, cooled
- 2-4 tablespoons heavy cream – As needed for consistency
- 1 teaspoon vanilla extract
- Pinch of salt
For Decoration:
- Reserved salted caramel sauce – For drizzling
- Flaky sea salt – Maldon or similar for garnish
- Optional: caramel candies, gold sprinkles, or toffee bits
Equipment Needed:
- Standard 12-cup muffin tin
- Paper cupcake liners
- Electric mixer (stand or hand)
- Medium saucepan for caramel
- Whisk and rubber spatula
- Piping bag with large star tip (Wilton 1M or similar)
- Candy thermometer (helpful but not required)

Step-by-Step Instructions
Making the Salted Caramel Sauce
Step 1: Prepare Your Ingredients
Before you start cooking caramel, have everything measured and ready. Caramel making moves quickly, and you won’t have time to hunt for ingredients mid-process. Bring your butter and cream to room temperature—cold ingredients can cause the hot sugar to seize and crystallize. Keep a pastry brush and glass of water nearby for washing down sugar crystals from the pan sides.
Step 2: Cook the Sugar
Pour granulated sugar into a large, heavy-bottomed saucepan in an even layer. Heat over medium heat without stirring. This is crucial—stirring can cause crystallization. Instead, gently swirl the pan occasionally as the sugar begins to melt around the edges. The sugar will clump before melting completely—this is normal. Continue heating and swirling until all sugar melts into a smooth, amber liquid. This takes 8-12 minutes. Watch carefully; caramel goes from perfect to burnt in seconds.
Step 3: Add Butter Carefully
When the caramel reaches a deep amber color (think old pennies), remove from heat and immediately add butter pieces. The mixture will bubble violently—this is expected. Whisk until butter melts completely and incorporates smoothly. If it seems separated, keep whisking; it’ll come together.
Step 4: Incorporate Cream and Salt
Still off heat, slowly drizzle in heavy cream while whisking constantly. Again, expect vigorous bubbling. Once all cream is added, whisk until completely smooth. Add sea salt and vanilla extract, whisking to combine. Let the caramel cool in the pan for 10 minutes, then transfer to a heat-safe jar. It will thicken as it cools. Reserve about 3/4 cup for the frosting and the rest for drizzling.
Making the Vanilla Cupcakes
Step 5: Prepare Your Pan and Oven
Preheat your oven to 350°F (175°C). Line a 12-cup muffin tin with paper liners. Don’t skip the liners—they prevent sticking and make for prettier presentation. Position your oven rack in the center position for even baking.
Step 6: Combine Dry Ingredients
In a medium bowl, whisk together flour, baking powder, baking soda, and salt. Whisk for at least 30 seconds to ensure even distribution of leavening agents. This step prevents pockets of baking powder that can create an unpleasant chemical taste. Set aside.
Step 7: Cream Butter and Sugar
In a large bowl or stand mixer, beat room-temperature butter on medium speed for about 1 minute until smooth. Add sugar and beat on medium-high speed for 3-4 minutes until light, fluffy, and nearly white in color. This creaming process incorporates air, creating lighter cupcakes. Scrape down the bowl sides halfway through.
Step 8: Add Eggs and Vanilla
Add eggs one at a time, beating well after each addition. The mixture should look smooth and emulsified, not curdled. Add vanilla extract and beat until combined. If the mixture looks slightly separated, don’t worry—it’ll come together when you add flour.
Step 9: Alternate Wet and Dry Ingredients
With mixer on low speed, add one-third of the flour mixture. Mix just until barely combined. Add half the sour cream and half the milk, mixing until just incorporated. Repeat with another third of flour, remaining sour cream and milk, then final flour addition. Mix each addition only until no flour streaks remain—overmixing creates tough, dense cupcakes. Finish by hand with a spatula if needed.
Step 10: Fill and Bake
Divide batter evenly among the 12 lined cups, filling each about 2/3 full. A spring-loaded ice cream scoop works perfectly for this. Bake for 18-22 minutes, until a toothpick inserted in the center comes out clean or with just a few moist crumbs. The tops should spring back when lightly pressed. Don’t overbake—dry cupcakes are a cardinal sin. Cool in the pan for 5 minutes, then transfer to a wire rack to cool completely before frosting.
Making the Caramel Buttercream
Step 11: Beat the Butter
In a large bowl with an electric mixer, beat softened butter on medium-high speed for 3-4 minutes until very light and fluffy. This extended beating time is important—it incorporates air and creates silky texture. The butter should nearly double in volume.
Step 12: Add Sugar Gradually
With mixer on low speed, gradually add sifted powdered sugar, one cup at a time. Beat each addition until incorporated before adding more. After all sugar is added, increase speed to medium-high and beat for 2 minutes.
Step 13: Add Caramel and Cream
Add the cooled salted caramel sauce and vanilla extract. Beat on medium speed until completely incorporated and smooth. Add heavy cream one tablespoon at a time until you reach your desired consistency. For piping, you want thick but spreadable. Beat on high speed for 2-3 minutes until frosting is light and fluffy.
Assembling the Cupcakes
Step 14: Fill the Cupcakes (Optional)
For extra decadence, use an apple corer or small knife to remove the center of each cooled cupcake, creating a small cavity about 1 inch deep. Fill each cavity with a teaspoon of salted caramel sauce. Replace the cake top to seal. This creates a surprise caramel center.
Step 15: Frost the Cupcakes
Transfer caramel buttercream to a piping bag fitted with a large star tip. Starting from the outer edge, pipe frosting in a spiral toward the center, creating a tall swirl. Alternatively, use an offset spatula to spread frosting in generous swirls. Don’t be stingy—these cupcakes deserve generous frosting.
Step 16: Drizzle and Garnish
Warm the reserved salted caramel sauce slightly so it’s pourable but not hot. Drizzle over frosted cupcakes, letting it cascade down the sides. Immediately sprinkle with flaky sea salt while caramel is still wet. The salt should be visible—this is a salted caramel cupcake, after all. Serve within a few hours for the best texture, or refrigerate if making ahead.
Pro Tips for Perfect Salted Caramel Cupcakes
Room Temperature Ingredients are Non-Negotiable
This isn’t just baker’s superstition—room temperature eggs, butter, sour cream, and milk emulsify properly, creating smooth batter and lighter texture. Cold ingredients don’t combine well, resulting in dense, uneven cupcakes. Plan ahead and remove dairy and eggs from the refrigerator 1-2 hours before baking.
Don’t Fear the Caramel
Many home bakers avoid homemade caramel, but it’s actually straightforward once you understand the process. The key is patience—don’t rush the melting sugar by increasing heat, which causes burning. Use a light-colored pan so you can see the amber color developing. If crystals form on the pan sides, wash them down with a wet pastry brush. Practice makes perfect, and even imperfect caramel tastes delicious.
Invest in Quality Vanilla and Salt
Since these cupcakes rely heavily on vanilla and salt for flavor, quality matters enormously. Pure vanilla extract (not imitation) provides complex, warm notes that artificial versions can’t match. For the salt garnish, flaky sea salt like Maldon offers delicate texture and clean flavor superior to table salt. These small investments transform good cupcakes into extraordinary ones.
The Toothpick Test Requires Interpretation
The instruction “bake until a toothpick comes out clean” doesn’t mean bone-dry clean. A few moist crumbs clinging to the toothpick are perfect—they indicate the cupcakes are done but still moist. Completely clean means overbaked and dry. Start checking at 18 minutes, and remember that cupcakes continue cooking briefly after removal from the oven due to residual heat.
Caramel Sauce Consistency Matters
Your caramel sauce should be pourable when warm but thick when cool—similar to honey. If it’s too thin, it’ll make frosting runny and won’t coat cupcakes properly. If too thick, gently rewarm it. The amount of cream determines consistency; for thicker caramel, use less cream. For drizzling, you want it slightly looser than for mixing into frosting.
Frosting Temperature Affects Texture
Buttercream should be cool but not cold when piping. If your kitchen is warm and the frosting seems too soft, refrigerate it for 10-15 minutes. If it’s too stiff to pipe smoothly, let it sit at room temperature briefly or beat in a bit more cream. The perfect consistency holds its shape when piped but isn’t so stiff it tears the cupcake.
Fill Cupcake Liners Properly
Too much batter creates mushroom-top cupcakes that overflow; too little creates flat, sad cupcakes. The magic number is 2/3 full—about 3 tablespoons of batter per cup. Using a spring-loaded ice cream scoop (#20 scoop) ensures perfect, consistent portions every time.
The Freezer is Your Friend
Both unfrosted cupcakes and frosting freeze beautifully. Freeze unfrosted cupcakes in airtight containers for up to 3 months. Thaw overnight in the refrigerator, then bring to room temperature before frosting. Freeze extra buttercream in freezer bags; thaw and rewhip before using. This makes these impressive cupcakes doable even on busy schedules.
Color Coordination Matters
The visual appeal of salted caramel cupcakes comes from the beautiful golden tones. Don’t overbake the cupcakes, which creates brown edges. Cook your caramel to deep amber, not light beige—deeper color means richer flavor. The final product should showcase various shades of gold, tan, and amber.

Common Mistakes to Avoid
Overmixing the Batter
The number one cause of tough, dense cupcakes is overmixing once flour is added. Gluten develops when flour meets liquid and gets agitated. Mix each addition only until you no longer see flour streaks—usually 5-10 seconds. Finish with a few hand stirs using a spatula to ensure no pockets of flour hide at the bottom while minimizing gluten development.
Using Cold Ingredients
I can’t stress this enough—cold butter won’t cream properly with sugar, cold eggs don’t emulsify into batter, cold sour cream creates lumpy batter, and cold milk can actually curdle when mixed with acidic ingredients. Temperature matters in baking chemistry. If you forgot to remove ingredients from the fridge, place eggs in warm water for 5 minutes and microwave milk and sour cream for 10-15 seconds.
Cooking Caramel Too Light or Too Dark
Undercooked caramel tastes merely sweet without complex flavor notes. Overcooked caramel is bitter and acrid. The sweet spot is deep amber—the color of old pennies or light maple syrup. Watch carefully during the last minute of cooking, removing from heat the moment it reaches this color. Remember that caramel continues darkening from residual heat even off the burner.
Adding Cold Cream to Hot Caramel
This mistake can cause the caramel to seize into hard chunks or splatter dangerously. Always bring heavy cream to room temperature before starting. If you forgot, warm it gently in the microwave for 20-30 seconds. When adding to hot caramel, pour slowly while whisking constantly. The vigorous bubbling is normal and expected.
Frosting Warm Cupcakes
This is the fastest way to create a melted, sliding mess. Buttercream melts around 90°F, so cupcakes must be completely cool—preferably cooled for at least an hour. If you’re impatient, pop them in the refrigerator for 20 minutes. You can frost slightly warm cupcakes if you use cream cheese frosting, but not buttercream.
Skimping on the Salt
Despite the name “salted caramel,” many bakers add barely enough salt to taste. The salt is what transforms plain caramel into something spectacular by enhancing sweetness and adding complexity. Don’t be shy—the caramel sauce should taste noticeably salty (but not unpleasant), and the flaky salt garnish should be visible and crunchy.
Not Sifting Powdered Sugar
Lumpy frosting is unprofessional and unpleasant. Powdered sugar develops hard clumps during storage. Always sift it before adding to butter, even if the bag says “pre-sifted.” This 30-second step ensures silky-smooth frosting. If you discover lumps after mixing, push the entire batch through a fine-mesh strainer.
Storage and Serving Suggestions
Room Temperature Storage
Frosted salted caramel cupcakes can sit at room temperature for up to 6 hours if your kitchen isn’t too warm (above 75°F). This makes them perfect for parties and gatherings. Cover loosely with plastic wrap or place in a container with a tall lid that doesn’t touch the frosting. The caramel drizzle will remain glossy and beautiful during this window.
Refrigerator Storage
For longer storage, refrigerate cupcakes in an airtight container for up to 4 days. The buttercream will firm up in the cold. Remove from refrigerator 1-2 hours before serving to allow frosting to soften and flavors to brighten. Cold cupcakes taste muted; room temperature cupcakes taste vibrant and rich. The texture improves dramatically at room temperature.
Freezing for Make-Ahead Convenience
Unfrosted cupcakes freeze exceptionally well. Wrap individually in plastic wrap, place in freezer bags, and freeze for up to 3 months. Thaw overnight in the refrigerator, then bring to room temperature. Frost fresh before serving. You can also freeze fully frosted cupcakes, but the frosting texture may change slightly. Freeze uncovered until firm, then wrap carefully.
Transporting Tips
These cupcakes travel beautifully if handled properly. Use a cupcake carrier with individual wells, or create a DIY carrier by placing cupcakes in muffin tins and covering with plastic wrap. Keep them cool but not refrigerated during short trips. For longer journeys, transport unfrosted and add frosting and drizzle at your destination.
Serving Suggestions
Salted caramel cupcakes pair beautifully with coffee, espresso, or salted caramel hot chocolate for dessert. For elegant presentation, place each cupcake in a decorative liner or on individual dessert plates with an extra caramel drizzle on the plate. Serve alongside vanilla ice cream for an over-the-top dessert experience.
Scaling the Recipe
This recipe makes exactly 12 standard cupcakes—perfect for small gatherings. To make 24, simply double all ingredients. For mini cupcakes, use the same batter but bake for only 10-12 minutes; the recipe yields about 36 minis. For jumbo cupcakes, bake for 25-28 minutes; the recipe makes about 6 jumbos.

Frequently Asked Questions
Can I use store-bought caramel sauce instead of homemade?
You can, but the flavor won’t be as complex and you’ll lose control over saltiness. Store-bought caramel tends to be thinner and sweeter. If using jarred caramel, choose high-quality brands and add extra sea salt to taste. You’ll need about 1 1/2 cups total—3/4 cup for frosting and the rest for filling and drizzling. Homemade tastes dramatically better and isn’t as difficult as you might think.
Why did my caramel sauce crystallize?
Crystallization happens when sugar crystals on the pan sides fall back into the melting sugar, triggering a chain reaction. Prevent this by: not stirring the sugar while it melts (swirl the pan instead), brushing down the sides with a wet pastry brush, and ensuring all sugar dissolves completely before it browns. If crystallization occurs, you’ll need to start over—there’s no fixing it mid-process.
Can I make these cupcakes ahead of time?
Absolutely! These cupcakes are excellent make-ahead desserts. Bake cupcakes up to 2 days ahead, store at room temperature wrapped well. Make caramel sauce up to 1 week ahead, refrigerate. Make frosting 1 day ahead, refrigerate, then bring to room temperature and rewhip before using. Assemble cupcakes the day of serving for best texture, or fully assemble up to 24 hours ahead and refrigerate.
My buttercream is too soft/too stiff. How do I fix it?
Too soft: Refrigerate for 15-20 minutes, then rewhip. If still soft, add more powdered sugar 1/4 cup at a time. Too stiff: Beat in heavy cream 1 tablespoon at a time until you reach desired consistency. Let it come to room temperature if it’s been refrigerated. Temperature dramatically affects buttercream consistency—it should be cool but spreadable.
Can I make these cupcakes gluten-free or dairy-free?
For gluten-free: Substitute a 1:1 gluten-free baking flour blend (like Bob’s Red Mill) for all-purpose flour. The texture will be slightly different but still delicious. For dairy-free: Use dairy-free butter, coconut cream instead of heavy cream and sour cream, and plant-based milk. The caramel will have slightly different flavor but works well. Note that achieving identical results is challenging with substitutions.
How do I get the frosting to look like the bakery swirls?
Use a piping bag fitted with a large star tip (Wilton 1M or 2D). Hold the bag perpendicular to the cupcake, starting from the outer edge. Apply steady pressure while moving in a circular motion toward the center, ending in a peak at the middle. Practice on parchment paper first. Alternatively, use a large round tip for a different aesthetic. Watch video tutorials for visual guidance.
Why did my cupcakes sink in the middle?
Several causes: overmixing the batter (creating too much structure that then collapses), opening the oven door too early (temperature drop causes collapse), oven temperature too high (rapid rise then collapse), or too much leavening. Ensure your oven temperature is accurate with an oven thermometer. Don’t open the oven for the first 15 minutes of baking.
How salty should the final product be?
The salted caramel sauce should taste noticeably salty but balanced—the salt should enhance the caramel flavor, not overwhelm it. Start with 1 teaspoon salt, taste, and add more if desired. The flaky salt garnish provides textural pops of saltiness. The overall experience should be sweet with pleasant salty notes throughout, not aggressively salty.
Conclusion
Salted caramel cupcakes represent the perfect intersection of homemade charm and professional bakery quality. While they require a bit more effort than box mix cupcakes, every additional minute spent is rewarded tenfold in flavor, texture, and the pride of creating something truly spectacular. The combination of tender vanilla cake, silky caramel buttercream, and that perfect drizzle of salted caramel sauce creates a dessert that’s greater than the sum of its parts.
What I love most about this recipe is how it demystifies techniques that intimidate many home bakers. Homemade caramel sauce isn’t scary once you understand the process. Buttercream frosting is actually quite forgiving. And the cupcake base is straightforward enough for beginners while delivering results that impress even seasoned bakers. Once you’ve made these a few times, the process becomes second nature, and you’ll find yourself whipping them up for every celebration.
The beauty of mastering salted caramel cupcakes extends beyond this specific recipe. The techniques you’ve learned—making caramel from scratch, achieving the perfect buttercream consistency, properly mixing cupcake batter—transfer to countless other baking projects. You’ve expanded your skill set while creating something absolutely delicious.
Now that you’re armed with all the knowledge, tips, and tricks for perfect salted caramel cupcakes, it’s time to preheat that oven and create some magic. Whether you’re baking for a special occasion or simply treating yourself to something extraordinary, these cupcakes deliver joy in every bite. The sweet-salty combination, the tender crumb, the luscious frosting—it all comes together in a cupcake worthy of any celebration. Happy baking!
Print
Salted Caramel Cupcakes: The Ultimate Guide to Perfect Sweet and Salty Treats (9 Pro Secrets)
Decadent salted caramel cupcakes featuring moist vanilla cake, silky caramel buttercream frosting, and homemade salted caramel sauce. These bakery-quality treats combine sweet and salty flavors in perfect harmony, crowned with flaky sea salt for the ultimate gourmet cupcake experience.
- Total Time: 50 minutes
- Yield: 12 standard cupcakes
Ingredients
Cupcakes: all-purpose flour, baking powder, baking soda, salt, butter, sugar, eggs, vanilla, sour cream, milk Caramel Sauce: sugar, butter, heavy cream, sea salt, vanilla Frosting: butter, powdered sugar, salted caramel sauce, heavy cream, vanilla, salt Garnish: reserved caramel sauce, flaky sea salt
Instructions
- Make salted caramel sauce: melt sugar, add butter, then cream and salt; cool
- Preheat oven to 350°F; line muffin tin with liners
- Whisk dry ingredients; cream butter and sugar; add eggs and vanilla
- Alternate adding dry ingredients with sour cream and milk; mix until just combined
- Fill liners 2/3 full; bake 18-22 minutes until toothpick comes clean
- Cool completely on wire rack
- Make frosting: beat butter until fluffy, add powdered sugar, caramel sauce, and cream
- Optional: core cupcakes and fill with caramel sauce
- Pipe frosting onto cupcakes; drizzle with caramel; sprinkle with flaky sea salt
Notes
- All ingredients should be room temperature for best results
- Don’t stir sugar while making caramel; swirl pan instead
- Cook caramel to deep amber for richest flavor
- Sift powdered sugar to avoid lumpy frosting
- Cupcakes must be completely cool before frosting
- Adjust frosting consistency with heavy cream as needed
- Store caramel sauce in refrigerator up to 2 weeks
- Unfrosted cupcakes freeze up to 3 months
- Prep Time: 30 minutes
- Cook Time: 20 minutes
- Category: Desserts
- Method: Baking
- Cuisine: American
- Diet: Vegan