

Dreamy Fluffy Japanese Soufflé Pancakes: The Ultimate Guide to Cloud-Like Breakfast Perfection

Dreamy Fluffy Japanese Soufflé Pancakes are the breakfast revelation you never knew you needed until that first bite sends you straight to cloud nine. These towering, jiggly stacks of pure heaven have taken the culinary world by storm, transforming ordinary mornings into extraordinary experiences. Unlike their flat American cousins, these ethereal creations wobble with each gentle touch, promising a texture so impossibly light that you’ll wonder if you’re eating breakfast or floating on air.
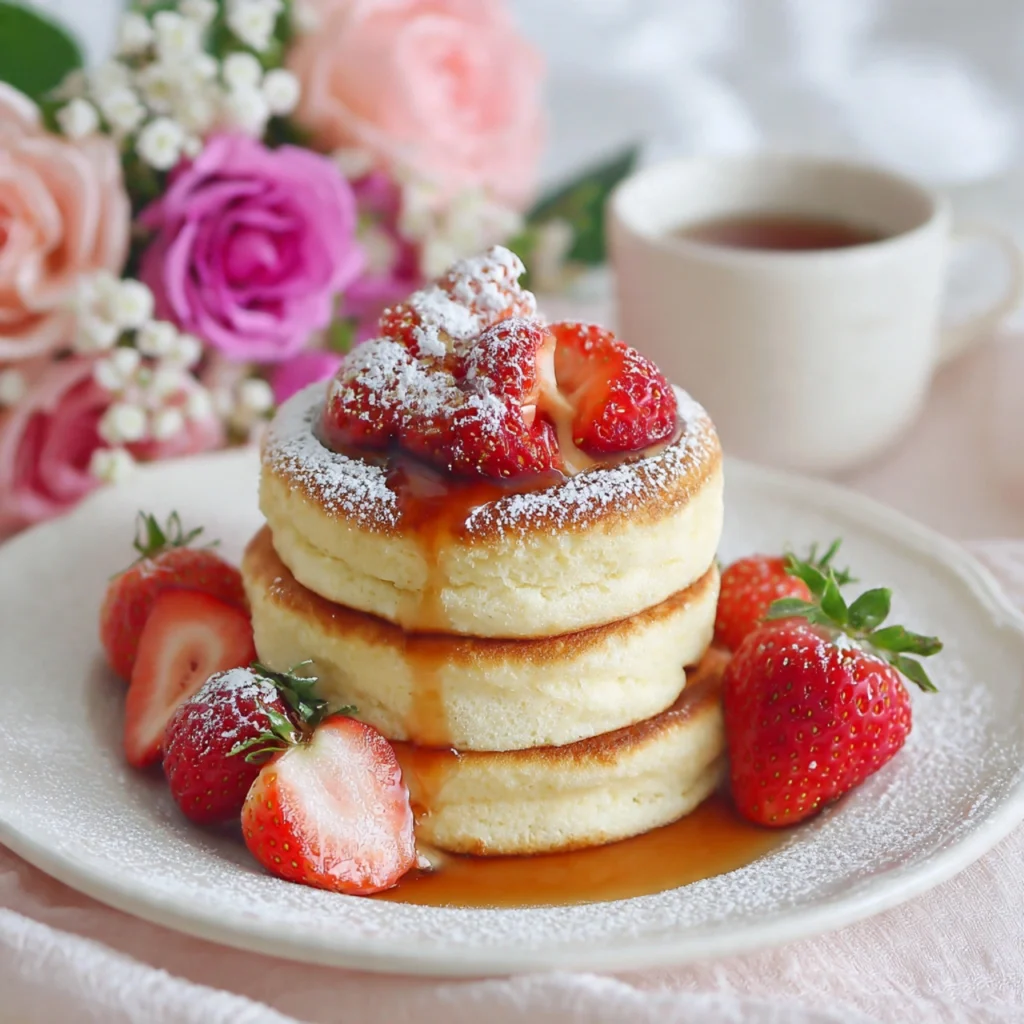
I still remember the first time I encountered these magnificent pancakes at a tiny café in Tokyo’s Harajuku district. The moment the server placed that towering stack before me, watching it gently jiggle like the world’s most delicious stress ball, I knew my pancake game would never be the same. The outside had a delicate golden crust that gave way to an interior so fluffy it practically dissolved on my tongue, leaving behind nothing but sweet, eggy bliss.
What makes these pancakes so special isn’t just their Instagram-worthy appearance or their mesmerizing wobble. It’s the technique, the patience, and the love baked into every impossibly airy bite. While they might seem intimidating at first glance, I’m here to tell you that with the right guidance and a bit of practice, you’ll be stacking these beauties like a seasoned Tokyo chef.
The magic behind Dreamy Fluffy Japanese Soufflé Pancakes lies in the meringue. By whipping egg whites to stiff, glossy peaks and gently folding them into the batter, you’re incorporating thousands of tiny air bubbles that expand during cooking, creating that signature height and fluffiness. It’s part science experiment, part culinary art, and entirely delicious.

Why You’ll Fall in Love with This Dreamy Fluffy Japanese Soufflé Pancakes
This recipe strikes the perfect balance between authenticity and accessibility. You won’t need specialized equipment or hard-to-find ingredients. Just basic pantry staples, a good whisk or electric mixer, and about 30 minutes of your time. The payoff? Pancakes that taste like they came straight from a high-end Japanese breakfast spot, complete with that satisfying wobble that’s become the hallmark of soufflé pancake perfection.
Whether you’re planning a special weekend brunch, celebrating a birthday breakfast, or simply want to treat yourself to something extraordinary, these pancakes deliver every single time. They’re conversation starters, mood lifters, and proof that breakfast really can be the most important meal of the day.
Ingredients for Dreamy Fluffy Japanese Soufflé Pancakes
For the Pancake Batter:
- 2 large eggs, separated (room temperature is crucial)
- 3 tablespoons whole milk, at room temperature
- 1/4 teaspoon vanilla extract
- 1/4 cup all-purpose flour, sifted
- 1/2 teaspoon baking powder
- Pinch of salt
- 3 tablespoons granulated sugar
- 1/4 teaspoon cream of tartar (or substitute with 1/2 teaspoon lemon juice)
For Cooking:
- Neutral oil or butter, for greasing the pan
- 2 tablespoons water per batch (for steaming)
For Serving (Optional but Recommended):
- Fresh berries (strawberries, blueberries, raspberries)
- Pure maple syrup or honey
- Powdered sugar for dusting
- Whipped cream
- Fresh mint leaves for garnish
Equipment You’ll Need:
- Electric hand mixer or stand mixer
- Large mixing bowl for egg whites
- Medium mixing bowl for yolks
- Fine-mesh sieve for sifting
- Non-stick skillet or griddle with a lid
- Ring molds or cookie cutters (3-inch diameter) – optional but helpful
- Rubber spatula
- Offset spatula or wide turner
Step-by-Step Instructions for Perfect Dreamy Fluffy Japanese Soufflé Pancakes
Step 1: Prepare Your Ingredients (5 minutes)
Before you begin, ensure all your ingredients are at room temperature. This is non-negotiable for achieving maximum fluffiness. Cold eggs won’t whip properly, and cold milk can deflate your carefully created meringue.
Separate your eggs with extreme care. Even the tiniest bit of yolk in your whites will prevent them from reaching their full fluffy potential. I like to use three small bowls: one for cracking, one for whites, and one for yolks. This way, if a yolk breaks, you haven’t contaminated your entire batch of whites.
Sift together the flour, baking powder, and salt into a small bowl. This step aerates the flour and removes any lumps, ensuring your batter stays silky smooth.
Step 2: Create the Egg Yolk Mixture (3 minutes)
In your medium mixing bowl, whisk together the egg yolks, milk, and vanilla extract until well combined and slightly pale. The mixture should be smooth and homogeneous.
Add the sifted flour mixture to the yolk mixture and whisk gently until just combined. Don’t overmix here; a few small lumps are perfectly fine and actually preferable to an overworked batter. Set this aside while you work on the star of the show: the meringue.
Step 3: Whip the Meringue to Stiff Peaks (7-8 minutes)
This is where the magic happens. In your largest, spotlessly clean mixing bowl, combine the egg whites and cream of tartar. Start beating on medium speed until the mixture becomes foamy and white, about 1 minute.
Gradually add the sugar, one tablespoon at a time, while continuing to beat. Once all the sugar is incorporated, increase the speed to medium-high and continue beating until stiff, glossy peaks form. This should take 5-7 minutes total.
You’ll know your meringue is ready when you lift the beaters and the peaks stand straight up without drooping. The mixture should be thick, shiny, and when you tilt the bowl, nothing should slide around. This is crucial: underwhipped meringue means flat pancakes, while overwhipped meringue becomes grainy and won’t fold in properly.
Step 4: Fold the Meringue into the Batter (3-4 minutes)
Here’s where gentle hands make all the difference. Add about one-third of the meringue to your egg yolk mixture. Using a rubber spatula, fold it in with broad, sweeping motions. Cut down through the center, sweep along the bottom, and bring the spatula up along the side. Rotate the bowl a quarter turn and repeat.
This initial folding lightens the base batter, making it easier to incorporate the remaining meringue without deflating it. Once this first addition is mostly incorporated (a few white streaks are fine), add half of the remaining meringue and fold gently using the same technique.
Finally, add the last portion of meringue and fold until just combined. The batter should be light, airy, and thick enough to hold its shape when scooped. Don’t overfold trying to eliminate every white streak; a few wisps of meringue are better than a deflated batter.
Step 5: Cook the Pancakes (15-18 minutes)
Heat your non-stick skillet over the lowest heat possible. This is critical: too high and your pancakes will burn on the outside while remaining raw inside. Give your pan at least 5 minutes to come to an even, gentle temperature.
Lightly grease the pan and your ring molds if using them. Place the molds in the pan and carefully spoon or pipe the batter into each mold, filling them about three-quarters full. If you’re not using molds, simply spoon large dollops of batter onto the pan, trying to keep them as tall and round as possible.
Gently tap the pan on the counter once or twice to release any large air bubbles. Add 2 tablespoons of water to the pan (away from the pancakes), immediately cover with a lid, and cook for 7-8 minutes. The steam created by the water helps the pancakes rise evenly without drying out.
After 7-8 minutes, carefully remove the lid. The pancakes should have risen significantly and set around the edges. Using an offset spatula or wide turner, very gently flip each pancake. Add another tablespoon of water to the pan, cover again, and cook for an additional 6-7 minutes.
The pancakes are done when they’re golden brown on both sides, spring back lightly when touched, and a toothpick inserted into the center comes out clean or with just a few moist crumbs.
Step 6: Serve Immediately
Soufflé pancakes are at their absolute best served immediately. They’ll begin to deflate slightly as they cool, which is natural. Stack them high, dust with powdered sugar, add your favorite toppings, and prepare for breakfast bliss.

Pro Tips for Perfect Dreamy Fluffy Japanese Soufflé Pancakes
Temperature Control is Everything
The single biggest mistake people make is cooking these pancakes over medium or high heat. Resist the temptation to speed things up. Low and slow is the only way to achieve that tall, evenly cooked interior without a burnt exterior. Think of it as meditation practice: patience yields perfection.
Room Temperature Ingredients Matter
Cold eggs produce a meringue that’s less stable and won’t incorporate as smoothly into your batter. I take my eggs out of the refrigerator 30-60 minutes before starting. If you forget, place whole eggs in a bowl of warm (not hot) water for 10 minutes.
The Meringue Test
Before you start folding, test your meringue by turning the bowl completely upside down. If the meringue doesn’t budge, you’ve nailed it. If it slides or looks wet and droopy, keep beating.
Folding Technique
Always fold gently and decisively. Tentative, repeated folding deflates the batter more than confident, thorough folds. Think of it like tucking someone into bed: smooth, deliberate movements rather than patting and poking.
Use Fresh Baking Powder
Baking powder loses its potency over time. If yours is more than six months old, replace it. The chemical leavening works with your meringue to achieve maximum rise.
The Water Trick
Adding water to the pan and covering it creates a steamy environment that helps the pancakes cook evenly throughout. Without it, you’ll get a dome that’s raw in the middle or a flat pancake that’s lost all its soufflé magic.
Ring Molds Are Your Friends
While not absolutely necessary, 3-inch ring molds help create those perfect, tall, uniform pancakes. Grease them well with butter or oil. You can find inexpensive sets online or improvise with clean tuna cans with both ends removed.
First Pancake Practice
Your first pancake is always a learning experience. Use it to gauge your pan temperature and cooking time. Every stove is different, so don’t be discouraged if you need to adjust.
Piping for Precision
For the tallest, most uniform pancakes, transfer your batter to a large piping bag or a zip-top bag with the corner cut off. Pipe in a spiral motion from the center outward, building height gradually.
Common Mistakes to Avoid
Mistake #1: Overbeating the Meringue
When meringue is overbeaten, it becomes dry, grainy, and separates. It won’t fold smoothly into your batter and will create dense pockets rather than even fluffiness. The sweet spot is glossy, smooth peaks that stand straight up.
Mistake #2: Overmixing After Folding
Every extra fold deflates more air bubbles. Once you no longer see large streaks of meringue, stop. A few white wisps are perfect; they’ll blend in during cooking.
Mistake #3: Skipping the Sifting
Unsifted flour creates lumps that won’t fully incorporate and can cause dense spots in your otherwise fluffy pancakes. Take the 30 seconds to sift; your pancakes will thank you.
Mistake #4: Opening the Lid Too Early
I know the temptation to peek is strong, but resist it. Opening the lid releases all that valuable steam and can cause your pancakes to collapse. Trust the process and trust the timing.
Mistake #5: Using Old Eggs
Fresh eggs produce the best, most stable meringue. Older eggs have thinner whites that don’t whip up as well. If your eggs are more than two weeks old, save them for scrambled eggs and buy fresh ones for this recipe.
Mistake #6: Cooking Over High Heat
This bears repeating: low heat only. These pancakes need time for the interior to set before the exterior burns. High heat equals disappointment.
Mistake #7: Not Greasing Adequately
Even with a non-stick pan, a light coating of oil or butter prevents sticking and helps achieve that beautiful golden color. Pay special attention to greasing your ring molds.
Mistake #8: Making the Batter Too Far in Advance
Meringue begins to deflate the moment you stop beating. Mix your batter and get it in the pan within 5 minutes for maximum rise.
Storage and Serving Suggestions
Immediate Serving
Dreamy Fluffy Japanese Soufflé Pancakes are absolutely best enjoyed fresh off the griddle. The contrast between the lightly crisp exterior and cloud-like interior is at its peak in those first few minutes. Serve them immediately on warmed plates to keep them cozy.
Short-Term Storage (Same Day)
If you must make these ahead, you can keep cooked pancakes in a 200°F (95°C) oven for up to 15 minutes. Place them on a wire rack set over a baking sheet so air can circulate and they won’t get soggy. They will deflate slightly, but they’ll still be delicious.
Refrigeration (Not Ideal but Possible)
Leftover pancakes can be stored in an airtight container in the refrigerator for up to 2 days. The texture won’t be quite the same, but they’re still tasty. Reheat gently in a 300°F (150°C) oven for 5-7 minutes, covered with foil to prevent drying out.
Freezing Instructions
You can freeze these pancakes for up to 1 month. Let them cool completely, then wrap individually in plastic wrap and place in a freezer-safe bag. Thaw in the refrigerator overnight and reheat in a 300°F (150°C) oven for 8-10 minutes. They won’t be quite as fluffy as fresh, but they make a decent quick breakfast.
Serving Suggestions
Classic Japanese Style: Dust with powdered sugar, add a pat of butter, and drizzle with maple syrup or honey. Serve with fresh berries on the side.
Decadent Treat: Top with whipped cream, fresh strawberries, and a drizzle of chocolate sauce. Add a sprinkle of matcha powder for an extra Japanese touch.
Savory Twist: Skip the sugar in the batter (or reduce to 1 tablespoon) and serve with smoked salmon, cream cheese, and fresh dill.
Berry Compote: Make a quick berry compote by simmering mixed berries with a tablespoon of sugar and a squeeze of lemon juice. Spoon over warm pancakes.
Café Style: Serve with a scoop of vanilla ice cream, sliced bananas, and a drizzle of caramel sauce.
Matcha Lovers: Add 1 tablespoon of matcha powder to the dry ingredients for beautiful green soufflé pancakes. Serve with red bean paste and whipped cream.
Beverage Pairings
These pancakes pair beautifully with hot green tea, matcha lattes, coffee, or even a glass of cold milk. For a special brunch, serve with Japanese iced coffee or a fruity mimosa.
Frequently Asked Questions
Can I make these pancakes without cream of tartar?
Yes, absolutely. Cream of tartar stabilizes the meringue, but you can substitute it with an equal amount of lemon juice or white vinegar. Some people even make these successfully without any acid at all, though the meringue may be slightly less stable. The key is to beat the egg whites thoroughly and work quickly once the batter is combined.
Why did my pancakes deflate after cooking?
Some deflation is completely normal and expected as soufflé pancakes cool. However, excessive deflation usually indicates one of three issues: undercooked centers (the structure hasn’t fully set), overfolded batter (too many air bubbles were destroyed), or meringue that wasn’t beaten to stiff enough peaks. Make sure you cook them long enough that a toothpick comes out clean, fold gently, and beat your meringue until it forms peaks that stand straight up.
Can I make the batter ahead of time?
Unfortunately, no. The meringue begins to deflate immediately after you stop beating it, which is why timing is so important. Mix your batter right before cooking for the best results. However, you can separate your eggs, sift your dry ingredients, and measure everything out ahead of time to speed up the process.
Do I really need ring molds?
Ring molds definitely help create those tall, uniform pancakes you see in pictures, but they’re not absolutely necessary. Without them, you can still make delicious soufflé pancakes by carefully spooning or piping tall mounds of batter onto your pan. They might spread slightly more and may not be quite as tall, but they’ll still be fluffy and delicious. If you want to invest in molds, 3-inch diameter stainless steel rings work perfectly.
Can I double or halve this recipe?
Yes, but with some considerations. This recipe is designed for 2-3 large pancakes, which is perfect for one or two people. You can halve it for a single serving, though beating just one egg white to stiff peaks can be tricky (use a small, deep bowl). Doubling works well, but I recommend making two batches rather than one large batch. Meringue deflates while sitting, so making a huge amount means the last pancakes won’t be as fluffy as the first.
What’s the best pan to use?
A non-stick skillet is absolutely essential for these delicate pancakes. Cast iron can work but requires more oil and careful temperature monitoring. I prefer a 10-inch non-stick pan, which gives me room to cook 2-3 pancakes at once with my ring molds. Make sure your pan is in good condition; if the non-stick coating is scratched or worn, your pancakes will stick.
How do I know when to flip the pancakes?
The pancakes are ready to flip when the edges look set and dry, the surface has lost its glossy wetness, and you see tiny bubbles forming on top. This typically takes 7-8 minutes on low heat. When you gently lift an edge with your spatula, the bottom should be golden brown. If you flip too early, they’ll collapse; too late, and the bottom will burn.
Can I add flavors or mix-ins?
Absolutely! For the batter itself, you can add 1/2 teaspoon of almond extract, 1 tablespoon of matcha powder, or a bit of citrus zest to the egg yolk mixture. Avoid adding heavy mix-ins like chocolate chips or nuts, as these will weigh down the delicate batter. If you want to include them, sprinkle a few on top of each pancake right after pouring rather than mixing them in.
Why are my pancakes browning too quickly?
Your heat is too high. These pancakes require the lowest possible heat setting on your stove. Every stove is different, so what works on mine might not work on yours. If you’re getting dark exteriors with raw centers, reduce your heat even further. It should take 13-15 minutes total to cook each batch properly.
Are these pancakes healthy?
These pancakes are an indulgent treat rather than an everyday health food. They’re relatively low in flour and use whole eggs, which provides protein. However, they’re light on fiber and nutrients. I think of them as a special occasion breakfast or weekend treat. You can make them slightly healthier by serving with fresh fruit and using pure maple syrup instead of processed syrups.
Final Thoughts
Dreamy Fluffy Japanese Soufflé Pancakes represent everything I love about cooking: the marriage of technique and creativity, the transformation of simple ingredients into something extraordinary, and the joy of sharing something truly special with the people you care about. Yes, they require more effort than dumping some Bisquick in a bowl, but the reward is so much greater than the sum of those extra minutes.
The first time you nail these pancakes, you’ll feel like a culinary wizard. That moment when you lift the lid and see those impossibly tall, golden pillows of perfection will make you grin like a kid on Christmas morning. And when you cut into that first bite and experience that melt-in-your-mouth texture, you’ll understand why these pancakes have captured hearts around the world.
Don’t be discouraged if your first attempt isn’t picture-perfect. Like any worthwhile skill, making soufflé pancakes improves with practice. Each batch teaches you something new about your stove, your mixing technique, your timing. Keep at it, and soon you’ll be whipping these up with confidence.
Remember, cooking should be joyful, not stressful. Put on some music, take your time, and enjoy the process. The meditative rhythm of whisking meringue, the satisfaction of a perfect fold, the anticipation as your pancakes rise in the pan—these moments are just as valuable as the finished product.
Whether you’re making these for a special someone, treating yourself to a solo breakfast date, or impressing brunch guests, Dreamy Fluffy Japanese Soufflé Pancakes deliver happiness in every wobbling, cloud-like bite. They’re proof that breakfast can be both an art form and a love letter to everyone lucky enough to gather around your table.
Now grab your whisk, separate those eggs, and get ready to create some breakfast magic. Your journey to soufflé pancake perfection starts today, and trust me, it’s a delicious path to travel. Happy cooking!
👉 Follow us on Pinterest
Print
Dreamy Fluffy Japanese Soufflé Pancakes: The Ultimate Guide to Cloud-Like Breakfast Perfection
These Dreamy Fluffy Japanese Soufflé Pancakes are impossibly tall, cloud-like pillows of breakfast perfection. Whipped egg whites create an airy meringue that gives these pancakes their signature jiggly wobble and melt-in-your-mouth texture. Cooked low and slow with steam, they rise to dramatic heights with a delicate golden exterior and an interior so fluffy it practically dissolves on your tongue.
- Total Time: 30 minutes
- Yield: 2-3 large pancakes (2 servings)
Ingredients
- 2 large eggs, separated (room temperature)
- 3 tablespoons whole milk, room temperature
- ¼ teaspoon vanilla extract
- ¼ cup all-purpose flour, sifted
- ½ teaspoon baking powder
- Pinch of salt
- 3 tablespoons granulated sugar
- ¼ teaspoon cream of tartar (or ½ teaspoon lemon juice)
- Neutral oil or butter, for greasing
- 2 tablespoons water per batch (for steaming)
- For serving: powdered sugar, pure maple syrup, fresh berries, whipped cream, butter
Instructions
- Prepare ingredients: Ensure eggs and milk are at room temperature. Separate eggs carefully, making sure no yolk gets into the whites. Sift together flour, baking powder, and salt.
- Make yolk mixture: In a medium bowl, whisk egg yolks, milk, and vanilla until smooth. Add the sifted flour mixture and whisk gently until just combined. Set aside.
- Whip the meringue: In a large, clean bowl, beat egg whites and cream of tartar on medium speed until foamy (about 1 minute). Gradually add sugar one tablespoon at a time. Increase to medium-high and beat until stiff, glossy peaks form (5-7 minutes total). Peaks should stand straight up when you lift the beaters.
- Fold batter: Add ⅓ of the meringue to the yolk mixture and fold gently with a rubber spatula using broad, sweeping motions. Add half the remaining meringue and fold, then add the final portion and fold until just combined with a few white streaks remaining.
- Heat pan: Heat a non-stick skillet over the lowest heat possible for 5 minutes. Lightly grease the pan and ring molds (if using).
- Cook first side: Spoon or pipe batter into 3-inch molds (or free-form dollops), filling ¾ full. Add 2 tablespoons water to the pan away from pancakes, cover immediately, and cook for 7-8 minutes without lifting the lid.
- Flip and finish: Gently flip each pancake with an offset spatula. Add 1 tablespoon more water, cover, and cook 6-7 minutes until golden brown and a toothpick inserted in the center comes out clean.
- Serve immediately: Stack pancakes high, dust with powdered sugar, add butter and maple syrup, and serve right away while they’re at their fluffiest.
Notes
Key Tips: Low heat is absolutely critical—cooking too fast burns the outside while leaving the inside raw. Room temperature eggs create more stable meringue. Don’t overfold the batter or you’ll deflate all those precious air bubbles. The water and lid create steam that helps pancakes rise evenly. Serve immediately for maximum fluff—they’ll deflate slightly as they cool, which is normal. First pancake is always a test—adjust heat if needed.
- Prep Time: 15 minutes
- Cook Time: 15 minutes
- Category: Breakfast
- Method: Stovetop
- Cuisine: Japanese
- Diet: Vegetarian


1 Comment
[…] allows the flour to fully hydrate, makes the dough much easier to roll out, and helps the cookies maintain their shape during […]
Comments are closed.