The Ultimate Guide to Perfect Chocolate Chip Cookies: A Recipe You’ll Make Forever
Introduction: Why Chocolate Chip Cookies Reign Supreme
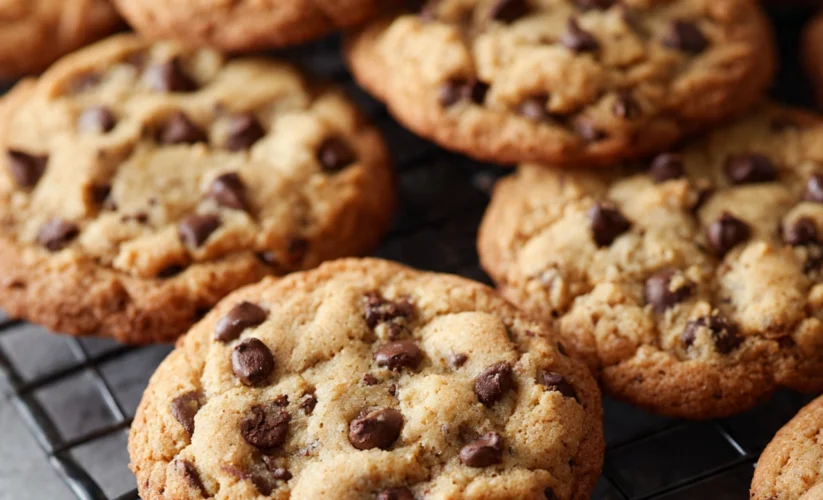
Chocolate chip cookies hold a special place in the hearts of bakers and dessert lovers everywhere. There’s something magical about pulling a tray of golden-brown cookies from the oven, their edges crispy and centers soft, with pools of melted chocolate dotting the surface. Whether you’re baking for a special occasion, a weekend treat, or simply craving that perfect bite of nostalgia, mastering the art of chocolate chip cookies is a skill every home baker should possess.
After two decades of testing, tweaking, and perfecting cookie recipes, I’ve discovered the secrets that transform ordinary cookies into extraordinary ones. This isn’t just another recipe you’ll try once and forget. This is the chocolate chip cookie recipe that will become your go-to, the one you’ll make for every bake sale, holiday gathering, and late-night craving. The beauty lies not just in the ingredients, but in understanding the science behind each component and how they work together to create cookie perfection.
What makes this recipe different? It delivers that coveted texture combination: crispy, caramelized edges that provide a satisfying crunch, paired with soft, chewy centers that practically melt in your mouth. The chocolate distribution is generous but balanced, ensuring every bite contains that sweet reward. Most importantly, this recipe is reliable, forgiving, and produces consistent results every single time.

The Secret to Perfect Chocolate Chip Cookies: Understanding Your Ingredients
Before we dive into the recipe, let’s talk about what makes these cookies exceptional. The ingredients aren’t just a shopping list; each one plays a crucial role in creating the texture, flavor, and appearance you’re after.
Butter is the foundation of flavor and texture. Using real butter (not margarine) provides richness and helps create those crispy edges. The temperature of your butter matters tremendously. Room temperature butter creams properly with sugar, creating air pockets that give cookies their structure. Too cold, and it won’t incorporate properly. Too warm, and your cookies will spread too much.
Brown sugar versus white sugar is one of the most important decisions in cookie baking. Brown sugar contains molasses, which adds moisture and creates chewier cookies with deeper flavor. White sugar helps cookies spread and creates crispness. This recipe uses both in a specific ratio to achieve the perfect balance.
Chocolate quality cannot be overstated. Your cookies are only as good as the chocolate you use. High-quality chocolate chips or chunks make an enormous difference in flavor. I recommend using a combination of chocolate chip sizes or chopping your own from a good chocolate bar for varied texture.
Ingredients: What You’ll Need
Dry Ingredients:
- 2 and 1/4 cups (280g) all-purpose flour
- 1 teaspoon baking soda
- 1 teaspoon fine sea salt
- 1/2 teaspoon baking powder (secret ingredient for extra lift)
Wet Ingredients:
- 1 cup (226g) unsalted butter, room temperature
- 3/4 cup (150g) granulated white sugar
- 3/4 cup (165g) packed light brown sugar
- 2 large eggs, room temperature
- 2 teaspoons pure vanilla extract
Mix-Ins:
- 2 cups (340g) semi-sweet chocolate chips
- 1 cup (170g) dark chocolate chunks (optional but recommended)
- Flaky sea salt for topping (optional but amazing)
Step-by-Step Instructions: Baking Perfect Cookies Every Time
Step 1: Prepare Your Workspace
Preheat your oven to 375°F (190°C). This temperature is crucial for achieving those crispy edges while keeping centers soft. Line two large baking sheets with parchment paper or silicone baking mats. Never skip this step; it prevents sticking and promotes even browning.
Take your butter and eggs out of the refrigerator 30 minutes before you begin. Room temperature ingredients incorporate more evenly, creating a better cookie structure. Your butter should be soft enough to leave an indent when pressed but still hold its shape.
Step 2: Mix Your Dry Ingredients
In a medium bowl, whisk together the flour, baking soda, salt, and baking powder. Whisking aerates the flour and ensures your leavening agents are evenly distributed throughout. This prevents pockets of baking soda that can create an unpleasant metallic taste. Set this bowl aside.
Step 3: Cream Butter and Sugars
In a large bowl or stand mixer fitted with a paddle attachment, beat the room temperature butter on medium speed for about one minute until creamy. Add both sugars and beat on medium-high speed for three to four minutes. This step is critical and should not be rushed. The mixture should become noticeably lighter in color and fluffy in texture. This creaming process incorporates air, which helps create tender cookies with good structure.
Step 4: Add Eggs and Vanilla
Reduce mixer speed to medium-low. Add eggs one at a time, beating well after each addition until fully incorporated. Scrape down the sides of the bowl with a rubber spatula. Add vanilla extract and mix until combined. The mixture might look slightly curdled at this point, which is completely normal.
Step 5: Incorporate Dry Ingredients
With the mixer on low speed, gradually add the flour mixture. Mix only until small streaks of flour remain visible. Do not overmix. Overmixing develops gluten, which creates tough, cake-like cookies instead of tender ones. It’s better to undermix slightly than to overmix.
Step 6: Fold in Chocolate
Remove the bowl from the mixer. Using a sturdy spatula or wooden spoon, fold in the chocolate chips and chunks by hand. This ensures even distribution without overworking the dough. Fold just until the chocolate is evenly dispersed throughout.
Step 7: Chill the Dough (Critical Step)
Here’s where patience pays off. Cover the bowl with plastic wrap and refrigerate the dough for at least 30 minutes, or up to 72 hours. Chilling serves multiple purposes: it allows the flour to fully hydrate, which improves texture; it solidifies the butter, which prevents excessive spreading; and it allows flavors to develop and deepen. For the absolute best results, chill for 24 hours. The difference is remarkable.
Step 8: Shape and Bake
When ready to bake, remove dough from refrigerator. Using a cookie scoop or spoon, portion dough into balls about 3 tablespoons each (approximately 2 inches in diameter). Place them on your prepared baking sheets, spacing them about 3 inches apart to allow for spreading.
For extra-thick cookies, you can roll the dough balls taller rather than wider. For a professional touch, tear each dough ball in half, then press the two halves back together with the rough, torn sides facing up. This creates those gorgeous craggy tops that catch the light and brown beautifully.
Sprinkle the tops lightly with flaky sea salt if desired. This is optional but highly recommended; the salt enhances the chocolate flavor and adds a sophisticated touch.
Bake for 11 to 13 minutes, or until the edges are golden brown but the centers still look slightly underdone and puffy. They will appear underbaked, and that’s exactly what you want. The cookies will continue cooking on the hot pan after you remove them from the oven, a process called carryover cooking.
Step 9: The Crucial Cooling Period
Let cookies cool on the baking sheet for five minutes. This resting time allows them to set up properly. If you try to move them immediately, they’ll fall apart. After five minutes, transfer cookies to a wire cooling rack. For the best texture, let them cool for at least 10 minutes before eating, though waiting is admittedly difficult.

Pro Tips for Perfect Chocolate Chip Cookies
Tip 1: Measure Flour Correctly The number one reason cookies fail is incorrectly measured flour. Never scoop flour directly with your measuring cup, as this compacts it and adds too much. Instead, spoon flour into your measuring cup and level it off with a knife. Better yet, weigh your ingredients with a kitchen scale for perfect accuracy every time.
Tip 2: Don’t Skip the Chill Time I know you’re eager to bake, but chilling the dough is non-negotiable for superior cookies. Cold dough spreads less in the oven, creating thicker cookies with better texture. The extended chill time also allows the dough to hydrate properly and flavors to meld.
Tip 3: Use Parchment Paper or Silicone Mats These prevent sticking and promote even browning. Greasing your pan can cause cookies to spread too much and brown too quickly on the bottom.
Tip 4: Rotate Your Pans Ovens have hot spots. Halfway through baking, rotate your pan 180 degrees for even baking. If baking two sheets at once, also swap their rack positions.
Tip 5: Underbake Slightly The secret to chewy centers is removing cookies when they still look slightly underdone. They’ll finish cooking on the pan. Overbaking is the most common mistake and results in dry, hard cookies.
Tip 6: Room Temperature Ingredients Matter Cold eggs and butter don’t incorporate properly, leading to dense, uneven cookies. Plan ahead and set ingredients out 30 minutes before baking.
Tip 7: Mix Chocolate Sizes Using both chips and chunks creates varied chocolate experiences in each bite. The chips distribute evenly throughout, while chunks create dramatic chocolate pools.
Tip 8: Bang the Pan Immediately after removing cookies from the oven, lift the baking sheet about 4 inches and drop it onto the counter. This creates those beautiful ripples and helps chocolate pool on top.
Tip 9: Quality Vanilla Matters Pure vanilla extract tastes noticeably better than imitation. It’s worth the extra cost for these simple cookies where every ingredient shines.
Tip 10: Fresh Baking Soda Baking soda loses potency over time. If yours is more than six months old, replace it. Fresh baking soda ensures proper rise and spread.
Common Mistakes to Avoid
Mistake 1: Using Cold Butter Cold butter doesn’t cream properly with sugar, resulting in dense, flat cookies that lack structure. Always use room temperature butter that’s soft but not melted.
Mistake 2: Overmixing the Dough Once you add flour, mix only until just combined. Overmixing develops gluten, creating tough, cakey cookies instead of tender ones.
Mistake 3: Baking on a Hot Pan Always let your baking sheet cool completely between batches. Placing dough on a hot pan causes immediate spreading and uneven baking. Have multiple pans ready or cool your used pan under cold running water, then dry thoroughly.
Mistake 4: Incorrect Oven Temperature Use an oven thermometer to verify your oven’s actual temperature. Many ovens run hot or cold, which dramatically affects baking. An oven that’s 25 degrees off can ruin your cookies.
Mistake 5: Crowding the Pan Cookies need space to spread. Place only 6 to 8 cookies per standard baking sheet, spacing them at least 3 inches apart.
Mistake 6: Opening the Oven Door Repeatedly Every time you open the oven, temperature drops dramatically. Resist the urge to peek until the minimum baking time has elapsed.
Mistake 7: Not Tasting Your Dough Always taste a small amount of dough before baking. While eating raw dough carries risks, a tiny taste tells you if you need to adjust salt, vanilla, or chocolate. It’s easier to fix dough than baked cookies.
Mistake 8: Using Old Chocolate Chocolate can develop bloom (white streaks) or stale flavors over time. Fresh, high-quality chocolate makes a noticeable difference in your final cookies.
Storage and Serving Suggestions
Room Temperature Storage Store completely cooled cookies in an airtight container at room temperature for up to 5 days. Place a piece of bread in the container; it releases moisture that keeps cookies soft. Replace the bread every couple days.
Freezing Baked Cookies These cookies freeze beautifully for up to 3 months. Layer them between parchment paper in an airtight container or freezer bag. Thaw at room temperature for about 20 minutes before serving, or warm in a 300°F oven for 5 minutes for that fresh-baked taste.
Freezing Cookie Dough This is my favorite trick for always having fresh cookies ready. Shape dough into balls, freeze on a baking sheet until solid, then transfer to a freezer bag. Bake directly from frozen, adding 1 to 2 minutes to the baking time. You can have warm cookies anytime without the full prep.
Serving Suggestions Chocolate chip cookies are perfect on their own, but here are some creative serving ideas:
- Sandwich vanilla ice cream between two cookies for homemade ice cream sandwiches
- Crumble over ice cream for a cookie sundae
- Serve warm with cold milk (the classic pairing)
- Break into pieces and fold into vanilla pudding for a quick dessert
- Layer with whipped cream and berries for a cookie trifle
- Warm slightly and top with a scoop of gelato
- Pack in gift boxes tied with ribbon for homemade gifts
Reheating Tips To recapture that fresh-from-the-oven experience, place cookies on a baking sheet and warm in a 300°F oven for 4 to 5 minutes. They’ll taste like you just baked them.
Frequently Asked Questions
Can I use salted butter instead of unsalted? Yes, but reduce the added salt in the recipe to 1/2 teaspoon. Unsalted butter gives you better control over the salt level, but salted butter works in a pinch.
Why are my cookies flat and greasy? This usually happens when butter is too warm or melted, or when dough isn’t chilled properly. Make sure butter is just room temperature (not warm), and always chill dough before baking. Flat cookies can also result from too much sugar or not enough flour, so measure carefully.
Can I make these cookies without a mixer? Absolutely. Use a wooden spoon and some elbow grease. The creaming process will take longer and require more effort, but it’s entirely possible. Mix butter and sugars vigorously for about 5 minutes until light and fluffy.
How do I make my cookies thicker? Chill the dough longer, use more brown sugar (which contains moisture), slightly underbake, and shape dough balls taller rather than wider. You can also reduce baking temperature to 350°F and bake a bit longer.
Can I substitute ingredients? While substitutions are possible, they’ll change the results. You can use all brown sugar for chewier cookies, or all white sugar for crispier ones. Coconut oil can replace butter but will alter flavor. For gluten-free, use a 1-to-1 gluten-free flour blend, though texture will differ slightly.
Why do my cookies spread too much? Common causes include warm dough, melted butter, too much sugar, not enough flour, or baking on a hot pan. Always chill dough thoroughly and use room temperature (not warm) butter.
Can I add nuts or other mix-ins? Definitely! Add 1 cup of chopped walnuts, pecans, or your favorite nuts. You can also include shredded coconut, toffee bits, or dried fruit. Just keep total mix-ins to about 3 cups so the cookie structure isn’t compromised.
How long does cookie dough last in the refrigerator? Raw dough keeps for up to 5 days refrigerated in an airtight container. In fact, dough aged for 24 to 72 hours develops even better flavor as the flour hydrates and ingredients meld.

Final Thoughts: Your Journey to Cookie Perfection
Mastering chocolate chip cookies is more than following a recipe; it’s understanding how ingredients interact, recognizing visual cues during baking, and developing your personal preferences. Some people love crispy cookies, others prefer soft and chewy, and many want that perfect combination of both. This recipe gives you the foundation, but don’t be afraid to make it your own.
Pay attention to how your cookies look, feel, and taste with each batch. Take notes on what you loved and what you’d change. Did you prefer 11 minutes of baking or 13? Do you like more chocolate or less salt? Cookie baking is forgiving enough for experimentation but precise enough that small changes create noticeable differences.
The magic of homemade chocolate chip cookies extends beyond the final product. It’s the anticipation while dough chills, the incredible aroma that fills your kitchen, the satisfaction of pulling perfectly golden cookies from the oven, and the joy of sharing them with people you love. These cookies create memories, become traditions, and bring comfort when you need it most.
Whether you’re baking your first batch or your thousandth, approach it with curiosity and patience. The perfect chocolate chip cookie is within your reach. Now grab your mixing bowl, preheat that oven, and create something delicious. Your kitchen is about to smell incredible, and you’re about to taste cookie perfection that you made with your own hands. That’s something special worth celebrating, one warm, chocolate-studded cookie at a time.
Happy baking!
for more recipe visite our pinterest
Print
Perfect Chocolate Chip Cookies
These perfect chocolate chip cookies deliver crispy, caramelized edges with soft, chewy centers and pools of melted chocolate in every bite. Reliable, forgiving, and deeply nostalgic, this go-to recipe is ideal for bake sales, holidays, or late-night cravings. After years of testing, this method guarantees bakery-style cookies every single time.
- Total Time: 32 minutes
- Yield: 24 cookies
Ingredients
Dry Ingredients
- 2¼ cups all-purpose flour
- 1 teaspoon baking soda
- 1 teaspoon fine sea salt
- ½ teaspoon baking powder
Wet Ingredients
- 1 cup unsalted butter, room temperature
- ¾ cup granulated sugar
- ¾ cup light brown sugar, packed
- 2 large eggs, room temperature
- 2 teaspoons pure vanilla extract
Mix-Ins
- 2 cups semi-sweet chocolate chips
- 1 cup dark chocolate chunks (optional)
- Flaky sea salt for topping (optional)
Instructions
- Preheat oven to 375°F (190°C) and line baking sheets with parchment paper.
- Whisk flour, baking soda, salt, and baking powder in a medium bowl. Set aside.
- Cream butter for 1 minute, then add both sugars and beat 3–4 minutes until light and fluffy.
- Add eggs one at a time, mixing well after each. Add vanilla extract.
- Gradually add dry ingredients on low speed, mixing just until combined.
- Fold in chocolate chips and chunks by hand.
- Cover and chill dough for at least 30 minutes (24 hours recommended).
- Scoop dough into 3-tablespoon balls and space 3 inches apart on baking sheets.
- Sprinkle with flaky sea salt if desired.
- Bake 11–13 minutes until edges are golden and centers look slightly underbaked.
- Cool on pan for 5 minutes, then transfer to a wire rack.
Notes
For thicker cookies, chill dough longer and shape dough balls taller rather than wider. Underbake slightly for soft centers. Dough can be refrigerated up to 5 days or frozen for later baking.
- Prep Time: 20 minutes
- Cook Time: 12 minutes
- Category: Dessert
- Method: Baked
- Cuisine: American