Chocolate Dipped Oranges: The Perfect Blend of Citrus and Cocoa (3 Ingredients!)
Introduction
Chocolate dipped oranges are one of those magical treats that look like they came from an upscale confectionery but are surprisingly simple to create in your own kitchen. This stunning combination of bright, juicy citrus and rich, velvety chocolate has been delighting dessert lovers for generations, and once you taste the contrast of tangy orange against sweet chocolate, you’ll understand why this pairing has stood the test of time.
I’ve been making chocolate dipped oranges for over two decades, and they never fail to impress guests at dinner parties, holiday gatherings, or as thoughtful homemade gifts. There’s something inherently elegant about the presentation—those glossy chocolate-coated slices arranged on a platter create an instant wow factor. Yet despite their sophisticated appearance, this recipe requires just three basic ingredients and about fifteen minutes of active time.
What makes chocolate dipped oranges particularly special is the sensory experience they deliver. The initial bite through the firm chocolate shell gives way to the burst of fresh, tangy orange juice. It’s a perfect balance of flavors and textures that appeals to both chocolate lovers and fruit enthusiasts. Whether you’re looking for a lighter dessert option, a unique party treat, or a creative way to enjoy seasonal citrus, this recipe delivers on every level.
The beauty of this treat extends beyond taste. Chocolate dipped oranges are naturally gluten-free, can be made vegan with the right chocolate choice, and offer more nutritional benefits than traditional candy thanks to the fresh fruit component. They’re also endlessly customizable—you can use different types of chocolate, add toppings, or experiment with various citrus varieties to create your own signature version.
Ingredients
For the Basic Recipe:
- 3-4 large navel oranges (seedless, sweet varieties work best)
- 12 ounces high-quality dark, milk, or semi-sweet chocolate (chips or chopped bars)
- 1 tablespoon coconut oil or vegetable shortening (optional, for smoother chocolate)
Optional Toppings and Variations:
- Flaky sea salt
- Chopped pistachios, almonds, or hazelnuts
- Shredded coconut
- Crushed peppermint candy
- Colorful sprinkles
- Drizzled white chocolate
- Orange zest
- Crushed freeze-dried raspberries
Equipment Needed:
- Sharp knife
- Paper towels
- Baking sheet
- Parchment paper or silicone baking mat
- Double boiler or microwave-safe bowl
- Fork or dipping tool
Step-by-Step Instructions
Step 1: Select and Prepare Your Oranges
Choosing the right oranges is crucial for success. Look for firm, heavy oranges with smooth, bright skin—this indicates they’re fresh and juicy. Navel oranges are my top choice because they’re seedless, naturally sweet, and have thicker membranes that hold up well when dipped. Blood oranges make a stunning visual statement with their deep red flesh, while Cara Cara oranges offer a unique pink hue and extra sweetness.
Wash your oranges thoroughly under cool water and pat them completely dry with paper towels. Any moisture on the surface will prevent the chocolate from adhering properly. This is an important step that many people rush through, but taking the extra minute to ensure your oranges are bone-dry will make a significant difference in the final result.
Step 2: Slice the Oranges
Using a sharp knife, slice off both ends of the orange to create flat, stable surfaces. Stand the orange upright and carefully slice it into rounds about one-quarter to one-third inch thick. If your slices are too thin, they’ll be fragile and difficult to handle; too thick, and they’ll be awkward to eat and won’t dry properly.
You should get about six to eight slices per orange, depending on its size. Remove any visible seeds with the tip of your knife. Lay the slices in a single layer on paper towels and gently pat the tops to remove excess juice. Some recipes call for letting the slices sit for 30 minutes to an hour to release more moisture, which can help the chocolate adhere better and prevent it from sliding off later.
Step 3: Prepare a Drying and Dipping Station
Line a baking sheet with parchment paper or a silicone baking mat. This is where you’ll place your dipped oranges to set. Make sure you have enough space in your refrigerator to accommodate the baking sheet, as chilling helps the chocolate set quickly and creates that satisfying snap when you bite into it.
If you’re using toppings, prepare small bowls with your chosen garnishes and have them ready near your dipping station. Timing is important—you’ll need to add toppings while the chocolate is still wet, so having everything organized beforehand prevents scrambling later.
Step 4: Melt the Chocolate
The key to beautifully dipped oranges is properly tempered chocolate. While true tempering is a more advanced technique, we can achieve excellent results with a simple melting method.
For the double boiler method, fill a saucepan with about an inch of water and bring it to a simmer. Place a heat-safe bowl on top, ensuring the bottom doesn’t touch the water. Add your chocolate and coconut oil (if using) to the bowl. Stir frequently as the chocolate melts, keeping the heat low to prevent scorching. The coconut oil helps create a thinner, more fluid consistency that’s easier to work with and creates a glossier finish.
For the microwave method, place chocolate and coconut oil in a microwave-safe bowl. Heat in 30-second intervals, stirring thoroughly between each interval. This prevents hot spots that can cause the chocolate to seize or burn. Continue until the chocolate is smooth and completely melted.
The ideal temperature for dipping chocolate is between 88-90°F for dark chocolate and 84-86°F for milk or white chocolate. If you don’t have a thermometer, the chocolate should feel barely warm to the touch.
Step 5: Dip the Orange Slices
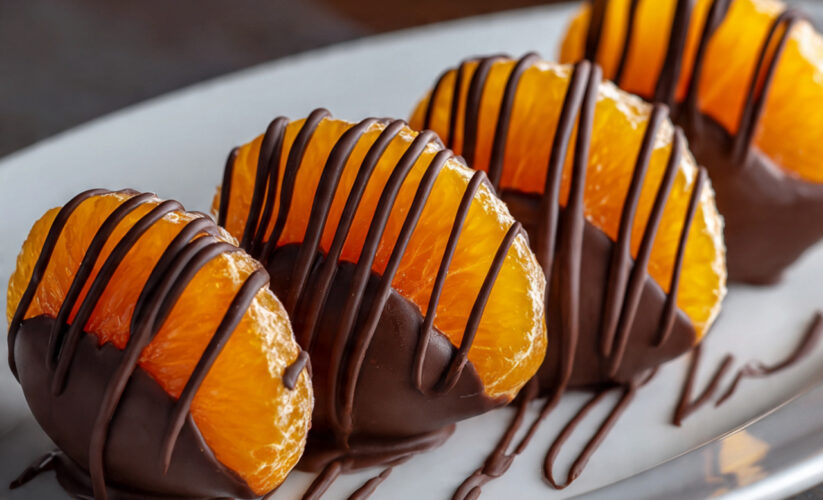
Now for the fun part! Pick up an orange slice and hold it by the edge. Dip half to two-thirds of the slice into the melted chocolate, allowing excess chocolate to drip back into the bowl. You can dip straight down for a half-moon effect or at an angle for a more artistic presentation.
Gently shake the slice to remove excess chocolate, then carefully place it on your prepared baking sheet. If you’re adding toppings, sprinkle or press them onto the wet chocolate immediately. Work relatively quickly, as chocolate begins to set within a few minutes, especially if your kitchen is cool.
Step 6: Set and Chill
Once all your orange slices are dipped and decorated, transfer the baking sheet to the refrigerator. Let them chill for at least 15-20 minutes, or until the chocolate is completely firm and set. The cold temperature helps the chocolate develop that perfect snap and prevents fingerprints when you handle them.
For best results, remove the oranges from the refrigerator about 10 minutes before serving. This allows them to come to a temperature where both the chocolate and orange flavors are most pronounced.
Pro Tips for Perfect Chocolate Dipped Oranges
Choose Quality Chocolate
The chocolate you select makes or breaks this recipe. Since there are only three ingredients, each one needs to shine. I recommend using chocolate with at least 60% cacao for dark chocolate versions, or a high-quality milk chocolate if you prefer something sweeter. Brands like Ghirardelli, Guittard, or Valrhona deliver superior flavor and melting properties compared to generic chocolate chips.
Dry, Dry, Dry
I cannot overemphasize the importance of thoroughly drying your orange slices. Even a small amount of moisture creates a barrier between the fruit and chocolate, causing the coating to slide off or develop condensation spots. Some professional chocolatiers even pat their fruit dry, then let it air-dry for an additional 30 minutes before dipping.
Control Your Chocolate Temperature
Chocolate that’s too hot will slide right off the oranges, creating a thin, uneven coating. Chocolate that’s too cool will be thick and clumpy, resulting in an unattractive finish. Aim for that sweet spot where the chocolate flows smoothly but isn’t steaming hot. If your chocolate starts to thicken as you work, briefly rewarm it.
Layer for Extra Impact
For an extra-decadent version, try double-dipping. After your first chocolate layer sets completely, dip the oranges again in a contrasting chocolate (white chocolate over dark, or vice versa). You can also create beautiful patterns by drizzling the second chocolate type in thin lines across the first layer.
Experiment with Flavor Additions
Enhance your chocolate by stirring in a quarter teaspoon of orange extract, a pinch of cinnamon, or even a tiny amount of cayenne pepper for a sophisticated kick. These subtle additions complement the orange flavor without overwhelming it.
Consider Candying First
For an even more indulgent treat, you can lightly candy your orange slices before dipping. Simmer them in a simple syrup for a few minutes, then dry them thoroughly on a wire rack for several hours or overnight. The candying process intensifies the sweetness and creates a slightly firmer texture that holds up beautifully under chocolate.
Common Mistakes to Avoid
Using Wet or Damp Oranges
This is the number one mistake that leads to chocolate sliding off or developing a streaky, unattractive finish. Water and chocolate don’t mix—the moisture causes the chocolate to seize and creates separation. Always ensure your orange slices are completely dry before dipping.
Overheating the Chocolate
When chocolate gets too hot, it loses its temper and can become grainy or develop a dull, streaky appearance when it sets. Never microwave chocolate for more than 30 seconds at a time, and if using a double boiler, make sure the water is simmering, not boiling vigorously.
Skipping the Coconut Oil
While technically optional, that tablespoon of coconut oil makes a tremendous difference in workability. It thins the chocolate just enough to create smooth, even coatings and adds a subtle sheen. Without it, especially if you’re using chocolate chips, you might end up with thick, clumpy coatings.
Working in a Warm Kitchen
Chocolate sets best in cool environments. If your kitchen is warm, the chocolate will take much longer to harden and may not achieve that satisfying snap. Work in an air-conditioned space if possible, or at least ensure your oranges go straight into the refrigerator after dipping.
Dipping Too Much of the Orange
While it’s tempting to completely coat the orange slices, leaving part of the fruit exposed serves both aesthetic and practical purposes. The exposed orange creates a beautiful color contrast and provides a place to hold the slice while eating without getting chocolate all over your fingers.
Not Accounting for Thickness Variations
Orange slices aren’t perfectly uniform. Thicker slices need more time in the chocolate and may require a second dip for complete coverage, while thinner slices need less. Pay attention to each slice individually rather than trying to dip them all exactly the same way.
Storage and Serving Suggestions
Storage Guidelines
Chocolate dipped oranges are best enjoyed within 24-48 hours of making them, as the moisture from the fresh fruit can eventually soften the chocolate coating. Store them in an airtight container in the refrigerator, with parchment paper between layers to prevent sticking.
If you need to store them longer, they’ll keep for up to four days refrigerated, though the orange slices will gradually release more moisture and the texture may become slightly compromised. The flavor remains delicious, but the chocolate may lose some of its crisp snap.
Do not freeze chocolate dipped oranges, as the freezing and thawing process creates excessive condensation that ruins the chocolate coating and makes the oranges mushy.
Serving Suggestions
Present chocolate dipped oranges on a beautiful platter or cake stand for maximum visual impact. Arrange them in overlapping rows or in a circular pattern radiating from the center. The contrast of dark chocolate against bright orange (or deep red if using blood oranges) is naturally striking.
These treats work wonderfully as part of a dessert board alongside cheeses, nuts, and other chocolate-covered fruits. They’re also perfect for:
- Holiday cookie exchanges (they’re a refreshing change from traditional baked goods)
- Valentine’s Day treats (especially when made with dark chocolate and decorated with edible gold dust)
- Dinner party desserts (serve them alongside coffee or as a palate cleanser)
- Bridal or baby showers (customize the chocolate color to match the theme)
- Teacher appreciation gifts (pack them in a decorative box with tissue paper)
- Healthier dessert options at gatherings (the fresh fruit component makes them feel less indulgent)
Gifting Ideas
Package chocolate dipped oranges in clear cellophane bags tied with ribbons, or arrange them in a small gift box lined with parchment paper. Include a note mentioning they should be refrigerated and enjoyed within two days. For extra-special presentation, nestle them in decorative paper cups (the kind used for truffles) inside a pretty tin.
FAQ (Frequently Asked Questions)
Can I use other citrus fruits besides oranges?
Absolutely! This technique works beautifully with clementines, tangerines, blood oranges, and even grapefruit (though grapefruit can be quite tart against sweet chocolate). Thin lemon or lime slices can also be used, but I recommend candying them first to balance the tartness. Each citrus variety brings its own unique flavor profile to pair with the chocolate.
What type of chocolate works best for dipping?
The best choice depends on your personal preference. Dark chocolate (60-70% cacao) provides a sophisticated, less-sweet option that lets the orange flavor shine. Milk chocolate is sweeter and more universally appealing, especially for kids. White chocolate creates a stunning visual contrast but is very sweet. I personally love semi-sweet or bittersweet chocolate for the best balance. Avoid chocolate labeled “candy coating” or “almond bark” as these don’t have the same rich flavor as real chocolate.
Why does my chocolate look streaky or dull after it sets?
Streaky, dull chocolate is usually the result of temperature issues. The chocolate may have been overheated during melting, or there might have been water or steam contamination. Sometimes condensation forms if you put very cold oranges into warm chocolate. For the best shine, ensure your chocolate is melted to the proper temperature and that all equipment is completely dry.
Can I make these ahead of time for a party?
You can make chocolate dipped oranges up to one day ahead, which is ideal for party preparation. Make them the evening before and store them refrigerated in an airtight container. Remove them from the refrigerator about 15-30 minutes before serving so they’re not ice-cold, which mutes the flavors. I don’t recommend making them more than 24 hours in advance for best quality.
How do I prevent the chocolate from sliding off the oranges?
This frustrating problem usually stems from three causes: oranges that weren’t dried thoroughly, chocolate that was too hot when dipping, or trying to dip oranges straight from the refrigerator (the temperature difference causes condensation). Make sure your orange slices are completely dry, your chocolate is warm but not hot, and work at room temperature. Adding a tablespoon of coconut oil to your chocolate also helps it adhere better.
Are chocolate dipped oranges healthy?
Compared to traditional candy or desserts, chocolate dipped oranges offer some nutritional benefits. The orange provides vitamin C, fiber, and antioxidants, while dark chocolate contributes flavonoids and minerals. However, they still contain sugar and should be enjoyed in moderation as a treat. One chocolate dipped orange slice contains significantly fewer calories than most desserts—typically around 60-80 calories depending on the size and how much chocolate you use.
Can I make this recipe vegan?
Yes! Simply choose dairy-free chocolate chips or bars. Many dark chocolates are naturally vegan, but always check the label to ensure there are no milk solids. Brands like Enjoy Life, Hu Chocolate, and certain varieties of Ghirardelli dark chocolate are vegan-friendly. Use coconut oil instead of butter-based options, and you’ll have a completely plant-based treat.
Nutrition Information (Approximate Values)
Serving Size: 1 chocolate-dipped orange slice Servings Per Recipe: 24-32 slices (depending on orange size)
- Calories: 65-80
- Total Fat: 3-4g
- Saturated Fat: 2-3g
- Cholesterol: 0-2mg (depending on chocolate type)
- Sodium: 0-5mg
- Total Carbohydrates: 10-12g
- Dietary Fiber: 1-2g
- Sugars: 8-10g
- Protein: 1g
- Vitamin C: 25-30mg (40-50% DV)
- Calcium: 15-25mg (1-2% DV)
- Iron: 0.5-1mg (3-5% DV)
- Potassium: 80-100mg (2-3% DV)
Note: Nutritional values vary based on the type of chocolate used (dark, milk, or white), the size of orange slices, and how much chocolate coating you apply. These estimates are based on semi-sweet chocolate and medium orange slices with moderate chocolate coverage. Adding toppings like nuts will increase calories, fat, and protein content.
Final Thoughts
Chocolate dipped oranges represent the perfect intersection of simplicity and elegance. In a world of complicated desserts requiring specialty equipment and advanced techniques, there’s something refreshing about a treat that delivers such impressive results from just three basic ingredients and fifteen minutes of your time.
What I love most about this recipe is its versatility. You can dress it up with fancy toppings and premium chocolate for special occasions, or keep it simple for an everyday treat that feels special. The combination of fresh fruit and chocolate satisfies both your sweet tooth and that little voice reminding you to eat more fruit. It’s a dessert you can feel relatively good about enjoying.
The visual appeal of chocolate dipped oranges cannot be overstated. Whether you’re arranging them on a holiday dessert table, packing them as gifts for teachers or neighbors, or simply making them for your family, they never fail to draw appreciative comments. That glossy chocolate coating against vibrant orange creates an immediate sense of occasion.
As you master the basic technique, don’t be afraid to experiment. Try different chocolate varieties, play with toppings, explore other citrus fruits, or even venture into candying your slices first for a more complex flavor profile. Each variation teaches you something new about how chocolate and fruit interact.
Remember that the key elements for success are quality ingredients, properly dried fruit, and chocolate at the right temperature. Master these fundamentals, and you’ll be creating professional-looking chocolate dipped oranges that taste even better than they look. So grab some gorgeous oranges, melt your favorite chocolate, and discover why this simple treat has been delighting people for generations!
PrintChocolate Dipped Oranges: The Perfect Blend of Citrus and Cocoa (3 Ingredients!)
Chocolate dipped oranges are an elegant yet simple three-ingredient treat that combines fresh, juicy citrus slices with rich melted chocolate. Perfect for entertaining, gifting, or enjoying as a lighter dessert option, these beautiful confections look impressive but require minimal effort and no baking.
- Total Time: 15 minutes (plus 20 minutes chilling time)
- Yield: 24-32 dipped orange slices
Ingredients
- 3-4 large navel oranges (seedless)
- 12 ounces high-quality chocolate (dark, milk, or semi-sweet)
- 1 tablespoon coconut oil (optional)
- Optional toppings: sea salt, chopped nuts, shredded coconut, sprinkles
Instructions
- Wash and thoroughly dry oranges, then slice into quarter-inch rounds
- Pat orange slices dry with paper towels and let air-dry for 30 minutes
- Melt chocolate with coconut oil using double boiler or microwave method
- Dip each orange slice halfway into melted chocolate, let excess drip off
- Place dipped slices on parchment-lined baking sheet
- Add toppings immediately while chocolate is wet
- Refrigerate for 15-20 minutes until chocolate is completely set
- Serve chilled or at room temperature
Notes
- Use seedless orange varieties for best results
- Ensure oranges are completely dry before dipping to prevent chocolate from sliding off
- Quality chocolate makes a significant difference in taste and appearance
- Store in airtight container in refrigerator for up to 2 days
- Remove from refrigerator 10 minutes before serving for optimal flavor
- Can be made with other citrus fruits like blood oranges, clementines, or grapefruit
- Prep Time: 10 minutes
- Cook Time: 5 minutes (chocolate melting)
- Category: Desserts
- Method: Dipping
- Cuisine: American
- Diet: Vegan