

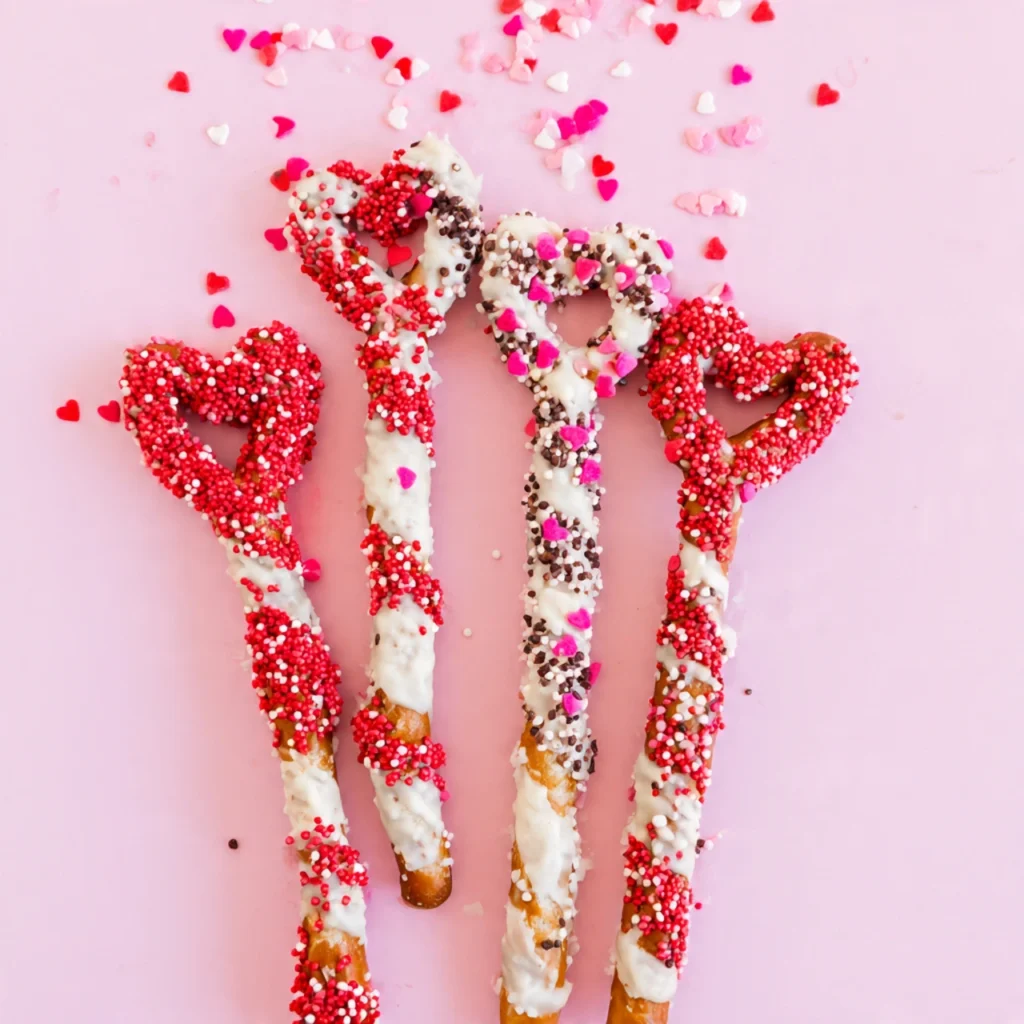
Valentine Pretzel Rods: The Ultimate Guide to Making Irresistible Chocolate-Dipped Treats

Valentine Pretzel Rods are the perfect combination of sweet, salty, crunchy, and utterly irresistible—a simple yet impressive treat that transforms ordinary pretzel rods into stunning Valentine’s Day gifts, party favors, or classroom snacks that everyone will adore. I’ve been making these festive treats for nearly fifteen years, ever since my daughter’s preschool teacher requested something “easy but special” for the class Valentine’s party, and they’ve become my absolute go-to recipe whenever February rolls around.
What makes Valentine Pretzel Rods so brilliant is their remarkable versatility combined with foolproof simplicity. Unlike temperamental candies that require precise temperatures or elaborate desserts demanding advanced techniques, these treats forgive mistakes gracefully while still looking professionally crafted. You’re essentially dipping pretzel rods in melted chocolate and decorating them—that’s it. Yet the end result appears so polished and intentional that recipients always assume you spent hours creating them.
The beauty of this recipe extends far beyond its ease of preparation. These pretzel rods check every box for an ideal Valentine’s treat: they’re visually stunning with festive pink, red, and white colors; they offer that addictive sweet-and-salty flavor combination that keeps people reaching for “just one more”; they’re sturdy enough to package beautifully as gifts without breaking; and they’re budget-friendly enough to make in large quantities for school parties, office celebrations, or neighborhood exchanges.
I’ve experimented with countless variations over the years—different chocolate types, various decorating techniques, creative flavor additions—and I’ve learned exactly what works and what doesn’t. The recipe I’m sharing today represents the culmination of all that trial and error, refined into a process that consistently produces gorgeous, delicious Valentine Pretzel Rods every single time.
Why You’ll Absolutely Love This Recipe
There are compelling reasons why Valentine Pretzel Rods have remained one of my most-requested recipes year after year. First and foremost, they require minimal ingredients and equipment. You don’t need a candy thermometer, a double boiler, specialty molds, or any intimidating tools. A microwave, a baking sheet, and basic kitchen supplies are sufficient to create something truly spectacular.
The make-ahead friendliness of these treats cannot be overstated. Valentine’s Day often arrives during the busiest weeks of winter, sandwiched between other obligations and activities. Being able to prepare these pretzel rods several days in advance—or even weeks if you freeze them—eliminates stress and allows you to enjoy the holiday rather than scrambling at the last minute.
Cost-effectiveness matters, especially when you’re making treats for an entire classroom or multiple friends and family members. A single batch of Valentine Pretzel Rods costs a fraction of what you’d spend on store-bought Valentine’s treats, yet they look exponentially more thoughtful and special. I can typically make two dozen decorated pretzel rods for less than the price of a single box of grocery store Valentine’s chocolates.
The customization possibilities are virtually endless. Once you master the basic technique, you can adapt these pretzel rods to any color scheme, flavor profile, or decorative style. Love dark chocolate? Use it instead of milk chocolate. Prefer a minimalist aesthetic? Skip the sprinkles and create elegant, simply-drizzled rods. Want to add pizzazz? Go wild with multiple colors, crushed candies, and elaborate designs.
Perhaps most importantly, making Valentine Pretzel Rods is genuinely fun. Whether you’re crafting them solo as a relaxing evening activity, enlisting kids to help with decorating, or hosting a Valentine’s crafting party with friends, the process brings joy. There’s something deeply satisfying about watching plain pretzel rods transform into beautiful treats right before your eyes.
Essential Ingredients for Perfect Valentine Pretzel Rods
The ingredient list for Valentine Pretzel Rods is refreshingly short, but quality matters significantly when you’re working with so few components. Here’s what you’ll need:
Core Ingredients
- 16-20 pretzel rods – Traditional rod-style pretzels work best for this recipe. Look for straight, uniform rods rather than twisted or irregular shapes. I prefer Snyder’s or Rold Gold brand for their consistent size and sturdy structure. Avoid thin pretzel sticks, which are too delicate, or thick sourdough rods, which can be overwhelming with the chocolate coating.
- 12 ounces chocolate melting wafers (pink, red, or white) – Candy melts or melting wafers are far superior to regular chocolate chips for this application. They melt smoothly, set quickly at room temperature, and maintain a beautiful glossy finish. Ghirardelli, Wilton, and CandiQuik all produce excellent melting wafers. You’ll need approximately 12 ounces for coating 16-20 pretzel rods, though I always recommend having extra on hand.
- 4-6 ounces contrasting chocolate for drizzling – Choose a complementary color to your base coating. If you dipped in pink, drizzle with white or red. If you used white chocolate, drizzle with pink or milk chocolate. This creates visual interest and professional-looking dimension.
- Valentine’s sprinkles, nonpareils, or decorations – This is where you can express creativity. Heart-shaped sprinkles, pink and red jimmies, edible glitter, crushed freeze-dried strawberries, mini chocolate chips, or Valentine’s-themed sugar decorations all work beautifully. Choose 2-3 types maximum to avoid a cluttered appearance.
Optional Enhancement Ingredients
- 1 tablespoon coconut oil or vegetable shortening – Adding a small amount of oil to your melted chocolate creates a thinner, smoother consistency that’s easier to work with and produces a thinner coating on the pretzels.
- 1/2 teaspoon flavored extract (vanilla, almond, or peppermint) – A drop of extract stirred into melted chocolate adds subtle flavor complexity that elevates your pretzel rods from good to exceptional.
- Flaky sea salt – A tiny sprinkle of high-quality sea salt on fresh chocolate coating enhances the sweet-salty contrast and adds gourmet appeal.
- Crushed cookies (Oreos, graham crackers, or vanilla wafers) – Rolling or sprinkling cookie crumbs over wet chocolate adds textural interest and extra flavor.
- Edible gold or silver luster dust – For truly elegant pretzel rods suitable for adult celebrations, a dusting of metallic powder creates sophisticated shimmer.
Equipment You’ll Need
Gather these basic items before beginning:
- Large baking sheet
- Parchment paper or silicone baking mat
- Microwave-safe bowls (at least 2)
- Tall glass or jar (for holding pretzels while chocolate sets)
- Rubber spatula for stirring
- Spoon for drizzling
- Small plastic bags or piping bags (for controlled drizzling)
- Cooling rack (optional but helpful)
- Cellophane bags and ribbon (if packaging as gifts)
Step-by-Step Instructions for Flawless Valentine Pretzel Rods
Follow these detailed steps to create picture-perfect Valentine Pretzel Rods. I’ve refined this technique through countless batches to prevent common problems before they occur.
Step 1: Prepare Your Workspace
Line a large baking sheet with parchment paper or a silicone baking mat. This surface will hold your dipped pretzel rods as they dry, and proper preparation prevents sticking. Set up a tall glass or jar filled with a few inches of sugar, rice, or small candies—this holder will support your pretzel rods upright while the chocolate sets, preventing flat spots and ensuring even coating.
Arrange all your decorating supplies within easy reach. Once you dip a pretzel rod, you’ll need to work quickly while the chocolate is still wet, so having everything organized beforehand is crucial. Open your sprinkle containers, measure out any crushed toppings, and have your drizzling chocolate ready to melt.
This preparation phase might seem tedious, but it’s the difference between smooth, enjoyable decorating and frantic scrambling that results in messy, less-than-perfect pretzel rods.
Step 2: Melt the Base Chocolate
Place your primary chocolate melting wafers in a microwave-safe bowl. If using coconut oil for smoother consistency, add it now. Microwave on 50% power in 30-second intervals, stirring thoroughly between each interval. This gradual melting prevents scorching and ensures smooth, workable chocolate.
Never rush this step by using full power or longer intervals. Chocolate can seize—become grainy and unusable—if overheated, and there’s no salvaging seized chocolate. It typically takes 2-3 intervals (1-1.5 minutes total) to fully melt chocolate wafers. The chocolate is ready when it’s completely smooth and flows easily off your spoon with no lumps remaining.
If your melted chocolate seems thick or doesn’t flow smoothly, add coconut oil or shortening one teaspoon at a time, stirring thoroughly between additions, until you achieve the desired consistency. The chocolate should be thin enough to create a relatively thin, even coating on your pretzels without being so thin that it drips excessively.
Step 3: Dip the Pretzel Rods
Working with one pretzel rod at a time, hold it by the top third and dip the bottom two-thirds into your melted chocolate. Tilt the bowl to create depth if needed, allowing you to coat the pretzel evenly without wasting chocolate by transferring to a narrower container.
Submerge the pretzel rod, then slowly lift it out, allowing excess chocolate to drip back into the bowl. You can gently tap the pretzel against the edge of the bowl or shake it very slightly to encourage dripping. Don’t shake too vigorously or you’ll lose too much chocolate and end up with thin, uneven coverage.
The goal is a coating that’s substantial enough to look professional and taste delicious but not so thick that it overwhelms the pretzel or takes forever to set. With practice, you’ll develop a feel for the perfect thickness.
Rotate the pretzel rod slowly as you lift it from the chocolate to ensure even coverage on all sides. Check for any bare spots and use your spatula to dab additional chocolate if needed before proceeding to decorating.
Step 4: Decorate Immediately
This is where speed matters. Chocolate begins setting within seconds, so you must add your decorations while it’s still wet. Immediately after dipping, hold the pretzel rod over a shallow bowl or plate and sprinkle your chosen decorations generously over the wet chocolate.
For the most even coverage, rotate the pretzel rod as you sprinkle, ensuring all sides receive decorations. Don’t be shy—you want visible, abundant decorations, not sparse speckling. Any excess will fall into your catch bowl and can be reused.
If you’re using multiple decoration types, apply them in quick succession while the chocolate remains wet. For example, you might sprinkle pink sugar, then add a few heart-shaped sprinkles, then dust with edible glitter—all within 15-20 seconds of dipping.
Work efficiently but don’t panic. You typically have 20-30 seconds of working time before the chocolate sets too much for decorations to adhere properly. With practice, this becomes second nature.
Step 5: Set the Pretzel Rods to Dry
Immediately after decorating, you have two options for setting your pretzel rods. Option one: place the pretzel rod upright in your prepared glass or jar holder, ensuring the chocolate-covered end doesn’t touch the bottom or sides. This method works well when you’ve applied a relatively thin chocolate coating.
Option two: lay the pretzel rod flat on your parchment-lined baking sheet. This prevents the tall-glass logistics but may create a slightly flat side where the chocolate pooled against the pan. For most purposes, this minor imperfection is insignificant.
I typically use the upright method for pretzel rods I’m gifting or photographing, and the flat method for classroom treats or casual occasions where minor aesthetic variations don’t matter.
Allow the chocolate to set completely at room temperature, which takes 15-30 minutes depending on your kitchen’s temperature. You can speed this process by refrigerating the pretzel rods for 10-15 minutes, though this sometimes causes chocolate “bloom”—a harmless but aesthetically unpleasing whitish coating.
Step 6: Add the Chocolate Drizzle
Once your base chocolate coating is completely set and hard to the touch, prepare your drizzling chocolate. Melt 4-6 ounces of contrasting chocolate using the same gradual microwave method as before. This chocolate should be slightly thinner than your dipping chocolate—add an extra teaspoon of coconut oil if needed to achieve easy drizzling consistency.
There are three methods for drizzling:
Fork method: Dip a fork into melted chocolate, then wave it back and forth over your pretzel rods in quick zigzag motions. This creates rustic, organic-looking drizzles.
Spoon method: Load a spoon with melted chocolate, then move it in quick back-and-forth motions over the pretzel rods, allowing chocolate to fall in thin streams. This produces slightly heavier, more dramatic drizzles.
Bag method: Transfer melted chocolate to a small plastic bag or piping bag, snip a tiny corner, then squeeze while moving the bag back and forth over the pretzel rods. This offers the most control and creates the finest, most delicate drizzles.
I personally prefer the bag method for its precision and professional appearance, though all three techniques produce beautiful results. Practice on parchment paper first if you’re nervous about your drizzling skills.
Drizzle in one direction, then rotate the pretzel rods and drizzle perpendicular to your first drizzles for a crisscross effect. Avoid overdrizzling—a little goes a long way, and too much obscures your base decorations.
Step 7: Final Setting and Finishing Touches
Allow your drizzled pretzel rods to set completely, which takes another 15-20 minutes at room temperature. If you’re adding any final touches like edible gold dust or strategic placement of special decorations, now is the time.
For an extra-special finish, you can add a small dot of melted chocolate to the top center of a pretzel rod and press on a heart-shaped candy or special decoration as a “topper.” This creates a focal point and adds vertical visual interest.
Step 8: Package or Store
Once completely set and hard, your Valentine Pretzel Rods are ready to package, store, or serve. For gift-giving, slide each pretzel rod into a clear cellophane bag, tie with festive ribbon, and add a small tag if desired. These make precious Valentine’s gifts for teachers, neighbors, coworkers, or anyone who deserves a sweet surprise.
For storage, layer pretzel rods in an airtight container with parchment or wax paper between layers to prevent sticking. Store at room temperature away from heat and direct sunlight.

Pro Tips for Bakery-Quality Valentine Pretzel Rods
After years of making these treats for every conceivable occasion, I’ve accumulated professional secrets that separate good pretzel rods from truly exceptional ones:
Choose Quality Chocolate
Not all melting wafers are created equal. Premium brands like Ghirardelli contain more cocoa butter and produce smoother, more flavorful chocolate coatings. Cheaper alternatives often taste waxy and artificial. The difference is noticeable, so invest in quality chocolate—it’s still very affordable compared to other baking ingredients.
Master the Microwave Power Level
This single tip prevents more chocolate disasters than any other: always melt chocolate at 50% power or lower. I cannot stress this enough. Chocolate melted at full power nearly always scorches, seizes, or develops a grainy texture. Be patient, use reduced power, and stir thoroughly between intervals.
Work in Small Batches
Dip and decorate 3-4 pretzel rods at a time rather than attempting production-line efficiency. Chocolate cools and thickens as you work, and trying to dip too many rods results in later ones having thicker, less attractive coatings. If your chocolate begins thickening, simply reheat it briefly (10-15 seconds at 50% power) before continuing.
Use Fresh Pretzels
Stale pretzels absorb moisture and lose their signature crunch. Always use fresh pretzel rods purchased within the past few weeks. Check the expiration date and store pretzels in an airtight container until you’re ready to use them. Stale pretzels coated in beautiful chocolate still taste disappointing.
Perfect Your Tap Technique
After dipping a pretzel rod, the tap-and-shake method for removing excess chocolate requires a delicate touch. Tap too hard and you’ll knock off too much chocolate; tap too gently and excess will drip down the rod creating thick drips. Practice achieving the Goldilocks zone—gentle but definitive taps that remove just enough excess.
Layer Decorations Strategically
For the most visually interesting pretzel rods, use 2-3 types of decorations in varying sizes. Start with a base layer of fine sprinkles or nonpareils, add a second layer of slightly larger decorations like jimmies or mini chips, then finish with a few statement pieces like large heart sprinkles. This creates depth and visual complexity.
Consider Color Theory
Certain color combinations are more striking than others. Pink base with white drizzle looks soft and romantic. Red base with white drizzle is classic and bold. White base with pink and red drizzle feels elegant and modern. Dark chocolate base with any bright color pops dramatically. Plan your color scheme before shopping for supplies.
Temperature Matters
Your kitchen temperature affects working time significantly. In a cold kitchen, chocolate sets quickly, giving you less time to decorate but reducing drying time. In a warm kitchen, you have more decorating time but longer setting times. Adjust your workflow accordingly—work faster in cool conditions, take your time in warm conditions.
Create an Assembly Line
When making large batches, set up stations: dipping station, decorating station (with all supplies organized), drying station, and drizzling station. This organization improves efficiency and results in more consistent pretzel rods.
Save Your Mistakes
If a pretzel rod turns out poorly, don’t throw it away—eat it immediately or break it up to sprinkle over ice cream! Every “mistake” is still delicious, and chocolate-covered pretzels in any form are never waste.
Common Mistakes to Avoid
Even experienced bakers encounter challenges with Valentine Pretzel Rods. Here are the most common pitfalls and how to prevent them:
Mistake #1: Using Regular Chocolate Chips
Regular chocolate chips contain stabilizers that prevent them from melting smoothly, making them unsuitable for dipping. They’ll melt eventually, but the texture remains thick and unworkable, creating gloppy, unattractive coatings. Always use chocolate melting wafers specifically designed for candy-making.
Mistake #2: Overheating the Chocolate
This is the number one reason for chocolate failure. Overheated chocolate seizes—transforms into a grainy, unusable mass that cannot be salvaged. Once chocolate seizes, your only option is to discard it and start fresh. Always use reduced microwave power and stir frequently.
Mistake #3: Getting Water in the Chocolate
Even a single drop of water causes chocolate to seize immediately. Ensure all bowls, utensils, and pretzel rods are completely dry before beginning. Don’t cover melting chocolate with a lid, as condensation will form and drip into the chocolate.
Mistake #4: Waiting Too Long to Decorate
Chocolate begins setting within seconds of being exposed to air. If you dip a pretzel rod, set it down, and then try to decorate 30 seconds later, your sprinkles won’t stick. Develop a rhythm: dip, immediately decorate, set aside to dry, repeat.
Mistake #5: Using Too Much Chocolate
While generous chocolate coating seems luxurious, excessive thickness creates problems. It takes forever to set, it can slide down the pretzel creating messy drips, and it overwhelms the pretzel’s salty crunch. Aim for a coating roughly 1/8 inch thick—substantial but not excessive.
Mistake #6: Refrigerating Too Long
While brief chilling speeds setting, extended refrigeration can cause chocolate bloom—a whitish, dusty-looking coating caused by moisture condensation or fat separation. Bloom doesn’t affect taste but ruins appearance. Set at room temperature when possible, or refrigerate briefly (10-15 minutes maximum) and remove immediately once set.
Mistake #7: Applying Drizzle Too Soon
If you drizzle contrasting chocolate over a base coating that hasn’t fully hardened, the colors will blend together creating muddy, messy results instead of crisp, defined drizzles. Always ensure your base coating is completely hard before drizzling.
Mistake #8: Overcrowding Decorations
More isn’t always better. Overly decorated pretzel rods look cluttered and childish rather than festive and appealing. Use decorations purposefully, leaving some chocolate visible to create balance and breathing room.
Mistake #9: Forgetting to Line Your Pan
Attempting to remove dried pretzel rods from an unlined baking sheet results in stuck chocolate, broken pretzels, and intense frustration. Always line your pan with parchment paper or a silicone mat—this 30-second step saves enormous hassle.
Mistake #10: Storing Improperly
Pretzel rods stored in humid conditions or without proper separation will stick together, and pretzels exposed to air will become stale. Always use airtight containers with parchment between layers, and store in a cool, dry location away from strong odors.
Creative Variations to Try
Once you’ve mastered basic Valentine Pretzel Rods, explore these delicious variations:
Dark Chocolate Raspberry Romance
Use dark chocolate melting wafers as your base, drizzle with white chocolate, and sprinkle with freeze-dried raspberry pieces and pink sugar. The sophisticated combination suits adult tastes perfectly.
Cookies and Cream Love
Coat pretzel rods in white chocolate, then roll in crushed Oreo cookies while wet. Drizzle with dark chocolate for striking contrast. These taste like cookies and cream ice cream bars.
Strawberry Cheesecake Pretzel Rods
Use white chocolate base, stir in 1/4 teaspoon strawberry extract, then sprinkle with crushed graham crackers and freeze-dried strawberries. Drizzle with pink-tinted white chocolate for the full cheesecake effect.
Red Velvet Elegance
Mix 1 tablespoon cocoa powder and red food coloring into melted white chocolate to create red velvet colored coating. Drizzle with cream cheese-flavored white chocolate (add cream cheese flavoring extract) for authentic red velvet cake vibes.
Peppermint Love
Coat in pink or red chocolate, then sprinkle with crushed peppermint candies. Drizzle with white chocolate. The mint-chocolate combination remains popular beyond the holidays.
Salted Caramel Romance
Use milk chocolate base, drizzle with caramel-flavored melting wafers, and sprinkle with flaky sea salt and pink sugar. Sweet, salty, and utterly addictive.
Conversation Heart Pretzel Rods
Press conversation heart candies into wet white or pink chocolate coating. These make adorable classroom treats with their nostalgic Valentine messages.
Storage and Serving Suggestions
Proper storage ensures your Valentine Pretzel Rods maintain optimal freshness, appearance, and flavor.
Short-Term Storage (Up to 2 Weeks)
Store completed pretzel rods in an airtight container at room temperature, layering them with parchment or wax paper between layers to prevent sticking. Keep the container in a cool, dry location away from direct sunlight, heat sources, and aromatic foods (chocolate absorbs odors).
Properly stored Valentine Pretzel Rods maintain excellent quality for up to 2 weeks, though the pretzels may gradually lose some crunch over time. For maximum freshness, consume within the first week.
Long-Term Storage (Up to 2 Months)
Valentine Pretzel Rods freeze beautifully for extended storage. Wrap each pretzel rod individually in plastic wrap or wax paper, then place all wrapped rods in a freezer-safe container or bag. Freeze for up to 2 months.
When ready to serve, remove from freezer and let thaw at room temperature for 15-20 minutes. Never microwave frozen chocolate-covered pretzels, as the chocolate will melt while the pretzel remains frozen.
Gifting and Packaging Ideas
Valentine Pretzel Rods make exceptional gifts when packaged thoughtfully:
- Individual cellophane bags: Slide each rod into a clear treat bag, tie with ribbon, and attach a small Valentine tag
- Mason jar presentations: Stand several pretzel rods in a decorative mason jar filled with pink tissue paper or shredded paper
- Bakery box arrangements: Line a small bakery box with tissue, arrange 6-8 pretzel rods neatly, and tie with ribbon
- Bouquet style: Gather 5-7 pretzel rods, wrap the uncoated ends with tissue paper like a bouquet, and tie with ribbon
- Custom labeled bags: Place several pretzel rods in a clear bag and seal with a custom printed label
Serving Suggestions
Valentine Pretzel Rods shine in numerous serving scenarios:
- Dessert tables: Display upright in tall vases or jars for dramatic vertical presentation
- Party favors: Package individually for guests to take home from Valentine’s parties
- Classroom treats: Easier than cupcakes and less messy—perfect for school celebrations
- Office gifts: Coordinate colors to match your workplace and give to colleagues
- Care packages: Ship these sturdy treats to distant loved ones without worry
- Dessert boards: Include alongside chocolates, cookies, and fruits on Valentine’s charcuterie boards
- Hot chocolate stirrers: Stand pretzel rods in mugs of hot chocolate for stirring and snacking
- Table settings: Lay one pretzel rod across each place setting as an edible Valentine’s favor
Serving Temperature
Valentine Pretzel Rods taste best at room temperature. If they’ve been refrigerated, remove them 10-15 minutes before serving to allow the chocolate to soften slightly for optimal texture and flavor.
Frequently Asked Questions About Valentine Pretzel Rods
Can I use regular chocolate chips instead of melting wafers?
While technically possible, I strongly discourage it. Regular chocolate chips contain stabilizers that prevent smooth melting, resulting in thick, difficult-to-work-with chocolate that creates gloppy, unattractive coatings. Melting wafers are specifically formulated for candy-making, melting smoothly and setting properly. They’re affordable and widely available, making them the superior choice for Valentine Pretzel Rods.
Why did my chocolate seize and become grainy?
Chocolate seizes for two main reasons: overheating or contact with water. Even a single drop of water causes immediate seizing. Always use dry bowls and utensils, melt chocolate gradually at reduced power, and never cover melting chocolate (condensation forms). Unfortunately, seized chocolate cannot be salvaged—you must discard it and start fresh with new chocolate.
How do I prevent the chocolate from sliding off the pretzel?
Chocolate sliding down pretzels typically happens when: the chocolate is too warm, you applied too thick a coating, or you didn’t allow sufficient drip time before setting the pretzel down. Hold pretzels upright for 10-15 seconds after dipping, allowing excess to drip back into the bowl. The chocolate should start to set at the top of the pretzel during this time, preventing sliding.
Can I make these ahead of time for a party?
Absolutely! Valentine Pretzel Rods are excellent make-ahead treats. Prepare them up to 2 weeks in advance, storing in airtight containers at room temperature, or up to 2 months in advance by freezing. The ability to prepare ahead makes them ideal for busy schedules and last-minute gatherings.
What’s the best chocolate color combination?
This is personal preference, but some combinations are particularly striking: white chocolate base with pink and red drizzle looks elegant and romantic; pink chocolate base with white drizzle feels soft and sweet; red chocolate base with white drizzle is bold and classic; dark or milk chocolate base with bright pink or red drizzle creates dramatic contrast. Consider your recipient’s preferences and the overall aesthetic you want to achieve.
How do I get my drizzle to look professional?
Professional-looking drizzle comes from three factors: proper chocolate consistency (thin enough to flow freely), controlled application method (piping bag works best), and confident motion (don’t hesitate—move your hand in smooth, steady zigzags). Practice on parchment paper first until you develop muscle memory, then drizzle your actual pretzel rods with confidence.
Can I add flavor extracts to the chocolate?
Yes! A small amount of extract enhances your Valentine Pretzel Rods beautifully. Add 1/4 to 1/2 teaspoon of vanilla, almond, peppermint, or strawberry extract per 12 ounces of melted chocolate. Stir thoroughly to distribute. Avoid adding more than 1/2 teaspoon, as excessive liquid can affect chocolate texture, and too much flavoring can be overwhelming.
Why are my decorations falling off?
Decorations that don’t stick indicate one of two problems: you waited too long after dipping before applying decorations (chocolate had already begun to set), or you’re using decorations that are too heavy for the chocolate to support. Apply decorations immediately while chocolate is fully liquid, and choose lightweight options like sprinkles, nonpareils, or small candies rather than heavy toppings.
How can I make these nut-free for classroom allergies?
Valentine Pretzel Rods are naturally nut-free as long as you avoid nut-containing toppings. Check your chocolate melting wafer labels—most major brands are produced in facilities that also process nuts, but some specifically advertise nut-free production. Wilton offers dedicated nut-free products. Use nut-free sprinkles and decorations, and you’ll have treats safe for classrooms with allergy restrictions.
What if my chocolate is too thick to work with?
Thick chocolate is easily fixed! Add coconut oil or vegetable shortening one teaspoon at a time, stirring thoroughly between additions, until you achieve flowing consistency. The oil thins the chocolate without affecting flavor or setting properties. Start with one teaspoon and add more as needed—most batches need 1-2 teaspoons total.
Conclusion: Share the Love with Valentine Pretzel Rods
Valentine Pretzel Rods prove that the most memorable treats don’t require culinary school training or hours of labor—sometimes, simple ingredients combined with thoughtful presentation create magic. Over the years, these chocolate-dipped delights have become my signature Valentine’s offering, and I’ve watched them bring joy to countless recipients, from excited preschoolers to appreciative coworkers to grateful neighbors.
What I love most about this recipe is its perfect balance of accessibility and impressiveness. Anyone can successfully make Valentine Pretzel Rods on their first attempt, yet the results look so polished that people always assume significant effort went into creating them. This combination makes them ideal for people who want to give heartfelt homemade gifts without the stress of complicated recipes.
The versatility of Valentine Pretzel Rods means they’ll serve you well for years to come. Beyond Valentine’s Day, adapt the colors and decorations for any celebration: pastels for Easter, school colors for graduations, blue and pink for baby showers, or elegant gold and silver for weddings. Once you master the basic technique, you’ll find yourself returning to it repeatedly throughout the year.
I encourage you to make this recipe your own. Experiment with flavor combinations, try different decoration styles, and don’t be afraid to get creative. Some of my best batches have resulted from spontaneous inspiration—adding unexpected ingredients or trying new color schemes just to see what happens. The forgiving nature of this recipe means experimentation rarely fails, and even “mistakes” are delicious.
Whether you’re preparing treats for a classroom full of eager children, assembling gifts for friends and family, or simply indulging your own sweet tooth, Valentine Pretzel Rods deliver satisfaction on every level. They taste incredible with that addictive sweet-salty combination, they look gorgeous with their festive decorations, and they carry the unmistakable warmth of something made by hand with care.
This Valentine’s Day, skip the store-bought chocolates and create something truly special. Gather your supplies, clear your counter, and spend an enjoyable hour transforming simple pretzel rods into expressions of affection. Your recipients will taste the difference that homemade treats make, and you’ll experience the deep satisfaction that comes from creating something beautiful with your own hands.
Now it’s your turn to spread love, one chocolate-dipped pretzel rod at a time. Will you go classic with pink and white, dramatic with red and dark chocolate, or create your own unique combination? However you choose to decorate your Valentine Pretzel Rods, I hope this guide has equipped you with the knowledge and confidence to create treats that look as wonderful as they taste.
Happy dipping, and may your Valentine’s Day be filled with sweetness—both the edible kind and the heartfelt kind!
Print
Valentine Pretzel Rods: The Ultimate Guide to Making Irresistible Chocolate-Dipped Treats
These Valentine Pretzel Rods transform simple pretzel rods into stunning chocolate-dipped treats perfect for Valentine’s Day celebrations, classroom parties, or heartfelt gifts.
- Total Time: 50-65 minutes
- Yield: 16-20 pretzel rods
Ingredients
- 16-20 pretzel rods
- 12 ounces chocolate melting wafers (pink, red, white, or milk chocolate)
- 4-6 ounces contrasting chocolate melting wafers for drizzling
- 1/4 cup Valentine’s sprinkles (hearts, pink/red jimmies, nonpareils)
- 1 tablespoon coconut oil or vegetable shortening (optional, for thinner chocolate)
- 1/2 teaspoon vanilla extract (optional)
- Additional decorations: mini chocolate chips, crushed candies, edible glitter, or sea salt (optional)
Instructions
- Prepare workspace: Line a large baking sheet with parchment paper. Set up a tall glass or jar to hold pretzel rods upright while drying. Organize all decorating supplies within reach.
- Melt base chocolate: Place 12 ounces of chocolate melting wafers in a microwave-safe bowl. Microwave at 50% power in 30-second intervals, stirring thoroughly between each interval, until completely smooth (typically 1-1.5 minutes total). Add coconut oil if chocolate seems thick.
- Dip pretzel rods: Hold one pretzel rod by the top third and dip the bottom two-thirds into melted chocolate. Lift slowly, allowing excess to drip back into the bowl. Gently tap against bowl edge to remove excess chocolate.
- Decorate immediately: While chocolate is still wet, hold pretzel rod over a plate and sprinkle generously with desired decorations. Rotate the pretzel to coat all sides evenly. Work quickly—you have about 20-30 seconds before chocolate sets.
- Set to dry: Place decorated pretzel rod upright in your prepared glass holder, or lay flat on the parchment-lined baking sheet. Repeat dipping and decorating process with remaining pretzel rods.
- Allow to set: Let pretzel rods dry at room temperature for 15-30 minutes until chocolate is completely hard, or refrigerate for 10-15 minutes to speed the process.
- Melt drizzle chocolate: Place 4-6 ounces of contrasting chocolate in a microwave-safe bowl and melt using the same method as before. Transfer to a piping bag or small plastic bag with corner snipped.
- Drizzle: Hold the bag over your set pretzel rods and squeeze while moving in quick zigzag motions. Create crisscross patterns by drizzling in multiple directions. Avoid over-drizzling.
- Final set: Allow drizzled chocolate to set completely, about 15-20 minutes at room temperature.
- Package or serve: Once fully hardened, package in cellophane bags for gifts, or store in airtight containers with parchment between layers.
Notes
- Chocolate choice: Always use melting wafers, not regular chocolate chips, for smooth melting and proper setting
- Temperature control: Melt chocolate at 50% power to prevent scorching and seizing
- Fresh pretzels: Use fresh pretzel rods for maximum crunch—stale pretzels are disappointing even with beautiful chocolate coating
- Working time: Decorate immediately after dipping while chocolate is wet—decorations won’t stick once chocolate begins to set
- Color combinations: Pink + white, red + white, or white + pink/red drizzle all look beautiful
- Make-ahead: Prepare up to 2 weeks ahead and store at room temperature, or freeze up to 2 months
- Allergy-friendly: Naturally nut-free if using nut-free toppings; check chocolate labels for facility information
- Prep Time: 20 minutes
- Cook Time: 30-45 minutes
- Category: Desserts
- Method: No-Bake, Dipping
- Cuisine: American
- Diet: Vegan


3 Comments
[…] the comforting familiarity of traditional pancakes with the irresistible allure of chocolate, creating a breakfast experience that appeals to both children and adults alike. Whether you’re celebrating a […]
[…] Palmiers are the epitome of French elegance meets romantic charm—delicate, crispy layers of buttery puff pastry shaped into perfect hearts, caramelized with sugar […]
[…] These aren’t just ordinary pancakes with a few berries tossed on top as an afterthought. This recipe incorporates strawberries directly into the batter and as a topping, creating layers of berry flavor that […]
Comments are closed.